
Y2 Unit 2.2: Getting Started with the Course Accelerator
The concept of course design as a collaborative process may be new to you, especially if you often develop courses with little advance notice or peer input. Piloting a course with the support of a project team can feel strange, even for seasoned instructors. The goal of collaboration is to align your design with your learning goals for students, ensuring that the learning experience is as effective as possible.
As this project aims to share courses that use an equity lens, taking time for design is a commitment we ask all pilot instructors to embrace. This process allows instructors to build on their own past experiences as educators and as students, to try out new ways of teaching, and to deepen learning for student groups that are often excluded from the design of traditional college courses. Past cohort members reported that both they and their students benefited from the time and effort invested in collaborative course design.
Get started right away by orienting yourself to how we’ll work together.
Collaborating with an Instructional Designer
Your Instructional Designer is a learning expert who is eager to collaborate with you. Here are examples of what they can help you with:
- Clarify your vision for your course
- Generate new ideas for assignments
- Suggest methods of content delivery and meaningful assessment
- Navigate educational technology and troubleshoot challenges
- Offer perspective and feedback.
Instructors in past cohorts shared that meeting with an Instructional Designer had a transformative impact not only on their course pilot, but on all their courses.
As an early career instructor, Kim Puttman notes that working with an instructional designer saved time and increased teaching quality:
If I were doing this by myself, I might have gotten there in ten years or so as I’ve been exploring my field, but especially at a small community college where I’m a department of one, being able to rely on a whole team of people….has really shortened the time it takes to access expertise. People have been doing this work for a long time in many different contexts, so having a person who is truly an expert in saying, “This is what works for students, this is how other instructors have solved that problem, this is what you could consider to make it better,” really has improved the quality of my teaching and my course design in ways that I couldn’t have imagined when I started this project.
As an experienced instructor, Elizabeth Pearce notes that working with an instructional designer is beneficial at any career stage:
I’ve been teaching for many years, but I’m also someone who is very motivated to grow and develop and so having an instructional designer, I think, at any stage of your career can help you improve what you’re doing. I would say the instructional designer helped me to be more transparent so that students have much more clear expectations about all aspects of the course.
How your Instructional Designer will connect with you:
- After you submit your letter from your department confirming your teaching assignment, you will receive an introductory email from the Project Manager with a link to this training and a timeline with completion dates for course design, development, pilot delivery, and course revision.
- Your Instructional Designer will email you directly to schedule your initial consultation via Zoom.
- At your first meeting, you and your Instructional Designer will schedule additional meeting times.
Before your first Instructional Designer meeting, make sure that you have completed the tasks in the list at the beginning of this unit. Now keep reading the rest of this unit to begin the Course Accelerator.
Using Google Docs
We will use many of the features of Google Docs for sharing, drafting and collaborating.
Managing document permissions
Google Docs has different sharing permissions. Here’s what you need to know:
- Your Google Docs are already shared with the support team and others on this project.
- Please keep your documents shared with all these roles.
Managing file versions
Unlike local file formats that are only saved to your device, Google Docs are online files that keep track of changes in your document by saving versions. In practice, this means:
- You don’t need to save different versions or make copies of files to archive.
- You can view past versions of a shared document, including what changes were made in that version, who made the changes, and at what time.
- You can revert to or make a copy of earlier versions of your document at any time. Learn more about how to do this at Manage file versions [Website].
Collaborating in Google Docs
When you are collaborating on drafts with your Instructional Designer, there are several useful features you can use:
- You can insert comments, and you can assign comments to other people with an @ (they will receive an email with your comment and a link to the document). For step by step instructions visit Add comments and assign action items [Website].
- You can suggest edits directly into the document text. Learn more about offering suggestions at Add and review suggested edits [Website].
If you want a hands-on session to learn more about the features of Google Docs, set up a meeting with the Project Manager.
Where To Find Your {Instructor} {Course #} Course Pilot Folder
The Project Manager emailed you a link to your {Instructor} {Course #} Course Pilot Folder. Click on this link to open your course pilot folder.
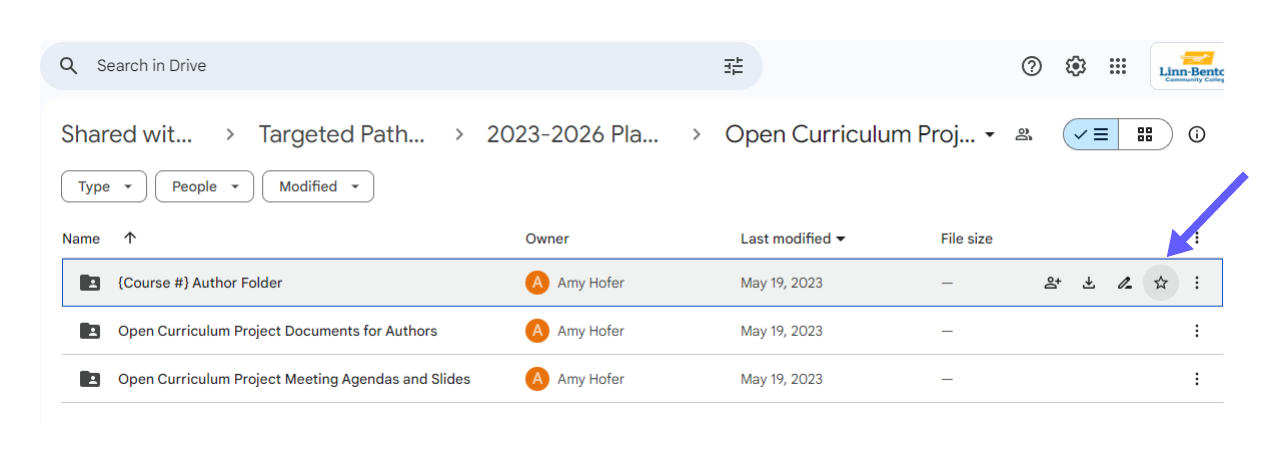
Bookmark or star this folder in Google Drive so that it’s easy to find again. You can click on the dropdown arrow next to the name of the folder and choose “Add to Starred” (figure Y2 2.2).
When you click on Starred in Google Drive, you will see your folder listed (figure Y2 2.3).

If you don’t like using starred folders, another option is to choose “Add Shortcut to Drive” and the folder will show up in alphabetical order in My Drive.
Your folder has a subfolder for course documents you may want to reference or reuse from past terms. Please upload your existing course syllabus plus any files that you want to review with your Instructional Designer. Other files to upload may include supplemental readings, lecture slides, and/or assignment prompts. It’s okay if this is your first time teaching and you don’t have any course documents yet.
The sections below orient you to the documents in your {Instructor} {Course #} Course Pilot Folder.
{Instructor} {Course #} Course Map
By the end of the Course Design Accelerator, you will transform your {Instructor} {Course #} Course Map document from a blank template into a complete go-to guide. This map makes the alignment of your course more transparent to you, your Instructional Designer, and future educators.
Preview the Course Map Example: Nichol CJA 220 Course Map to see what a completed document looks like.
Get started right now!
- Go to your {Instructor} {Course #} Course Pilot Folder and open the {Instructor} {Course #} Course Map.
- Practice editing your {Instructor} {Course #} Course Map document by entering the following:
- Instructor Name and Institution
- Course description
- Any other information that you already have can be added to the top of the template, above the table.
We will come back to this document later in this unit.
{Instructor} {Course #} Pilot Deliverables for Open Curriculum Development Project
Open your {Instructor} {Course #} Pilot Deliverables for Open Curriculum Development Project sheet. This sheet includes tabs with benchmarks and target completion dates for each phase of your course pilot. You and your Instructional Designer will use this document to keep your course on track.
Look at the tab “Course Design To-Dos.” At your first meeting with your Instructional Designer, you will fill in target completion dates that line up with your teaching term and your available design time. You will also schedule Instructional Designer meetings based on the target completion dates. Remember to bring your calendar to your first meeting.
Instructional Designer meeting notes: Preparing for your initial consultation
The {Instructor} {Course #} Course Development Notes document is where your Instructional Designer will capture notes from each of your meetings. This way all of your logistical information will stay in one place. Use the outline pane on the left side of your Google Doc to easily jump between section headings to make it easier to navigate this long document.
Get started right now!
- Open your {Instructor} {Course #} Course Development Notes document.
- Jump to the section “Meeting 1: Initial Consultation.”
- Review the prompts that your Instructional Designer will use during your first meeting. Write down at least one idea for each bullet point so that you are prepared to meet your Instructional Designer. Put your notes either under the “Meeting 1: Initial Consultation” header.
{Course #} About This Book
The pilot edition of each textbook is available to course pilot instructors at least two weeks before the start of the course pilot term. You may not have time to read the entire textbook before your pilot course starts. Depending on your existing teaching and service commitments, it may be the case that you are reading the textbook just ahead of, or even along with, your students.
However, all course pilot instructors will have a {Course #} About This Book document in your folder. You will use this document to understand the textbook’s goals and scope. This will be a key resource for you and your Instructional Designer in the early stages of design. Open this document now to orient to its structure:
- Note that the {Course #} About This Book document contains learning outcomes. You can use these outcomes to personalize your own course outcomes.
- Read the textbook description and equity statement carefully to understand the textbook’s vision and purpose.
- Review chapter outlines, including learning objectives, key terms, and subject headings. You will use this content later to fill in columns of your Course Map.
Using GenAI in Course Design
Given the rise of Generative AI tools, it’s important to emphasize the expertise and discernment of human instructors in designing a course. As Rebus outlines in their May 2025 webinar Revising and Remixing with AI: Ethical and Practical Strategies [Streaming Video], GenAI may take the role of a thought partner or summarizer in the design process. However, the work of reflection, metacognition, and idea exploration is entirely human.
Furthermore, bias, misinformation, and errors in the datasets that train GenAI tools can’t be corrected without sustained human intervention. All output must be thoroughly vetted to recognize errors and redesign with accurate information. Keep in mind that if you do use GenAI to create course work, you can’t openly license that content. You’ll need to keep track of the role of AI in the work so that you can clarify what tools were used, which sections were AI-generated, different copyright/licensing of those portions, etc. You will also need to review the licensing terms of the specific AI tool you used to ensure legal use of the output. Transparency in your GenAI use is critical in order to share your course materials with future educators.
At the time of creating this Course Accelerator (fall 2025), access to GenAI tools remains uneven. Some instructors can afford to subscribe to tools out of pocket or receive access via their institution, while others can’t afford to pay out of pocket or don’t have institutional access. The datasets that train GenAI tools remain deeply flawed. Compounding this inequity is global concern about the environmental impact of the massive data servers required to run these tools (Zewe 2025). Developing clear ethical guidance on GenAI use is an ongoing challenge. This training represents the best of our knowledge at this time.
Course Design Timeline
Let’s take a step back and get an overview of your entire course development timeline. This process begins before your pilot, continues while you teach your course, and concludes after you’ve made revisions to the course materials you decide to share with an open license.
Pre-pilot phase: Course design, development, and build
In the pre-pilot phase, instructors design, develop, and build out course content with the help of an instructional designer. Figure Y2 2.4 provides a top-level view of this course design phase.
Ideally, you will be able to avoid the time pressure of developing a course while you are teaching it. If you have more than four weeks before the start of term, you and your Instructional Designer will work backwards from the course pilot launch date to set target completion dates for the pre-pilot phase. The recommendations below show how the timing works if you have an entire term (10 weeks) to prepare your course design and how the timing works if you have the minimum (4 weeks) to prepare your course design.
If you are completing this Course Design Accelerator in the minimum time, your course development goals before the pilot launch will be:
- Complete course map, including all module-level learning objectives, formative and summative assessments, and content assignments.
- Build 3 complete modules in your course site before the start of the term, including all necessary assignment prompts and rubrics.
This way you will be ready to build the remainder of your course as students get underway.
| Deliverable | Agenda | Instructor brings to this meeting | Target completion date with 10 weeks design time | Target completion date with 4 weeks design time |
|---|---|---|---|---|
| Initial Consultation with Instructional Designer |
|
Year 2, Unit 2: information at the top of the map and drafted first two columns | 10 weeks in advance of pilot launch | 4 weeks in advance of pilot launch |
| Instructional Designer Meeting 2 |
|
Year 2, Unit 3: assessments in Course Map columns drafted; one assignment and rubric drafted | 9 weeks in advance of pilot launch | 3 weeks in advance of pilot launch |
| Instructional Designer Meeting 3 |
|
Year 2, Unit 4, part 1: Welcome Module and weekly module template drafted in learning management system + Course Map is complete | 8 weeks in advance of pilot launch | 2 weeks in advance of pilot launch |
| Instructional Designer Meeting 4 |
|
Year 2, Unit 4, part 2: populate course shell for at least the first three weeks (ideally complete all content in the learning management system) | 2 weeks in advance of pilot launch | 1 week in advance of pilot launch |
| Optional: Additional Instruction meetings to work on course design |
|
Schedule prior to pilot launch | Schedule prior to pilot launch |
Pilot phase: While you are teaching
During the pilot term, the Instructional Designer will submit representative course materials to the Workforce Advisory Board for their feedback. This will be important to your course revisions post-pilot. During the pilot term, pilot instructors will also complete a weekly survey outlining areas of success and improvement in the course. Figure Y2 2.5 provides a top-level view of this phase.
If you completed the Course Design Accelerator in the minimum time of 4 weeks, you will also continue building the rest of the modules for your course. Your development will stay 3 weeks ahead of your students at all times. This allows you to manage illness or unexpected life events while maintaining consistency and presence for your students.
| Deliverable | Pilot Instructor Tasks | Target Completion Date |
|---|---|---|
| Workforce Advisory Board Assessment Package |
|
Beginning of term |
| Weekly survey |
|
Complete weekly |
| Instructional Designer Meeting 5: Midterm Check In |
|
Week 5 of pilot term |
| Optional: Additional Instruction meetings to continue course build |
|
At least 3 weeks in advance of student engagement with new pilot content |
Post-pilot phase: Course revision for open course pack
The final phase begins about two weeks after the pilot term ends. This phase allows for 8 weeks to review and revise course materials that you choose to share with an open license. The Instructional Designer will move course content from your learning management system into the Course Pilot Folder to make revision as efficient as possible. Figure Y2 2.6 provides a top-level view of this phase.
| Deliverable | Objectives | Target Completion Date |
|---|---|---|
| Instructional Designer Meeting 6: Course Revision Action Plan |
|
2 weeks after pilot term ends |
| Instructional Designer migrates pilot learning management system content into Course Pilot Folder |
|
3 weeks after pilot term ends |
| Optional: Additional Instruction meetings to implement revisions |
|
4-6 weeks after pilot term ends |
| Revised Course Materials |
|
10 weeks after pilot term ends |
Licenses and Attributions for Getting Started with the Course Accelerator
Open content, original
“Getting Started with the Course Accelerator” by Open Oregon Educational Resources is licensed under CC BY 4.0.
Open content, shared previously
Quotes from Kim Puttman and Elizabeth Pearce are from Using Open Education Instructional Design to Transform the Classroom and the Community by Elizabeth Pearce, Kim Puttman, and Veronica Vold, licensed under CC BY 4.0.
References
Zewe, Adam. (2025). “Explained: Generative AI’s environmental impact.” MITNews. https://news.mit.edu/2025/explained-generative-ai-environmental-impact-0117.
