
Y1 Unit 1.2: Get Started Right Now! Author Folder, Documents, and Other Housekeeping
You have an author folder in Google Drive that is populated with the documents you need to start your project. You will write, collaborate, and revise your content in Google Docs rather than in personal files or offline programs like Word. This ensures that everyone has access to the same documents and that everyone can comment. This section explains exactly how to get started in your shared documents.
Where To Find Your Author Folder
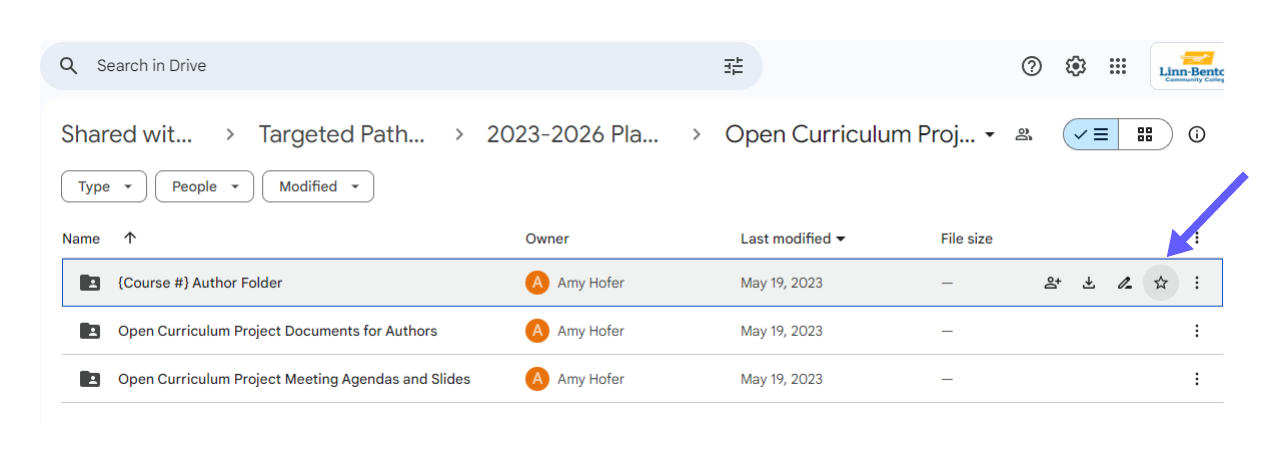
The top level folder for the project is the Open Curriculum Development Project Author Folder. You should bookmark or star this folder so it’s easy to find again. You can click on the dropdown arrow next to the name of the folder and choose “Add to Starred” (figure Y1 1.2).
When you click on Starred in Google Drive, you will see your folder listed (figure Y1 1.3).

If you don’t like using starred folders, another option is to choose “Add Shortcut to Drive” and the folder will show up in alphabetical order in My Drive.
The top level Open Curriculum Development Project Author Folder contains subfolders. Look for {Course #} Author Folder – there is one of these folders per author team. This is where you and your team will share your work with each other and the project’s support roles.
Please get started right now! Go to Open Curriculum Development Project Author Folder > {Course #} Author Folder > {Course #} About This Book, and open up that document. The section below is a brief overview of Google Docs for those who are new to this tool, and the section after that explains the {Course #} About This Book document and how we’ll use it during the Textbook Accelerator.
Using Google Docs
We will use many of the features of Google Docs for sharing, drafting, and collaborating.
Google Docs has different sharing permissions, and your Google Docs are shared with the support team and other authors on this project. Please keep your documents shared with all these roles.
Google Docs keeps track of changes in your document by saving versions, so you don’t need to save different versions yourself. You can view past versions of the document, what changes were made in that version, and who made the changes. You can also revert to or make a copy of earlier versions of your document. Learn more about how to do this at Manage file versions [Website].
When you are collaborating on drafts with your team, there are several useful features you can use. You can insert comments, or suggest edits. You can also assign comments to other people with an @, which means that they will receive an email with your comment and a link to the document. Learn more about comments at Add comments and assign action items [Website] or suggestions at Add and review suggested edits [Website].
If you want a hands-on session to learn more about the features of Google Docs, set up a meeting with the Project Manager.
{Course #} About This Book
The goal of the Textbook Accelerator is to complete a {Course #} About This Book document that has all the information that outside readers need to understand your plan for the textbook. Each unit in this accelerator prepares you to complete a part of your document. Preview the About This Book sample document for Mental Disorders and the Criminal Justice System [Google Doc] to see what a completed About This Book document looks like.
Here are some examples of how this document will be used:
- Lead Authors and Contributing Authors stay aligned while writing their individual chapters
- Additional Contributing Authors will be onboarded to your project in the future
- Preliminary Reviewers provide feedback on your outline draft
- Pilot Instructors decide whether to adopt your book
- Developmental Editors, Copy Editors, and Proofreaders have a reference to maintain coherence across chapters
Your document is laid out as a template with all the elements that will appear in the completed version. We’ve used structured headings in this document. When you replace template text with your own headers, you should keep the document structure the same (for example, H2s stay as H2s).
Here is a brief description of the sections in the About This Book document:
- Author bios: Use this section to introduce yourself to the other members of your team AND to future readers of your book. This is on your task list for this unit.
- Curriculum Equity Statement: In Unit 2 you’ll review the equity statement for the Open Curriculum Development Project as a whole. You can adopt it as-is or write a project-specific equity statement that clarifies the specific equity goals for your curriculum.
- Book Description: In Unit 3 you’ll define what success looks like in 100 words or fewer. What will this textbook do that other textbooks do not?
- Course Outcomes: There may be a pre-set list specified by a state- or institution-wide agreement. In Unit 3 you’ll determine whether your curriculum will have additional course-level outcomes. Your textbook will have 4-6 course outcomes.
- One-sentence argument for each chapter: In Unit 4 you’ll describe what each chapter is doing in your book so that our Preliminary Reviewers understand the book’s approach to the content. Your one-sentence arguments will likely become topic sentences for chapter overview sections when you start drafting.
- Chapter Learning Objectives: Starting in Unit 4, you’ll define the skills and knowledge that students engage with in each chapter. Your 3 to 5 learning objectives per chapter align with course-level outcomes.
- Key Terms: Starting in Unit 4, you’ll list up to 10 key terms per chapter. Key terms relate to the essential concepts students will learn about in each chapter.
- Numbered outline: Starting in Unit 4, you’ll use the structure 1., 1.1, 1.1.1, and so on, to lay out where each topic in your book will be covered. Your outline will also give you a top-level view of recurring chapter elements so that you can include them consistently.
- Word list: Keep a running list of decisions about your team’s word choices.
- License statement: In Unit 2 you’ll practice writing an open license so that others can reuse the content in your document. An example will be when we move your author bio into the launch version of your book.
Before you move on to the next section in this unit, practice editing your {Course #} About This Book document by replacing one of the author H3s with your name (keeping the heading level as H3). Copy and paste the template text under your name. You can start writing your bio now or come back to it later, but finish your draft by the end of Unit 1.
{Course #} Textbook Deliverables for Open Curriculum Development Project
We’re working on large, complex projects with many deliverables and due dates. You and your team members have your own needs and preferences for tracking to-dos. In addition, we provide tools to help the entire project team keep track of who is doing what, when.
Please get started right now! In your author folder, open the document {Course #} Textbook Deliverables for Open Curriculum Development Project. This is the primary tracking tool we created to track project deliverables in a shared document.
The “Deliverables Overview” tab provides a top-level view of everything that will be created for your project. The column headers tell you when we work on each task and how long we expect it to take. If you keep scrolling to the right, there are also columns explaining the purpose of each task and defining who is responsible for each one. We recommend leaving this tab as-is so that you always have a top-level view of project expectations.
If you look at the very bottom of the spreadsheet, you’ll find the option to change to different tabs. The next tab over, “About This Book To-Dos,” has a template for tracking deliverables related to your {Course #} About This Book document. We recommend making any edits your team needs in this tab to make it work for you.
At the beginning of each unit, we provide a task list with time estimates (for example, here is the Unit 1 Task List). This doesn’t exactly match the “About This Book To-Dos” tab because some of the tasks for the unit don’t show up as deliverables that are included in your “{Course #} About This Book” document. You will need to do all the tasks in the task list in order to complete the deliverables that are represented in the “About This Book To-Dos” tab.
You can always add to-dos to your {Course #} Textbook Deliverables spreadsheet so that you can assign them, add due dates, and check them off when they’re complete. This tab will be most effective if the team takes ownership of its layout and contents. The Project Manager will be the person on the team who is ultimately responsible for keeping this tab up to date.
Before you move on to the next section in this unit, practice using this spreadsheet by assigning yourself to do your author bio in row 3, 4, 5, or 6:
- In the dropdown menu for “Assigned To,” click on the pencil in the lower right corner to change “Author #” to your name as you would like it to appear on this sheet. You’ll only have to do this once.
- The due date is the date of our next meeting.
- When you’ve completed the task, check it off in column D.
The document {Course #} About This Book contains step-by-step directions for writing your bio. You’ll also practice using the Comment feature in Google Docs by leaving at least one comment on another team member’s bio. You can highlight something you have in common, ask a question about their interests, or share something you’re looking forward to learning more about with them.
Schedule Team Meetings
There is one more housekeeping item to get started on: schedule a standing weekly meeting time with your team. Starting in Unit 7, when you are drafting chapters, you may decide to meet less frequently. Your Project Manager will email the author team to find a time in common and send a calendar invitation.
Even if you don’t use all of your weekly meeting time, it’s important to set aside the time on your calendar. It’s an opportunity to check in with your team and stay accountable for making progress on your project. It’s also a time to get to know your co-authors better, share challenges and successes, and build a sense of alignment as a team.
Be prepared to have the task list for the unit completed before each project-level meeting. Your team meeting time will help you prepare for each upcoming project-level meeting.
The Project Manager does essential behind-the-scenes coordination work to keep our open curriculum development projects on track. This role schedules and attends all the team meetings and all the project-level meetings, while keeping track of all the to-dos to make sure they’re done on time. Perhaps most important of all, this role is the primary point of contact for questions and support. If you have questions, the Project Manager is the person to ask!
{Course #} Parking Lot
As we mentioned in Unit 0, we’re presenting information to you linearly, which is not an accurate representation of how writing happens. Expect to circle back, revise, and do things out of order. That’s a completely normal part of the writing process.
In fact, we encourage you to capture ideas that you are excited about even if our model says that it’s not time to do that task yet. For example, if you’re talking with a colleague and get interested in a scholar, look up a source and save the citation. If you have an inspiration about how you want to convey a tricky point to students next time, write a few sentences down. In other words, please don’t let these process steps deplete your creativity! Record your ideas in your {Course #} Parking Lot document.
Licenses and Attributions for Get Started Right Now: Author Folder, Documents, and Other Housekeeping
“Get Started Right Now: Author Folder, Documents, and Other Housekeeping” by Open Oregon Educational Resources is licensed under CC BY 4.0.
