
Y1 Unit 8.6: Effective Multimedia Figures
Each chapter includes at least one figure per chapter section. Incorporating figures into your textbook ensures that at least once per page, the text is broken up by multimedia.
Offering multiple means of engagement lets students access course content not just by reading, but also by listening to audio, looking at images, watching videos, or analyzing graphs and charts (for figure examples, revisit figure Y1 4.4). This is a key principle of Universal Design for Learning, which was introduced in the matrix in Unit 1, and it’s why one of our Learner Focus criteria for success is that each chapter includes multiple forms of media that are relevant to the text. The sections below cover considerations for incorporating figures that support your pedagogical goals.
As we discussed in Unit 3, right-sizing your textbook is critical to centering the student learning experience. If chapters are 10,000 words or less, about 18-20 minutes total of multimedia should be interspersed throughout a chapter at regular intervals. This means that it takes students between 90 and 120 minutes to read a chapter.
In our textbooks, figures will always be informative elements that work hand in hand with the content. They should never be merely decorative; they should be chosen purposefully to enhance the content and communicate ideas. Figures underscore the chapter’s learning objectives and are anchored in the text in a meaningful way.
Figures meet these three considerations for inclusion:
- Essential: required for students to achieve the chapter’s learning objectives.
- Aligned: supports content already in the text.
- Accessible: alt-text for images, captions for audio/video, etc.
For an example of a figure that is essential, aligned, and accessible, review how Anne Nichols integrates the video “Dignity Of Risk” into a textbook chapter from Unit 6.
It’s OK to hand in a chapter draft with incomplete figures. This can be part of your 80/20 approach.
- Minimum requirement: Identify where in each chapter section you expect to add a figure. In brackets, write a few sentences about what you envision so that the Developmental Editor can understand your plan. Check in with the Project Manager to get help with this element of your chapter.
- More likely scenario: Include a mix of figures you are happy with and placeholders in your chapter. For placeholders and missing figures, follow the approach in the scenario above to show the Developmental Editor what you have in mind.
The rest of this unit goes into detail about how to include essential, aligned, accessible figures in your chapter draft. If you are meeting the minimum requirement for your submission, it’s OK to read quickly and come back to this information when it’s relevant.
Making a Media Development Request
Authors often have ideas for developing relevant media. Consider how your use of figures could differentiate your chapter from learning materials that are currently available by focusing on Oregon-specific stories, and highlighting communities that are historically not represented in textbooks.
Start by reviewing your background scan and parking lot document for reusable openly licensed media that supports your chapter’s learning objectives. Where you identify gaps, we can follow the media development request process, below, to create new content for your textbook.
Open Oregon Educational Resources maintains a pool of contacts that we can reach out to when we need to create multimedia content, such as charts, graphics, photos, videos, animations, and so on. Videographers, video editors, graphic designers, artists, and anyone interested in content creation are encouraged to join the pool. Authors can share this opportunity widely in their networks and refer leads to the Project Manager.
Project leadership works with media developers to make sure that original media developed for this project will be accessible and openly licensed. That way it does not introduce any barriers to being included in your textbook. Here is how the process works:
- The author identifies a media development need and takes notes in the Media Requests tab of the {Course #} Textbook Deliverables for Open Curriculum Development Project spreadsheet. Email the Project Manager right away to let them know you want to start a media development project.
- The Project Manager reaches out to a Media Developer on the contact list whose skills align with the work needed.
- The author, Project Manager, and Media Developer meet to clarify the project, including goals, scope, budget, design, and deliverables. Authors should come to this meeting with their idea as developed as possible, and also be ready to adapt the concept based on the Media Developer’s input. The Instructional Designer, Equity Consultant, and Research Consultant may also attend this meeting for insight and support.
- The Media Developer follows the agreed-upon timeline to receive feedback on a draft and complete a final project.
- Authors should email the Project Manager to confirm that they integrated requested media. If the author isn’t able to complete integration by the end of Year 1, the author should email the Project Manager to make sure this task is captured in Year 2 to-dos.
The next sections offer more detail on what we mean by saying that figures will be essential, aligned, and accessible. Figures that you reuse or develop will meet these criteria.
Essential Figures
Essential figures provide context that directly relates to at least one learning objective and are meaningfully incorporated. They make an argument richer and more complex, rather than simply repeating it. They support the equity lens of the project by focusing on the primary experiences of people directly influenced by the topics under discussion. Here are some examples of essential figures:
- A short audio or video clip featuring a person with primary experience of an issue being discussed in the chapter using their own words and experiences.
- Cultural media like a historic artifact, painting, or poster that brings a historical perspective to a chapter section.
- A student-generated media element that is scoped for chapter learning objectives.
In contrast, “nice to have” figures supplement chapter learning objectives, but don’t directly align with your core goals. For example, “nice to have” figures might summarize, repeat, or reinforce claims already made in the chapter. They might even include student voices that reinforce a topic or frame a problem. However, if “nice to have” figures were removed, the central argument of a chapter section would remain intact.
Your own priorities for the project will determine what are essential figures vs. “nice to have.” Your essential figures might look different from another author’s priorities, as your learning objectives and core goals won’t be the same.
Notes on non-essential media
Many authors like to include links to interesting media that supplement the chapter’s content, but aren’t required for the students to accomplish the chapter’s learning objectives. Non-essential media is introduced with language to make it clear that viewing the material is not required; for example, “If you’d like to learn more about [the topic], watch this video.”
We encourage you to use this option sparingly. Placement and formatting of non-essential media should help students understand when and how to engage with the material. For instance, there may be an “additional resources” section at the end of each chapter for students who’d like to explore the topic more. Using a textbox to frame the link is another way to draw attention to the resource while keeping it separate from the main content.
Notice how even non-essential media invite the student to engage with the content and apply what they’ve learned. The more intentional you can be about framing the content, the more likely students will take the extra time to explore the resources you provide.
If optional content at an external link does not meet the accessibility requirements described below, it is not OK to link to it. Summarize the main idea and cite the source instead.
Use Captions to Show Alignment
Figure captions are a key place to show how all the elements in the chapter work together to support student learning. One of our Oregon Context criteria for success is that figure captions for images, media, and tables are clearly connected to chapter learning objectives and include a statement or question inviting Oregon students to make connections with lived experience.
Figure captions start with a figure number, followed by one to two sentences of description that contextualize the image content within the surrounding text. Figure captions often pose a question, draw a contrast, or explain a concept. Consider the following language for directing student attention toward figures:
- Presented as an example of an idea in the text: “Figure X. As you watch [the title of the media element], keep [a main idea from the chapter] in mind and consider the ways that [the topic of the media] relates to [the chapter’s overall topic.]”
- Framed as a pedagogical element with questions: “Figure X. [The title of the media element] is a [#]-minute
that exemplifies [a main idea from the chapter]. Listen specifically for [a connection with the chapter’s overall topic] and answer the following questions:”
Be descriptive, so that readers understand the purpose of the image without needing to read the rest of the page. Direct reader attention to the information the image conveys in a new, but related, way to the paragraphs of text around the image. Finally, keep it short. If you find yourself writing more than one or two sentences in a figure caption, shift any additional phrases to the surrounding paragraphs of text.
The following two examples of figure captions accompany an image from a section on collaboration in the first chapter from Introduction to Human Services. The first example is a satisfactory figure caption. The second example (the actual caption in the chapter!) is even stronger.
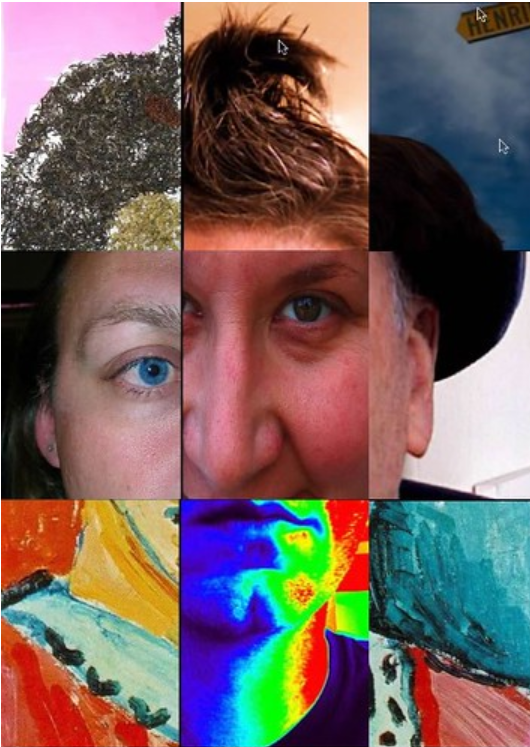
- Example 1: Figure Y1 8.5. Lots of learners find their fit in the human services field.
- Example 2: Figure Y1 8.5. Collaboration amongst multidisciplinary agencies and individuals can feel disjointed, but it is important to work together toward the best quality of life for clients.
Both of these figure captions are good. They both include figure numbers and provide a short, concise statement as the caption. They also both orient introductory students to the career of human services. However, what sets them apart is the degree of alignment with chapter content and the interpretative claim they make about the image itself. The second figure caption draws on a key term discussed in the chapter section: collaboration. It also references the “disjointed” feeling of different service providers working together on behalf of a client, much like the composite portrait itself. It directs the reader’s attention in a new, but related, way to the text itself.
Style Notes
- All figure captions start with the word “figure,” no matter what kind of figure it is (photo, video, table, etc).
- “Figure” is capitalized at the beginning of the caption, but if it appears in the middle of a sentence, use lower case (example: “…as we see in figure 1.3 below…”)
- While you’re drafting, label all figures “Figure X.” You can number them when you are done revising your chapter.
- Do not put a title above your figure.
Accessible Figures
Figures must be accessible to all students. This requirement aligns with multiple means of representation, a foundational principle of Universal Design for Learning. It also meets two of our Accessibility criteria for success: Images include figure captions and either alt text or long description; do not rely on color to connote meaning; are drafted at high resolution; and videos include accurate captions, audio description, and transcripts (including when shared as optional content).
Stick with us while we explain how to make images and videos accessible in the rest of this section. We are writing during a transition period where new accessibility standards are being implemented for all educational materials. If new tools or interpretations change our thinking about best practices, we will notify authors and revise this section.
Considerations for images
Figure captions, alt text, and image descriptions work together to ensure that all readers can access the essential, aligned information provided by the images you choose to include. Here’s how these different elements serve distinct purposes:
- Figure captions, as explained above, often pose a question, draw a contrast, or explain a concept. The caption is readable to all textbook users, with or without screen reader software.
- Alt text, or alternative text, is the short text substitute for visual information conveyed by an image, chart, or graph. Typically, alt text is only read by users who use screen reader software. It isn’t visible on the page. Alt text is not necessarily a literal description of the image. Instead, alt text briefly captures visual information that relates to the purpose of the image.
- Image descriptions accompany alt text when more than 10 words are necessary to communicate the relevant visual information. This is often the case for infographics, charts, graphs, or other complex images. Image descriptions are not only for people who use screen reader software, but also for people who benefit from additional orientation to visual information. They can be accessed by all users. Image descriptions are linked in the caption of an image, which brings users to the back matter of your book, where they can read the description and then return to the image in the chapter.
Sometimes the figure caption will convey all the relevant details about the visual information in the image. If this is the case, then adding alt text is redundant. Adding alt text is only necessary when the visual information conveyed by an image is not otherwise available to users who use screen reader software. Figure Y1 8.6 is an example of when alt text is not necessary because the figure caption is quite detailed.

Most of the time, however, the figure caption won’t summarize the visual information conveyed by an image in detail and alt text will be necessary. Figure Y1 8.7 is an example of a figure that has both a caption for all readers and alt text for screen reader users:

In the above figure caption, the visual information of the image is not described in the caption itself; the image supplements the text. In order to convey the visual information, the alt text reads: “An unzipped glucometer kit and accessories.”
Have you ever tried to access an image with a screen reader yourself? This is an everyday activity for screen reader users, but might be new to sighted people. To understand why alt text is so essential, optionally watch a screen reader user demonstrate what happens when an image is missing alt text in the 30-second video Screen Reader: Image without Alt Text [Streaming Video].
Sometimes alt text will include information that is relevant to all users but only appears in alt text. In these cases, the information should be moved to the figure caption instead so that it is available to the broadest audience. For example, let’s say that the alt text for the above image listed each accessory, but the list wasn’t available in the surrounding text or figure caption. The list of accessories would need to be included in the surrounding text or figure caption.
Figure Y1 8.8 is an example of a complex image that has a caption for all readers, a “glance” in a 10-word alt text for screen reader users, and an image description linked in the caption where any reader can decide to access more information. This example is drawn from a chapter that examines the meaning of disability. In Inequality and Interdependence: Social Problems and Social Justice, Kimberly Puttman writes:
Traditional views of disability follow a medical model, primarily explaining diagnosis and treatment models from a pathological perspective (Goodley and Lawthorn 2010). In this traditional approach, individuals diagnosed with a disability are often discussed as objects of study instead of complex individuals impacted by their environment.
The image illustrates the complexity of individuals, noting that disability conditions may be visible or hidden, temporary or permanent, and are experienced by people of every age and social group.

The alt text for figure Y1 8.8 is a short phrase that summarizes the visual information in the image. It reads: “A group of people of color with a range of disabilities pose together.” In this example, the author wants to include identity-specific information about the individuals pictured because she is making the larger point that disability is shared across a number of social identities. The author includes an image description linked in the caption so that these social identities can be discussed in detail. The image description for figure Y1 8.8 is copied from the website that published the image, Disabled and Here [Website]:
Six disabled people of color smile and pose in front of a concrete wall. Five people stand in the back, with the Black woman in the center holding up a chalkboard sign reading ‘disabled and here.’ A South Asian person in a wheelchair sits in front.
This level of detail may or may not be appropriate for every chapter or for every image. The level of detail depends on the author’s purpose for including each image. Since the disability status and race of the people in the image is relevant to the author’s argument, the image description gives this information to all users.
How to write alt text
Alt text complements the figure caption by describing relevant visual information that the figure caption doesn’t name. By writing alt text, you will ensure that all users can access visual information from an image. Users who are blind or have low vision use screen reader software to read alt text. If an image won’t load due to issues with a device or limited internet connectivity, alt text will show instead.
Follow these guidelines to pair your figure captions with useful alt text:
- Keep it concise and focused (usually 10 words or less). If you have a lot to say, include more information in an image description or in the figure caption.
- Avoid the phrase “picture of” or “image of.” Screen reader software will say “graphic” when reading alt text. If the medium of the image is relevant to its purpose, for example, a painting or a handwritten letter, include this information.
- When describing people, do not assign people social identities. Unless people in images are self-described, use terms like “dark skin tone” or “light skin tone” and note hairstyle, clothing, and physical build. Alt text should respectfully describe human diversity in images.
- Alt text describes the relevant visual information that is not named in the figure caption. If the figure caption fully explains all relevant visual information, the alt text can read “See figure caption for details.”
- Consider the context for the image. The same image will have different alt text in different contexts. For example, the alt text for an image of a child riding a bus for a chapter on gender might focus on the gender presentation and clothing of the people on the bus. The alt text for that same image in a math textbook might note the skin tones of people on the bus but focus on the bus schedule.
- If the image includes a few relevant words or numbers, write them out in the alt text, unless they are already included in the figure caption.
- If the image is complex, use the alt text to summarize key information so that non-sighted users can decide if they want to open the image description. Write an image description (see next section) and add “Image Description Available” to the figure caption so that all users know it is there.
- Different authoring platforms use different fields for adding alt text. When adding alt text in Google Docs, use the “description” field (and you can ignore the “title” field).
Why Authors Write Alt Text
Can someone else write your alt text for you? The answer is, as usual, that it depends.
Sometimes alt text that was generated by AI, is already associated with the image metadata, or was written by a collaborator, will suit your purpose. But please check all alt text to make sure that it conveys the relevant information in the context of your chapter.
The following two examples show how alt text for the same image will be different depending on its purpose and use.
Example 1 is a 1-minute (21:14-22:10) video clip from a webinar from the National Center on Accessible Educational Materials [Streaming Video] in which presenters pose a question to participants: What’s the best alt text for this image from Disney World?
https://www.youtube.com/watch?v=VqPp9dhT4Cc&t=1254s
Turns out, this is a trick question! The presenter reveals, “You’re actually all right.” The alt text for this image may include any number of features: geographical location, contrasting color, weather conditions, or architecture. The list is long! And without a clear purpose, alt text will be quite random. This is why the role of the author is so critical to writing alt text. The author is the person best situated to determine the purpose for an image and the best alt text.
Example 2 offers alt text options for two different contexts that could be applied to the image below (figure Y1 8.10).

Context 1: The image in figure Y1 8.10 appears in a furniture shop website with the following figure caption: “Our loveseats ensure supreme comfort for heart to heart chats.”
Which alt text best serves the purpose of this image?
- Option 1: “Image.”
- This alt text is not useful. Screen reader software will tell the user that there is an image, so there is no need to write “image.” If the medium of the image is relevant to its meaning, for example, a painting or a handwritten letter, it’s fine to include this info. To be helpful, alt text should describe the image.
- Option 2: “People hold hands on a plush linen sofa.”
- This alt text emphasizes the quality of the sofa, but doesn’t capture any physical identifiers or mood of the people pictured.
- Option 3: “Two people with broad shoulders, medium-dark skin tones, and facial hair hold hands on a sofa upholstered in a plush grey linen fabric.”
- This alt text is detailed, descriptive, and emphasizes the physical descriptions of the people in the image.
Context 2: The image in figure Y1 8.10 appears on a counselor education website with the following caption: “Counselors have the responsibility to develop clinical competency with issues facing LGBTQIA+ people, including how the development of racial and ethnic identities may influence the development of sexual identity.”
- Option 1: “People in love.”
- This alt text provides minimal detail, does not capture any physical descriptors relevant to the purpose of the image, and assigns a social relationship to the people in the image that is not self-described.
- Option 2: “Two men hold hands on a couch.”
- This alt text assumes that the people in the image identify as men. It’s best practice not to assign social identities unless they are self-described.
- Option 3: “Two people with medium-dark skin tones and facial hair hold hands on a couch.”
- This alt text includes physical descriptors that specifically link the image to the identity development of queer people of color, which reinforces the claim in the caption.
For additional examples of how alt text for the same image differs by purpose for decorative, functional, and informative images, visit WebAIM’s Alternative Text [Website].
How to write image descriptions
While alt text is a short phrase – the text equivalent of glancing at a figure – image descriptions include rich visual detail and context. As accessibility advocate Veronica Lewis notes, “alt text tells someone that there’s a puddle on the floor, and image description tells someone that the puddle on the floor is in the middle of the floor and it’s orange juice” (n.d.).
If you need more than 10 words to describe your image, you need an image description. Follow these three steps:
- Summarize the purpose of the image in alt text.
- Add “Image description available” after the last sentence of your caption so that non-sighted users can decide if they want to open the image description.
- Write your image description in a separate Google Doc. The file name is: {Image Title} Image Description. Don’t include a figure number because that might change later. Save your image description doc in the {Course #} Image Descriptions Folder.
Image descriptions help all users understand language, relationships, and actions they otherwise might miss. To write image descriptions, use the following guidelines:
- The goal of an image description is to provide more context and detail than the alt text alone. It should not repeat the alt text but add something new.
- When describing people in image descriptions, include emotions when relevant. If facial expressions and body language communicate emotions (anger, joy, fear) that are relevant to the purpose of using the image, describe them.
- Just as when writing alt text, unless someone’s race or gender is self-described, do not assign people social identities. You can use terms like “dark skin tone” or “light skin tone” and note hairstyle, clothing, and physical build.
- If the image includes words or numbers, write them out. If an image is an infographic or chart, it will likely include a great deal of information.
- Don’t forget to note details about the setting of an image when relevant to its purpose. You might choose to describe the visual perspective of the image (close-up, bird’s eye view, high-angle, low-angle), the weather conditions, the lighting, different figures or creatures, or visual textures.
- In your chapter doc, after the last sentence of your figure caption, add “Image description.” Link this text to the image description document in your Course Image Description folder.
Figure Y1 8.11 is an example of a complex image that conveys more information than alt text can convey in 10 words. The figure shows the relationships between social identities as distinct and yet connected. This image requires both alt text and an image description.
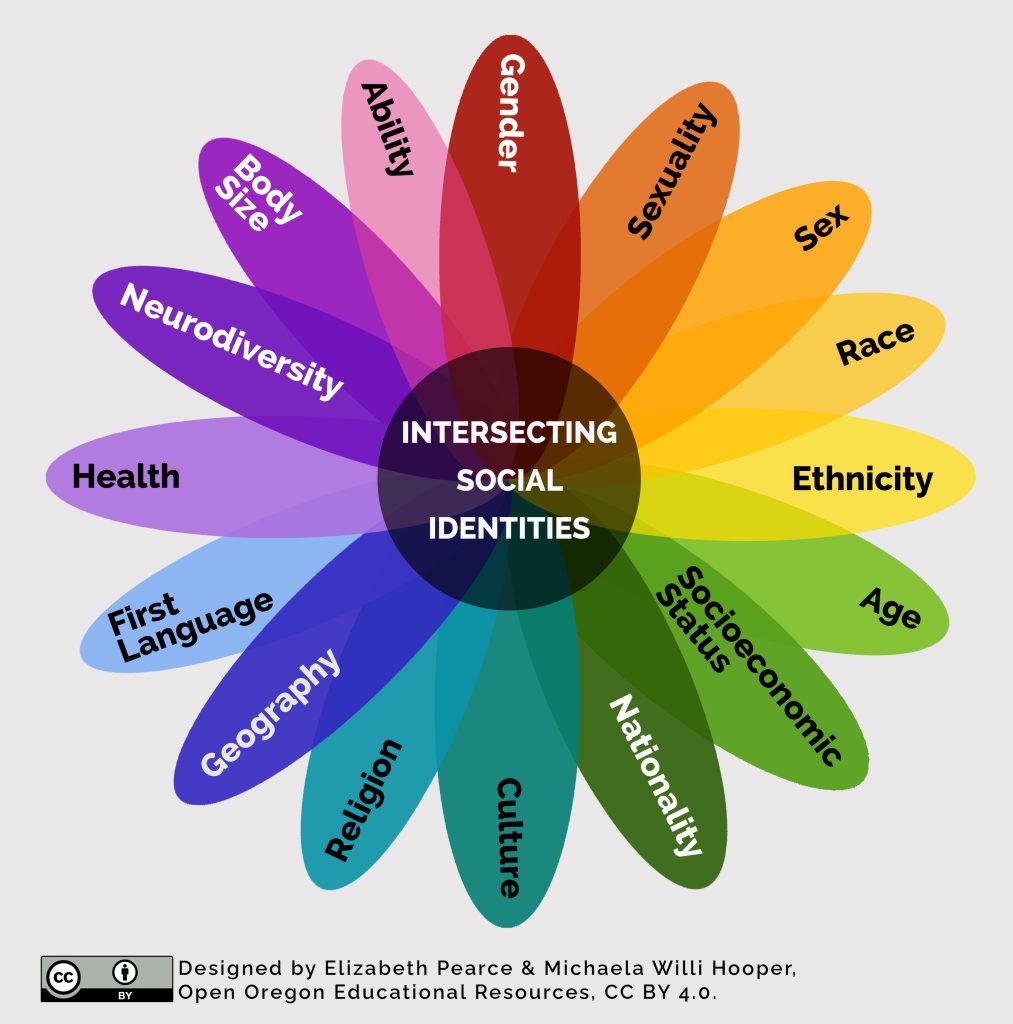
The alt text for figure Y1 8.11 is short, summarizing the visual information with a sentence. It reads: “A vibrant flower with different social identities on each petal and a center labeled ‘Intersecting social identities.’”
The image description linked in the figure caption provides additional necessary detail, including the identities indicated by each petal:
A vibrant, rainbow-toned flower with different social identities marked on each petal, including: Neurodiversity, Body Size, Ability, Gender, Sexuality, Sex, Race, Ethnicity, Age, Socioeconomic Status, Nationality, Culture, Religion, Geography, First Language, and Health. Each petal intersects at the flower’s center, which is labeled “Intersecting social identities.” Creators Elizabeth Pearce and Michaela Willi Hooper are noted along with the CC BY Creative Commons license.
This additional detail indicating color tone and emphasis helps to ensure that all parts of the image are accessible to users. It also notes the spatial relationship between the center and the petals of the flower. Further, the image description includes attribution information as it is embedded in the image itself. As sighted users see this information associated with the image, it is appropriate for the image description to convey this information as well.
Considerations for multimedia
Audio captions, transcripts, and audio descriptions work together to ensure that all readers can access the essential, aligned information provided by the multimedia you choose to include. Here’s how these different elements serve distinct purposes:
- Audio captions provide a running transcription of audio content that is synched up to an audio or video file. Audio captions appear within the media player.
- Transcripts provide the full transcription of audio content in a text file. They are keyword searchable and offer an alternative to watching the video. Transcripts are useful for students who can read more efficiently than they process auditory information. Transcripts are also important for students who want to accurately cite or quote something they learned from engaging with the multimedia.
- Audio descriptions provide a spoken description of content that would otherwise be conveyed only visually. People who can’t see the video can access visual information this way. (Example: you’re playing a cooking video while preparing a meal. During a pause in the dialog, a new voice narrates, “Amy and Veronica pour the ingredients into the bowl and stir.”)
Audio captions, transcripts, and audio descriptions that come with multimedia are often machine-generated. Content creators and platforms take this option on the theory that providing something is better than nothing. However, machine-generated audio captions, transcripts, and audio descriptions are often only 80 percent accurate (Klein, 2023), particularly when it comes to names, places, or accented speech.
If these files aren’t reviewed and edited by a human, students who are Deaf or hard of hearing won’t be able to access this content. English language learners will miss key information. Students who are studying with sound off won’t be able to accurately follow along. Accurate audio captions, transcripts, and audio descriptions ensure that all students have an equitable opportunity to engage.
To evaluate the audio captions, transcripts, and audio descriptions in media you want to use in your textbook, watch two full minutes of the selected media with the captions turned on. Here’s what to look for:
- Are audio captions appearing within the video frame?
- Can you find a transcript on the site where the video is shared?
- Are audio descriptions offered to describe visual content?
If you do find these elements, pay attention to the accuracy of spelling, phrasing, and punctuation while you watch. If you see more than one error, it’s safe to conclude that these captions have not been edited by a human.
Multimedia decision tree
The bulleted list below describes how to handle decision making about audio captions, transcripts, and audio descriptions and transcripts.
- Start here: Author checks two minutes of the media, as described above. Does it have accurate audio captions, transcripts, and audio descriptions?
- Yes: see below.
- No: Author asks original content creator to either create or edit their audio captions, transcripts, and audio descriptions (or asks the Project Manager for help with this step). Did they respond affirmatively?
- Yes: see below.
- No: If inaccessible multimedia is shared under all-rights-reserved copyright, we don’t have permission to remediate it and share the accessible version. In these cases, we will create a transcript and share it under fair use in the back matter of your book. Authors should use the Media Requests tab of {Course #} Textbook Deliverables for Open Curriculum Development Project spreadsheet and notify the Project Manager if they need a transcript created.
- You have accessible multimedia!
- Make a copy of the {Title of Video} Transcript template. Follow the formatting in the transcript to copy/paste the transcript content into the new document you created.
- Save your transcript doc in the {Course #} Transcript Folder.
Unit Self-Check Questions
Licenses and Attributions for Effective Multimedia Figures
Open content, original
“Effective Multimedia Figures” by Open Oregon Educational Resources is licensed under CC BY 4.0.
Open content, shared previously
“Effective Multimedia Figures” is adapted from “Module 3: Working Toward Accessibility: Expanding Your Universe of Learners by Veronica Vold, licensed under CC BY 4.0.
“Effective Multimedia Figures” is adapted from “Supplemental vs Informative Figures” and “Considerations for Media Elements” by Stephanie Lenox, licensed under CC BY 4.0.
Sample paragraph about views of disability is from Inequality and Interdependence: Social Problems and Social Justice by Kimberly Puttman, licensed under CC BY NC SA 4.0.
Figure Y1 8.5. Collaboration” by bre pettis is licensed CC BY-NC 2.0.
Figure Y1 8.6. Portland Oregon neon signage during nighttime by Zach Speak is licensed under the Unsplash License.
Figure Y1 8.7. Gestational diabetes kit by Stevenfruitsmaak is licensed CC BY 2.0.
Figure Y1 8.8. “Disabled and here group shot” by Disabled And Here is licensed CC-BY.
Figure Y1 8.10. “LGBT Love” by Nehemiah Brent is in the Public Domain.
Figure Y1 8.11. “Intersecting Social Identities” by Michaela Willi Hooper and Elizabeth Pearce for Open Oregon Educational Resources is licensed CC BY.
References
Klein, R. (2023). The Problem with Using Auto Captions in Higher Education. https://www.3playmedia.com/blog/problem-using-auto-captions-education/
Lewis, V. (n.d.). How To Write Alt Text and Image Descriptions for the Visually Impaired. https://veroniiiica.com/how-to-write-alt-text-image-descriptions-visually-impaired/
