
Y2 Unit 4.3: Designing the Student Learning Experience in Your Course Site
Up to now, you and your Instructional Designer have worked together in your shared Google Folder. In this unit, we’ll ask you to build modules directly in your learning management system so that students can access them at the start of the pilot. Your Instructional Designer will export to a shared Google Folder in the post-pilot phase so that your course module structure can be shared with future instructors who may not have access to your course via your institution’s learning management system.
This section shows you how to structure course content in your site to make navigation more efficient for students. Predictable unit structures that follow a set sequence can increase a student’s fluency in finding and engaging each required element. Your course site creates a path with clear signposts that students can follow over the course of the term.
For this unit, you will draft a unit module template and a welcome module in your learning management system. When you meet with your Instructional Designer, you will review and receive feedback on the templates. After that, you’ll be ready to copy your unit module template and reuse it to build out the rest of your course.
Note that we focus on the welcome module, consistent course navigation, and assessment design before working on the course syllabus. A syllabus is essential for record-keeping, but it is often not the first or only way a student will engage in your course. Thus it is a lower priority in our design process. When you get there, your syllabus must follow institutional requirements for policy information on student technology support, student services, and campus commitments. Be sure to include the title and link to the open textbook so students can access it readily.
Creating a Module Template
A module template lays out the desired sequence of content for the term. Students must predictably locate content and gauge the assigned workload each week. Dividing your course into units or modules creates a coherent and user-friendly pathway. You will draft your module template in your learning management system.
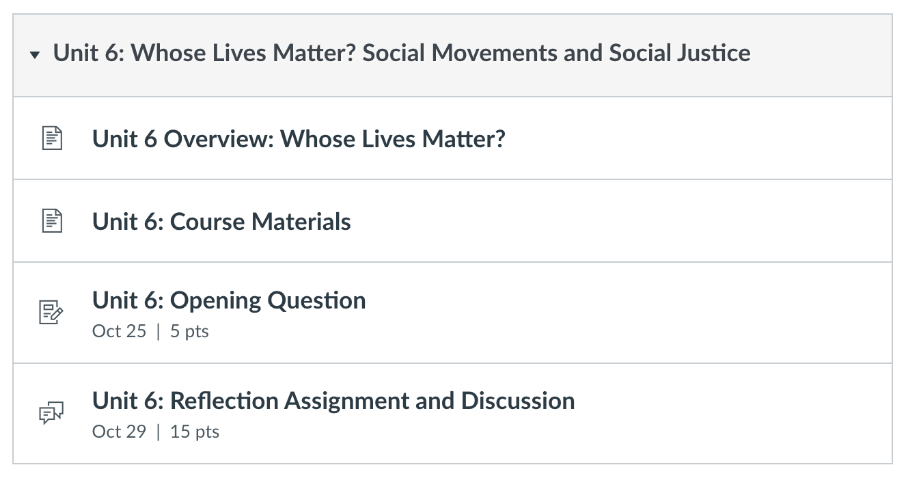
Keep in mind that the first unit of a course is atypical, as students will complete orientation tasks and engage with you and their peers for the first time, as well as complete regularly assigned work. The first module typically isn’t a template for the rest of the course because setting expectations and introducing the learning community are unique tasks. This is why we recommend starting with a typical module – usually the second – when you draft your module template. Figure Y2 4.4 shows an example.
Once you have a module template built out, you can copy it so that each week or unit follows the same structure. Don’t forget that you’ll meet with your Instructional Designer and get feedback on your first module draft before you copy the structure into the rest of your course.
Consistency is an Equity Move
Being consistent in your course site design will save you and your students time and heartache. This is also an important equity move that aligns with one of our Accessibility criteria for success: Module/page organization is consistent and intuitive. We encourage you to be detail-oriented in site design!
Consistency in naming conventions is crucial for clarity. Ensure all units and assignments follow a uniform naming pattern (e.g., “Week X Overview,” “Discussion Forum X”). Inconsistent names (e.g., referring to “Discussion Forum 1: Cultural Imagination” as “Cultural Imagination Response” elsewhere) can confuse students. Ultimately, inconsistent naming conventions require more of your time to respond to student emails and clarify queries.
Inconsistent naming also creates more work for you after the term is over, when instructors revise course content to share with an open license. Setting revision priorities for 10 discussion forums that are all labeled by topic rather than number can be needlessly challenging.
Do your future self, and your students, a favor by using consistent, meaningful naming conventions and module structures from the very beginning of the design process.
Vary Your Design with Care
Experienced instructors will already know that inconsistency can be an equity move too, when it is deployed with care.
For example, to give students study time before midterms, you might change the course cadence and make a discussion forum optional. If you plan to add extra credit assignments, time them at regular intervals when students aren’t already overloaded and focused on other work.
Each variation on the sequence or order of content types should be deliberate, mindful of student needs, and clearly communicated.
Example Module Template
The example template below is a suggestion. Some institutions have other requirements for course site layout that we expect you to follow. When you meet with your Instructional Designer, please make sure that they know about your requirements.
Instructors often use pages in their learning management system to group content so that the module- or unit-level view isn’t too crowded or busy. Creating pages allow instructors to frame, annotate, and link out to content so that students have a stronger sense of direction and engagement.
The example below uses pages and describes the purpose and hierarchy of content in a week two module.
- Week Two: {Topic}
- Week 2 Overview
- Short text introduction to the themes or concepts of the week.
- Introduce an introductory question or image, or provide more context for the week’s goals.
- List learning objectives for this week or unit: What will students be able to do or to know after they complete the module?
- Provide reminders of the weekly work and links to the following sections of the module.
- Week 2 Course Materials
- List required reading and required media to watch or listen to. Use the page structure to divide readings from media so that students can budget their time accordingly.
- Frame the assigned readings and media elements with annotations that show their connection to the unit’s learning outcomes. What do you want students to think about as they engage this week? Are there key words you want them to pay attention to?
- For any media you want students to view or listen to, include the viewing time. Example: “(Viewing time: 4 minutes 30 seconds).” This helps students manage their available study time effectively.
- Separate what is required from what is optional or intended for further study if students have time. Including a section called “Optional Resources” helps students prioritize their learning time on required content and pursue additional opportunities at their own discretion.
- Week 2 Discussion/Assignment
- List assignments or discussions at the end of the module so that they stand out as required tasks.
- If an assignment is due in a few weeks, post the assignment description in the week you want students to begin to work on it so that students can review the purpose, tasks, and criteria for success before the assignment is due. Encourage students to ask questions now.
- Add the {Course #} Chapter Level Feedback survey link as a weekly assignment in the course site.
- Week 2 Wrap Up
- Help students transition between weeks or units. Prepare for the week ahead by summarizing what this week covered, offering a final reflection question, or synthesizing key points you don’t want students to miss.
- Offer a statement of encouragement and support as students move on to the next module or unit.
Example Welcome Module
The Welcome Module orients students to the course instructor, course outcomes, and grading rationale. It provides students with communication expectations and links to campus resources to support their success in college. The Welcome Module takes vital syllabus information and breaks it out into the pathway of the course, creating an interactive delivery that supports students in retaining and referencing information. This module is important because it helps students to get their bearings and build confidence in navigating the course site. Whatever your course delivery format, online, in-person, or hybrid, a course Welcome Module is an essential element to help students feel connected and ready to get started.
Welcome Modules will differ according to the preferences and personality of each instructor, but they generally contain the following pages:
- Instructor Welcome
- Short welcome written by the instructor to their students as well as salient biographical information about the instructor, including their research interests and personal goals as a teacher. Often instructors can begin to build rapport with students by sharing a few personal details about their life beyond the classroom.
- Optional: a short welcome video (5 minutes or less) to help students orient themselves to the learning experience ahead. Here are two examples:
- Course Information
- State the format of the course (online, in-person, on Zoom) and any required synchronous class sessions.
- State the hours of expected course work per week. Link to your institutional policy on course credit hours as they relate to expected hours of course work if it is available.
- Link to a downloadable syllabus file so students can print the file if needed.
- List course-level learning outcomes to set the stage for the work ahead.
- Grading and Assignment Information
- List and describe the assignments for the course. Direct students to the appropriate course site location for more information.
- Provide a grading rationale for students:
- How do you score or evaluate their work in the course?
- What matters to you most about their performance?
- Why did you choose the assignments and their weight toward the final grade?
- How should they interpret feedback and what should they do if they have questions?
- Communication Expectations
- Share office hours, email information, and office location information.
- Tell students about your expected response time for emails (48 hours during Monday-Friday is common).
- If you have guidance for students on preferred email format or email etiquette, share it here.
- Student Services
- If your campus has a Student Services website, copy/paste key content you want to emphasize as well as link to that site directly on this page.
- Include links and descriptions of the following services:
- Library Services
- Academic Tutoring and Writing Support
- Disability Services
- Counseling Services
- Advising Services
- Basic Needs Services
- Food Security
- Housing Security
- Childcare
- Technology Support
- Direct students on how to request and receive technical assistance when accessing software, connecting to the campus internet, or accessing their institutional student accounts.
- If technology support information is available elsewhere on the course site, describe how students can find it (Example: “On the home page of our course site, select Technology Help in the lower right corner.”)
- Class Q&A Board
- Students can often answer one another’s questions faster than their instructor. To help facilitate their discussion of logistics and support with one another, offer a discussion board. The following prompt can help students to understand the purpose and use of the board:
- “This is a discussion board to help us manage course logistics. Please post any questions that come up about navigating the site, submitting assignments, or accessing content. I will review this board every 48 hours. If you know the answer to a question, please feel welcome to reply before I do! If you have questions you’d like to ask me directly or concerns about your performance in the course, please email me at .”
- Students can often answer one another’s questions faster than their instructor. To help facilitate their discussion of logistics and support with one another, offer a discussion board. The following prompt can help students to understand the purpose and use of the board:
- Week 2 Overview
Including a Welcome Module with these elements helps students get the orientation and warmth they need to integrate into the course community and take on a term of work in your pilot course.
Licenses and Attributions for Designing the Student Learning Experience in Your Course Site
Open content, original
“Designing the Student Learning Experience in Your Course Site” by Open Oregon Educational Resources is licensed under CC BY 4.0.
Open content, shared previously
Figure Y2 4.4. “Screenshot of a Sample Module Template” by Kim Puttman and Veronica Vold for Open Oregon Educational Resources is licensed under CC BY 4.0.
