
13 Chapter 4: Bandsaw
OBJECTIVE
After completing this unit, you should be able to:
- Identify Bandsaw.
- Understand the safety rules.
- Describe operation of the Horizontal Bandsaw.
- Describe operation of the Vertical Bandsaw.
- Describe the Chop Saw.
- Explain saw blades selection.
- Describe the Tooth set.
- Explain Vise loading.
- Describe lubrication.
Bandsaw
There are two types of band saws available in the market – one is the horizontal band saw and the other is vertical band saw. Band saws have become fairly common in any machine shop and require no special skills to use. However, considering the nature of work involved, it is important that you familiarize yourself with the equipment and follow a few simple steps when using a band saw. Here are some simple instructions on how to safely use vertical band saws.
Step 1: Safety
Before handling any sort of power tool it is important to wear safety goggles, gloves and any other relevant safety gear. Try to minimize loose clothing as it could potentially get caught in the saw blades.
Step 2: Know your Machine
Most band saw machines come with variable speeds but if yours is only one speed that is not a cause of concern. Your power switch and speed indicators are usually located on the left side of the machine if you are standing in front of the machine. The transmission shift lever and the variable speed control will be located at the back of the machine. The tilt table at the front allows you to move the object you are cutting with ease. The air blower at the top of the blade makes sure any particles are blown away from you and not towards you.
Step 3: Measurements
Mark your measurements on the object you need to cut. Make sure that the sizes that you are trying to cut are able to fit through the machine. This is more important for any contour sawing as opposed to straight line cutting. When cutting straight lines, make sure the width of the object does not increase the distance between the blade and the column of the machine. If you are cutting a contour, make sure the object can pass through the gap between the column and blade in all directions. If that is not the case, simple cutoff any excess object that you can before using the machine.
Step 4: Set Speed
Depending on what type of material you are cutting, the speed of the saw will vary accordingly. The general rule of thumb is to use fast speed for softer materials and relatively slower speed for harder materials. Once you switch on the machine, wait a few seconds as it powers up and settles at its working speed.
Step 5: Feeding
Once you have marked the object and set the speed, you are ready to feed the object through the machine. Depending on what type of machine you are using, the object can be fed manually or using the powered feeder. Before feeding the object and even before turning the machine on, check which side the teeth of the blade are facing. This is the side you will be feeding the object from.
If you are manually feeding the object make sure you keep your hands out of the way of the blade and if you are using the powered feeder, make sure you are not in a position to get caught in any of the moving part of the machine. Firmly grab the object, align the cutting line with the blade, clear your hands from the path of the blade and push the object into the line of the band saw blades. Once you have cut through the object, remove the articles from the machine and turn the machine off.
Safety
- Know where the start and stop switches are located.
2. Make sure that the blade is adjusted correctly and that the doors are closed before using the machine.
3. Use the right blade for the thickness of the material being cut. There should be at least three teeth for the thickness of the material.
4. Never run the machine faster than the recommended speed for the specific material.
5. Make sure that the saw blade is sharp enough to cut the material.
6. Adjust all guards in place before operation. The upper guide/guard assembly should be placed within ¼ of an inch of the workpiece.
7. Make sure the workpiece is flat on the table before starting the cut.
8. Do not start cutting until the blade has attained its full speed.
9. Maintain a safe distance between your hands and the blade.
10. Use the appropriate amount of force when cutting a piece.
11. When pushing irregular or small stock, use a board or push stick.
12. Be mindful of thin pieces jamming the slot or hitting the end of the slot in the insert.
13. If blade binding occurs, turn the machine off by unplugging the power cord and wait until it stops fully before attempting to remove the blade from the workpiece. Blade binding is when the saw blade gets stuck in the work piece.
14. Never make adjustments until the machine has fully stopped.
15. In the event of a broken band, unplug and keep away from the machine until it comes to a complete stop. Contact the instructor immediately.
16. Remove excess chips using brushes or rags after stopping the machine in order to prevent large quantities of chips from accumulating.
17. Make sure the machine is turned off and clean before leaving the workspace.
Horizontal Bandsaw
Adjusting the Vice
Loading Vice
- Turning the handle to the left will loosen the vice. Turning it to the right will tighten it.
2. The vice will be movable by hand if it is not clamped down. Some force may be needed to move the vice, and if it is sticking, slightly loosening the handle should resolve the problem.
3. The workpiece should be secured in a manner in which it will not pop out during the cutting process.
4. Make sure that the workpiece is being cut by multiple blade teeth, not just one.
Rotating Vice
- If the desired cut is not a 90 degree angle, the vice’s angle can be adjusted by up to 45 degrees.
2. To change the angle, lift the cutting head and adjust the bolts as shown on the image below.
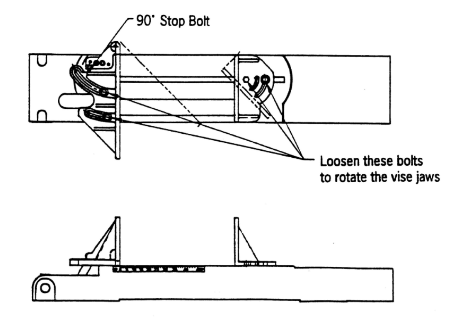
3. Before cutting, tighten the bolts and restore the jaws to their original position.
4. When the vice is rotated by a full 45 degrees, the maximum size for the stock becomes 8” round and 8” square.
Procedure
- Lift the handle and lock the machine in place.
2. Mount the stock inside the vice and tighten it.
3. Do not cut thin, vertical pieces, as they can damage the blade.
4. Do not cut large, flat pieces on the horizontal bandsaw. Cut these pieces with the vertical bandsaw.
5. Adjust the blade holders so that they clear the stock.
6. Turn the coolant or cutting oil on if necessary.
7. Place the emergency stop button in the extended position.
8. Turn the machine off by pressing the green button.
9. Adjust the speed of the blade to suit your needs.
10. Slowly turn the vertical feed lever and change the speed as needed.Ask your instructor about head speed. If the speed is too low, the blade can become dull. However, if the speed is too high, it may damage the blade. The blade should be doing all of the work.
11. The machine will stop automatically after cutting the workpiece.
12. Return the head speed to the default and clean the machine.
Vertical Bandsaw
Setup
- Make sure that the power is off and adjust the height of the guidepost to ¼ of an inch above the top face of the stock by loosening the guidepost lock. When finished, remember to tighten the lock.
2. Make sure that there is a push stick available.
Procedure
- Turn the machine on and wait for it to reach maximum speed.
2. Cut the stock, making sure to keep fingers at least 4 inches away from the blade.
3. When cutting small objects, use a push stick.
4. Make relief cuts when cutting curves or intricate cuts. This will lower the amount of blade stain. It will also remove the need to back out of a cut.
5. Use a tail man when re-sawing or cutting long pieces.
6. When ripping bevels keep the fence on the low side of the blade.
7. If the blade makes clicking sounds, turn the machine off immediately. The sound signifies a breaking blade. Notify the instructor immediately.
8. Turn off the machine and stop the blade using the foot brake when finished cutting. Do not leave the band saw without stopping the blade completely.
Post-Job Procedure
- Clean up any sawdust and pieces using a broom and dustpan.
2. Clean off the saw and check for damage. If any is seen, report to the instructor immediately.
1. Material should be laid on the table and flush against the fence.
2. Angle the table to the desired orientation and secure the pivot.
3. Do not turn the saw on in this step. Line up the blade to the desired cutting length.
4. Bring the saw up completely. Do not suddenly let go of the saw.
5. Securely hold the stock to the table and fence. Ensure that your hand is at least 6 inches away from the blade during the cut.
6. While the saw is at maximum height, hold the handle firmly and press and hold the switch.
7. Once the blade has reached full speed, slowly lower the blade through the stock.
8. After the cut is complete, turn off the saw by releasing the switch.
9. Slowly raise the saw back to its original position after the blade has stopped completely.
There are different types of chop saws, with each differing slightly from the others.
Compound chop saws tilt and pivot on the vertical axis. They can cut angles on both the side and the top of the workpiece.
Sliding compound chop saws also tilt and pivot on the vertical axis, but can also slide on linear rails. This allows the saw to make longer cuts.
Saw Blades Selection
Choosing the right blade for the material to be cut plays an important role in cost effective
band sawing. Here are some guidelines to help you make the right decision.
Blade Terminology
A clear understanding of blade terminology can help avoid confusion when discussing
cutting problems.
1. Blade Back: The body of the blade not including tooth portion.
2. Thickness: The dimension from side to side on the blade.
3. Width: The nominal dimension of a saw blade as measured from the tip of the tooth to the back of the band.
4. Set: The bending of teeth to right or left to allow clearance of the back of the blade through the cut.
Kerf: Amount of material removed by the cut of the blade.
5. Tooth Pitch: The distance from the tip of one tooth to the tip of the next tooth.
6. TPI: The number of teeth per inch as measured from gullet to gullet.
7. Gullet: The curved area at the base of the tooth. The tooth tip to the bottom of the gullet is the gullet depth.
8. Tooth Face: The surface of the tooth on which the chip is formed.
9. Tooth Rake Angle: The angle of the tooth face measured with respect to a line perpendicular to the cutting direction of the saw.
Tooth Form
The shape of the tooth’s cutting edge affects how efficiently the blade can cut through a piece of material
while considering such factors as blade life, noise level, smoothness of cut and chip carrying capacity.
Variable Positive: Variable tooth spacing and gullet capacity of this design reduces noise and vibration, while allowing faster cutting rates, long blade life and smooth cuts.
![]()
Variable: A design with benefits similar to the variable positive form for use at slower cutting rates.

Standard: A good general purpose blade design for a wide range of applications.

Skip: The wide gullet design makes this blade suited for non-metallic applications such as wood, cork, plastics and composition materials.

Hook: Similar in design to the Skip form, this high raker blade can be used for materials which produce a discontinuous chip (such as cast iron), as well as for non-metallic materials.

Tooth Set
The number of teeth and the angle at which they are offset is referred to as “tooth set.” Tooth set affects cutting efficiency and chip carrying ability.
Raker: 3 tooth sequence with a uniform set angle (Left, Right, Straight). Modified Raker: 5 or 7 tooth sequence with a uniform set angle for greater cutting efficiency and smoother surface finish (Left, Right, Left, Right, Straight). The order of set teeth can vary by product.
Vari-Raker: The tooth sequence is dependent on the tooth pitch and product family. Typically Vari-Raker set provides quiet, efficient cutting and a smooth finish with less burr.
Alternate: Every tooth is set in an alternating sequence. Used for quick removal of material when finish is not critical.
Wavy: Groups of teeth set to each side within the overall set pattern. The teeth have varying amounts of set in a controlled pattern. Wavy set is typically used with fine pitch products to reduce noise, vibration and burr when cutting thin, interrupted applications.
Vari-Set: The tooth height / set pattern varies with product family and pitch. The teeth have varying set magnitudes and set angles, providing for quieter operation with reduced vibration. Vari-Set is efficient for difficult-to-cut materials and larger cross sections.
Single Level Set: The blade geometry has a single tooth height dimension. Setting this geometry requires bending each tooth at the same position with the same amount of bend on each tooth.
Dual Level Set: This blade geometry has variable tooth height dimensions. Setting this product requires bending each tooth to variable heights and set magnitudes in order to achieve multiple cutting planes.
Vise Loading
The position in which material is placed in the vise can have a significant impact on the cost per cut. Often, loading smaller bundles can mean greater sawing efficiency.
All machines have a stated loading capacity, but the practical level is usually lower, 1/2 to 1/3 as much, depending on the material being cut (harder materials are best cut at 1/3 rated capacity).
When it comes to cutting odd-shaped material, such as angles, I-beams, channel, and tubing, the main point is to arrange the materials in such a way that the blade cuts through as uniform a width as possible throughout the entire distance of cut.
The following diagrams suggest some cost-effective ways of loading and fixturing. Be sure, regardless of the arrangement selected, that the work can be firmly secured to avoid damage to the machine or injury to the operator.
Lubrication
Follow the lubrication manufacturer’s instructions regarding mixing and dispensing of lubricant. Keep a properly mixed supply of replenishing fluid on hand. Never add water only to the machine sump. A fluid mixture with too high a water-to-fluid ratio will not lubricate properly and may cause rapid tooth wear and blade failure. Use a refractometer, and inspect the fluid visually to be sure it is clean. Also, make sure the lubrication delivery system is properly aimed, so that the lubricant flows at exactly the right point.
How to select your band saw blades:
The following information needs to be specified when a band saw blade is ordered:
For Example: Product Name Length x Width x Thickness Teeth Per Inch
CONTESTOR GT 16’ x 1-1/4” x .042” ¾TPI
These steps are a guide to selecting the appropriate product for each application:
Step 1: Analyze the sawing application Machine:
For most situations, knowing the blade dimensions (length x width x thickness) is all that is necessary.
Material: Find out the following characteristics of the material to be cut.
• Grade • Hardness (if heat treated or hardened)
• Shape • Size
• Is the material to be stacked (bundled) or cut one at a time?
Other Customer Needs: The specifics of the application should be considered.
• Production or utility/general purpose sawing operation?
• What is more important, fast cutting or tool life?
• Is material finish important?
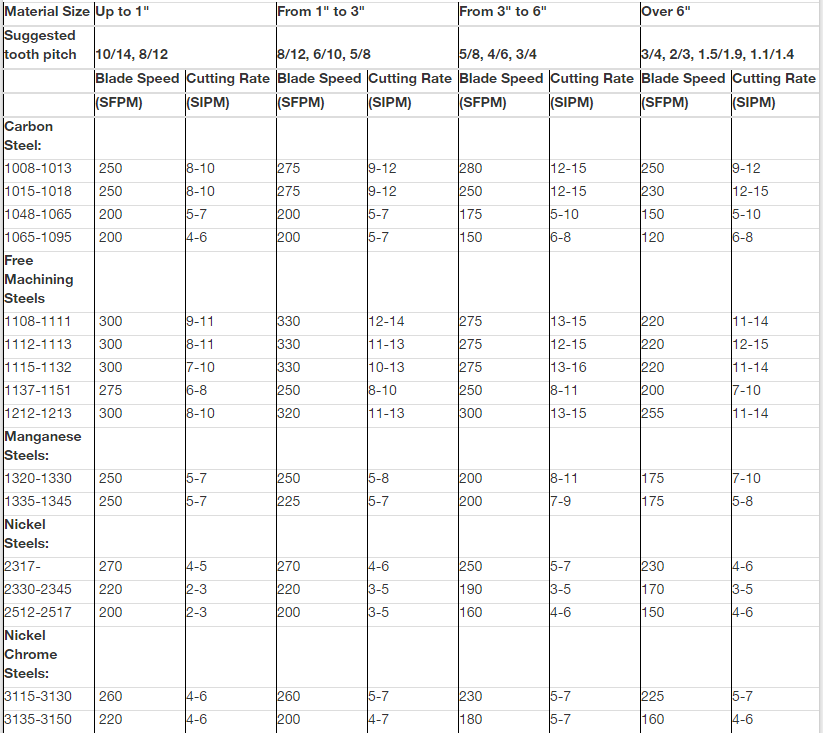
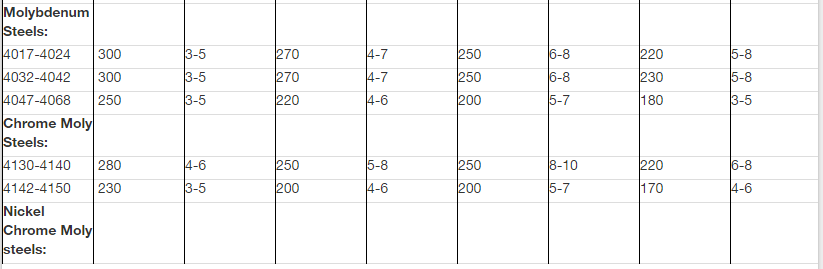
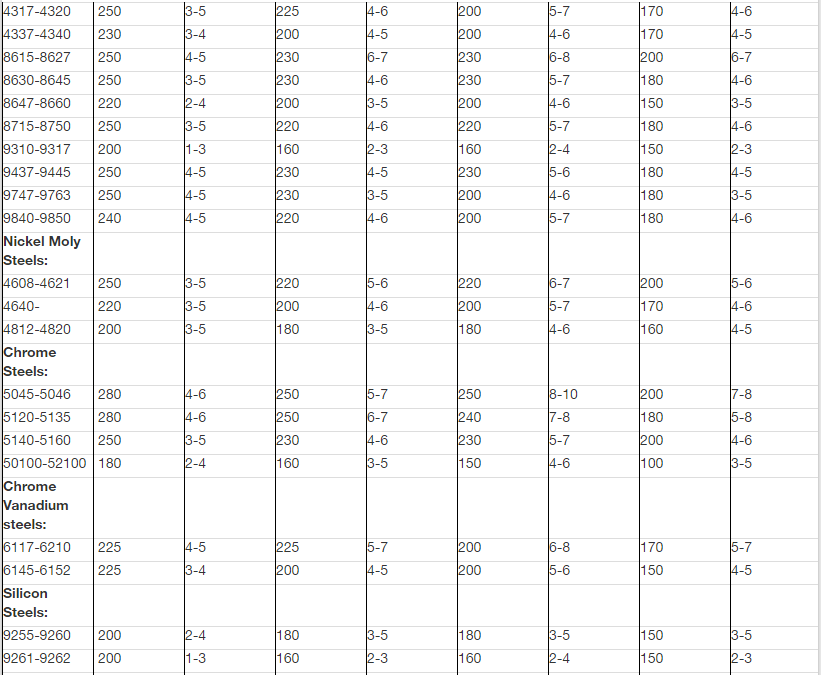
Step 2: Determine which product to use Use the charts below.
• Find the material to be cut.
• Read the chart to find which blade is recommended.
Step 3: Determine the proper number of teeth per inch (TPI)
Use the tooth selection chart (See chart below).
• If having difficulty choosing between two pitches, the finer of the two will generally give
better performance.
• When compromise is necessary, choose the correct TPI first.
Step 4: Order Sawing Fluids and Lubricants for better performance and longer
life on any blade.
Step 5: Install the blade and fluid
Step 6: Break in the blade properly
Step 7: Run the blade at the correct speed and feed rate.
Refer to the chart below.
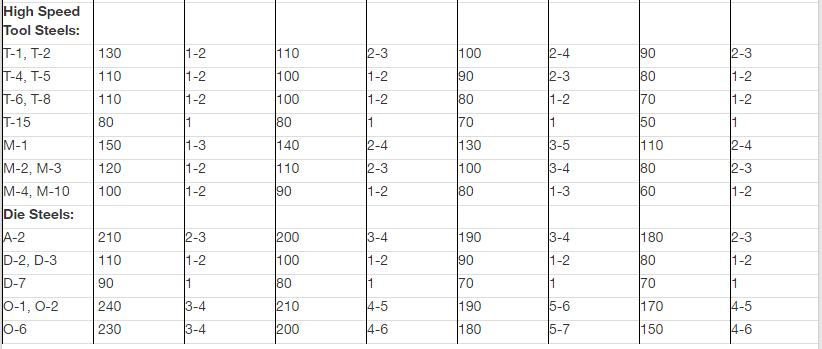
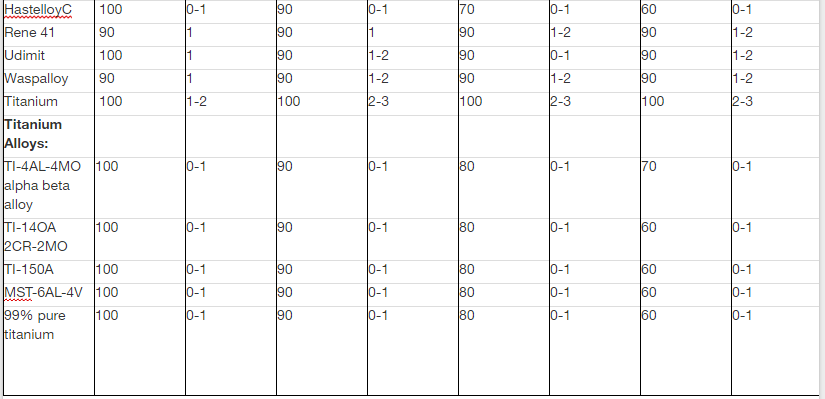
BAND SPEED AND RECOMMEND CUTTING RATES FOR BI-METAL SAWING APPLICATIONS


UNIT TEST:
1. Name two types of band saws.
2. Lists five important step when using a band saw.
3. Please explain Kerf.
4. What is a Tooth Pitch?
5. Please define TPI.
6. Please explain Variable Positive.
7. What is a tooth set?
8. Please lists and describe five tooth sets.
9. Lists three reason why we use Lubrication.
10. When ordered a bandsaw blade, what information needs to be specified?Chapter Attribution Information
This chapter was derived from the following sources.
- Horizontal Bandsaw Procedure derived from Horizontal Band Saw Operation by the University of Idaho, CC:BY-SA 3.0
- Vertical Bandsaw Procedure derived from [blank] by the [blank], CC:BY-SA 3.0
- Chop Saw Procedure derived from Woodshop Red Safety and Basic Usage by novaLABS, CC:BY-SA 3.0.
