
13 Aseptic Transfer
Emilie Miller, Ph.D
To study bacteria and other microorganisms, it is necessary to grow them in controlled conditions. Microbes are grown in substances that provide the nutrients necessary to sustain their metabolic activities and reproduction called growth media or simply media. Growth media can be either liquid or solid.
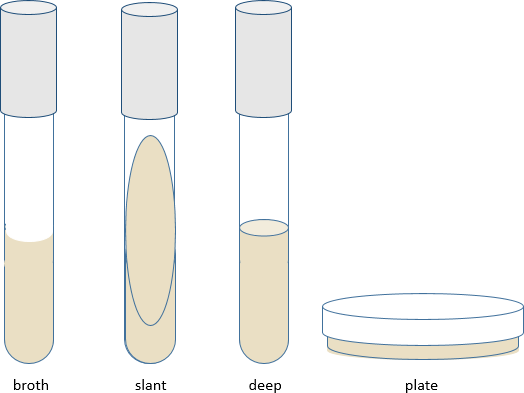
A liquid medium is called a broth. Broths can be used to determine growth patterns in a liquid medium, and for certain types of inoculations and metabolic tests. They are also the method of choice for growing large quantities of bacteria. (Petersen, 2016)
Solid growth media usually contains agar, which is a mixture of polysaccharides derived from red algae. It is used as a solidification agent because it (1) is not broken down by bacteria, (2) contains no nutrients that can be used by bacteria and (3) melts at high temperatures, and yet is solid at temperatures used for most bacterial growth. Solid growth media is used in the following forms: agar plates, agar slants and agar deeps. Melted agar is poured into a test tube and then allowed to solidify vertically for an agar deep, or at an angle for an agar slant. Agar plates are made by pouring melted agarinto a petri dish. (Petersen, 2016)
Because of the relatively small tube opening (less opportunity to dry out or become contaminated) and the surface area available for growth, agar slants are commonly used to culture and store bacteria for intermediate periods of time (weeks). These types of cultures are called stocks. Deeps are often used to for certain differential metabolic tests.
In contrast to deeps and slants, agar plates have a large surface area for growth. Bacterial cells can be spread out over the surface so that they form discrete colonies which can be characterized. In a few weeks, you will be using a series of plate cultures to separate two different microbes from a mixture. In addition, specialized media in plate form is used for certain biochemical tests. (Petersen, 2016)
Microbiologists prefer to study the organisms in pure culture, a culture that contains a single microbial species. If an unintended microorganism is introduced into a pure culture, the culture becomes contaminated. Aseptic technique is the collection of procedures and techniques designed to prevent the introduction of unwanted organisms into a pure culture or into the laboratory environment. The term “aseptic” literally means “without contamination.” These procedures are as important for the experimenter’s safety as they are for maintaining culture purity.
Sterilization is the complete removal all vegetative cells, endospores, and viruses from an item (OpenStax CNX, 2018). Sterilization is all or none; something is either sterile or it is not sterile. In this course, all media, the substance in which the cells are grown, is sterilized by autoclave.
An autoclave uses moist heat (steam) under pressure to destroy all life forms. Whereas most vegetative cells can be killed at temperatures between 60 and 80oC, bacterial spores require temperatures above boiling (>100oC) for destruction. With a pressure of 15-20 lbs./in2, the autoclave can achieve a temperature of 121-132oC. Media under these conditions for at least 20 minutes will kill all spores as well as vegetative cells. Larger volumes require longer exposure times to ensure sufficient heat transfer to the materials being sterilized. The steam must directly contact the liquids or dry materials being sterilized, so containers are left loosely closed and instruments are loosely wrapped in paper or foil. The key to autoclaving is achieving a temperature high enough to kill spores for complete sterilization (OpenStax CNX, 2018).
Disinfection is the killing or growth inhibition of vegetative microbes. Generally, spores and some hearty cells will survive disinfection. Chemical disinfectants, such as chlorine bleach or products containing chlorine, are used to clean nonliving surfaces such as laboratory benches, clinical surfaces, and bathroom sinks (OpenStax CNX, 2018). We will use a chorine-based disinfectant to clean our work surfaces and to clean up any culture spills. Note that sterilization and disinfection are not interchangeable! (Why?) Spraying your bench top with disinfectant does not make it sterile.
Antiseptics are antimicrobial chemicals safe for use on living skin or tissues. Examples include hydrogen peroxide and isopropyl alcohol (OpenStax CNX, 2018). When working in a microbiology laboratory, you must always remember that bacteria are present on all surfaces in the lab, as well as on your own hands and clothing. Aseptic techniques are designed to prevent the transfer of bacteria from the surrounding environment into a culture medium and from a culture to the environment. These techniques require care, concentration and practice. (Petersen, 2016)
Transfer Procedures
Watch the video Basic Aseptic Transfers. Because these procedures are completely new to most students, I strongly recommend that you watch the video at least twice. Keep in mind the following principles. (Some of these have been covered in the Laboratory Safety Exercise. They bear repeating because they are very important to keep you safe.)
Always begin by preparing your work area and making the necessary labels. Make sure you are clear about what transfers need to be made. A transfer can be thought of in two parts, obtaining the cells (inoculum) from the source/parent culture and inoculating the new sterile tube or plate. Transfers, with very few exceptions, are performed by a single individual. You should not be holding the tube while your partner inoculates it.
Before you start
- Have your Bunsen burner, striker, and inoculating loop ready.
- Culture media must initially be sterile. Inspect your media before you start. If a culture medium appears cloudy or you observe unwanted growth, consult with your instructor to be sure it is not contaminated before using it.
- Label your tubes with marker.
- Label plates on the bottom.
 Inspect the parent cultures. If the cells have fallen to the bottom, be sure to re-suspend them by flicking the tube gently to mix. Never shake a tube.
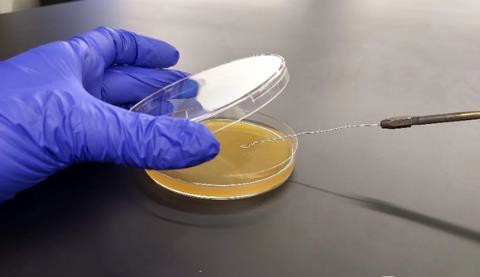
Sterilizing your loop
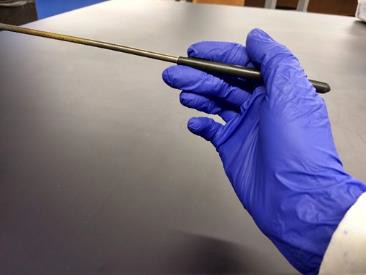
- Hold the inoculating loop in your dominant hand like a pencil. To sterilize, place it in the flame for AT LEAST 10 SECONDS (or flame it at an angle so that the wire is along the margin of the inner blue flame. The ENTIRE WIRE must be heated RED HOT). Watch the clock for the time. Students tend to count too fast.
- Do not let the loop sit in the flame more than 15 seconds.
- Hold the instrument in the air allowing the wire to cool for about 15 seconds before making any transfers. Please do not wave it around to cool it.
- The wire is now sterile. If at this time, if you set it down on the bench top, which is not sterile, it must be flamed again before going into any culture. If a sterile instrument is touched to anything not sterile including your hand, sleeve, the outside of a tube or plate, a slide or the bench top, it becomes contaminated and cannot be used in an aseptic transfer.
Obtaining the inoculum from a tube culture
- With your non-dominate hand, pick up the parent tube by grasping the tube just below the cap and lifting it out of the rack.
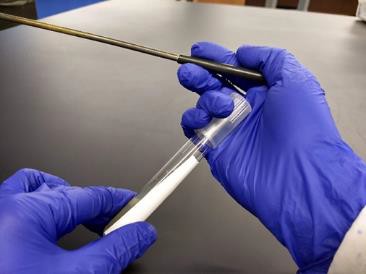 Grasp the cap with the pinky and ring finger of your dominate hand and gently twist the tube out of the cap keeping your dominate hand still. The cap is kept in your hand and never placed on the bench top.
- Heat the mouth of the open tube by placing it near the mouth of the flame for 10 seconds. (Or pass it through the flame). Heating creates convection currents, which carry airborne particles away from the mouth of the tube, preventing contamination of the culture or medium within.
- For a broth parent culture: Place the cooled loop into the broth and remove making
 sure that you have a thin film of liquid filling the loop. Jiggling the loop in the broth is not needed and can result in the formation of tiny aerosol droplets. Please do not jiggle the wire.
 - For a slant parent culture: Touch the cooled loop to the growth. Do not break the agar surface. Refrain from “swiping” a large mass of cells. You do not need to see cells on the loop to have millions!
- Again, heat the mouth of the tube after withdrawing the transfer instrument. This step incinerates any microbes that may have been deposited on the lip of the tube during the transfer.
- Replace the cap and set the parent tube back in the test tube rack.
To obtain the inoculum from a plate culture
- Keep the inoculating instrument in your hand.
 Turn the parent culture plate right side up.
- Lift the lid a short distance, with your non-dominate hand, so that the lid acts at a shield protecting the agar surface from falling microbes in the air.
- Touch the cooled loop to the growth. Do not break the agar surface. Refrain from “swiping” a large mass of cells. You do not need to see cells on the loop to have millions!
- Replace the lid immediately after withdrawing the transfer instrument and turn the plate upside-down again.
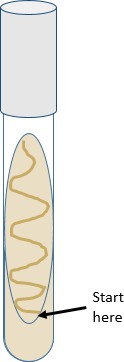
Inoculating a slant
- Keep the inoculating instrument in your hand.
- With your non-dominate hand, pick up the parent tube by grasping the tube just below the cap and lifting it out of the rack.
- Grasp the cap with the pinky and ring finger of your dominate hand and gently twist the tube out of the cap. Keeping your dominate hand still is especially important because there are cells on the loop at this point. Keep the cap in your hand.
- Heat the mouth of the tube for 10 seconds.
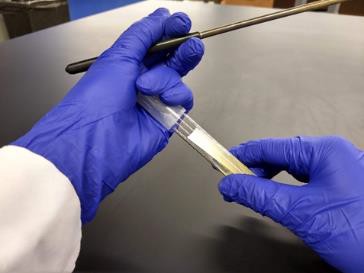
- Insert the loop all the way to the bottom of the slant surface.
- Drag the loop on the agar “snaking” your way up the slant creating a “fishtail pattern.” This is called a fishtail inoculation.
- Again, heat the mouth of the tube after withdrawing the transfer instrument. Replace the cap and set the parent tube back in the test tube rack.
- Immediately flame the inoculating loop and wire for a full 10 seconds before setting it down
Inoculating a broth
- With your non-dominate hand, pick up the parent tube by grasping the tube just below the cap and lifting it out of the rack.
- Grasp the cap with the pinky and ring finger of your dominate hand and gently twist the tube out of the cap. Keeping your dominate hand still is especially important because there are cells on the loop at this point.
- Heat the mouth of the tube for 10 seconds.
- Insert the loop to the bottom of the broth liquid and then remove the loop. Jiggling is not necessary to dislodge cells.
- Again, heat the mouth of the tube after withdrawing the transfer instrument. Replace the cap and set the parent tube back in the test tube rack.
- Immediately flame the inoculating loop and wire for a full 10 seconds before setting it down.
After all inoculations
- Cultures to be incubated should be placed in the designated area for culture incubation. Otherwise, a student’s culture may be disposed of accidentally.
- Be sure to turn it off the Bunsen burner when you are finished with it.
Because there is so much to remember, the first time you make transfers many of the above actions are repeated in context. After a few weeks practice, the repetition will no longer be necessary and it will be assumed that you will adhere to the procedures above without reminder.
Materials per student pair
2 TSA slants
2 TSB tubes
Cultures
Cultured plate
Cultured broth
Procedure Lab 1
- Prepare for the exercise by turning on your Bunsen burner, washing your hands, and donning your gloves.
- Tube to tube Inoculations with living cells:
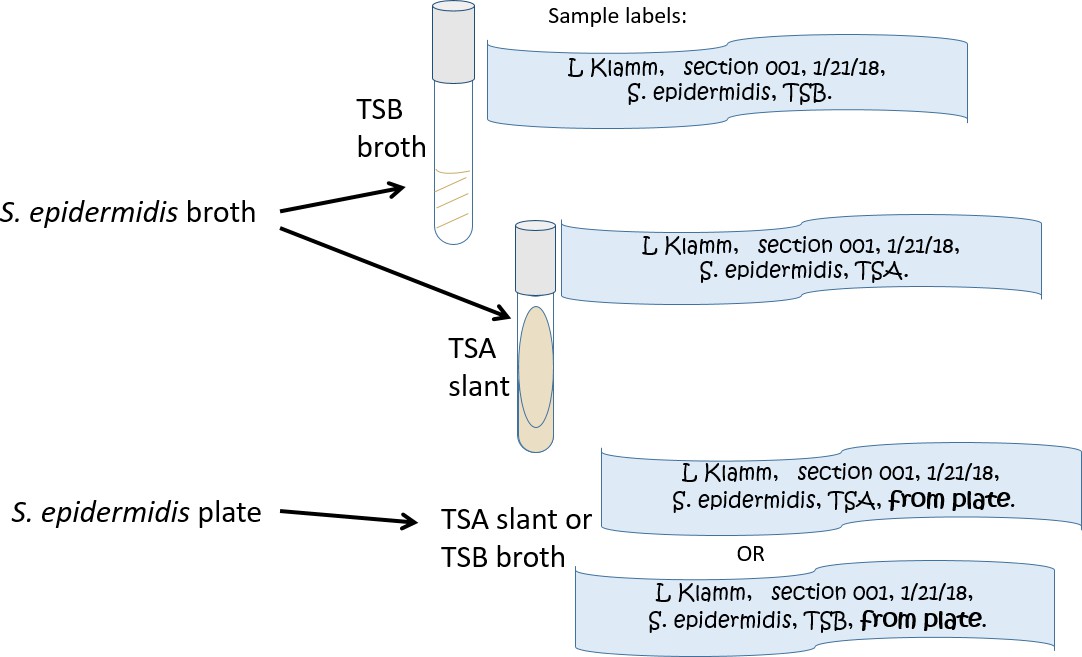
- Label one broth tube and one slant tube with the 4 label components. The organism name will be (You may abbreviate on labels. See Figure 8 below.)
- Using the parent broth culture provided to you, transfer cells from the parent culture to your sterile broth tube using the techniques described above.
- With the same parent culture, inoculate your sterile slant with the fishtail technique.
- Plate to Tube Inoculation with living cells:
- Label your tube (broth or slant) with the 4 components as you did in above. Add one additional piece of information, “FROM PLATE.” Once all the tubes are incubated, there is no way to tell the actual source of the cells unless you write it on your tube.
- Using the techniques from the video aseptically transfer cells from the parent S. epidermidis plate to your sterile tube. Use the fishtail inoculation technique if you have the slant.
- Place all your culture tubes in a test tube rack and carry them to the location for cultures to be incubated. You should have a total of 4 tubes. Take the cultures out of your rack and place them together in the rack provided.
- The culture tubes will be incubated for 24 hours at 37 C.
- Clean up by turning off your Bunsen burner, disinfecting your work area, removing your PPE, and washing your hands and exiting the lab.
Procedure Lab 2
- Prepare for the exercise as described for Procedure Lab 1.
- Take an empty test tube rack to the bench where the incubated student cultures are located and retrieve your cultures from last week.
- Without disturbing the broths, describe the growth in each
- Mix and describe again. DO NOT SHAKE the tube, please. Hold the tube securely between thumb and forefinger, just below the cap. (Do not hold the tube by the cap!) Flick the bottom of the tube until all cells are suspended in the solution and none remain in the bottom.
- To determine the relative amount of growth in each broth, place your broth tubes broth tubes in a rack. Make sure that each has been mixed by flicking as described above. Arrange them in order from most turbid to least. Then assign each a number from 0 to 5 (5 represents the greatest amount of growth). Record each number in the corresponding row of the data table. Two or more tubes may have the same number if they have similar turbidity.
- To determine the relative amount of growth in each slant, use a method similar to the above. You will not be looking at turbidity, but instead relative width and thickness of the growth on the surface.
