
5 Microscopy
Emilie Miller, Ph.D
The Compound Microscope
There would be little to do in a microbiology laboratory without a microscope, because the objects of our attention (bacteria, fungi, and other single celled creatures) are otherwise too small to see. Microscopes are optical instruments that permit us to view the microbial world. Lenses produce the magnified images that allow us to visualize the form and structure of these tiniest of living beings.
To use this important piece of equipment properly, it is helpful to know how a microscope works. A good place to begin is to learn the name and function of all of the various parts, because when we talk about the ways to improve microscopic images, terms like “ocular lenses” and “condenser” always come up.
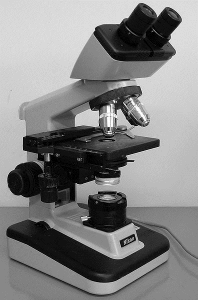
Based on the picture of the binocular, compound light microscope in Figure 1, match the name of the major part (listed below) with its location on the microscope, and give a very brief description of what each is used for:
| Ocular lenses | _________________________________ | Locate the parts on the microscope that allow you to:
|
| Objective lenses | _________________________________ | |
| (Revolving) Nosepiece | _________________________________ | |
| Stage and stage clips | _________________________________ | |
| Course and fine focus knobs | _________________________________ | |
| Condenser lens | _________________________________ | |
| Iris diaphragm | _________________________________ |
Making Images
With a bright-field microscope, images are formed as a result of the interplay between light waves, the object, and lenses. How images of biological objects are formed is actually more physics than biology. Since this isn’t a physics course, it’s more important to know how to create exceptional images of the object than it is to know precisely how those images are formed.
Light waves that pass through and interact with the object may speed up, slow down, or change direction as they travel through “media” (such as air, water, oil, cytoplasm, etc.) of different densities. For example, light passing through a thicker or denser part of a specimen (such as the nucleus of a cell) may be reflected or refracted (“bend” by changing speed or direction) more than those waves passing through a thinner part. This makes the thicker part appear darker in the image, while the thinner parts are lighter.
For a compound microscope, the optical path leading to a detectable image involves two lenses – the objective lens and the ocular lens. The objective lens magnifies the object and creates a real image, which will appear to be 4, 10, 40, or 100 times larger than the object actually is, depending on the lens used. The ocular lens further magnifies the real image by an additional factor of 10, to produce a vastly larger virtual image of the object when viewed by you.
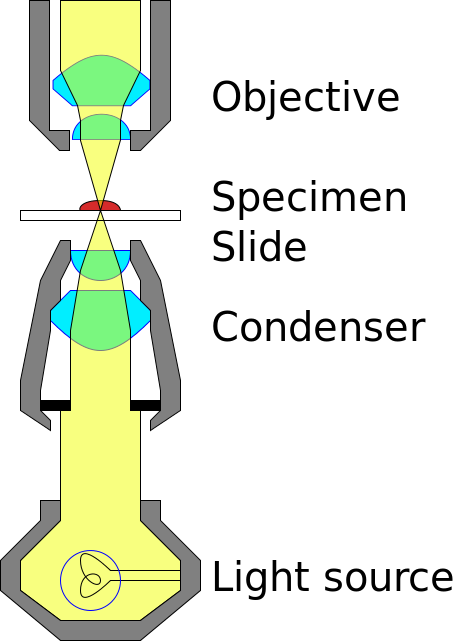
Light from an illuminator (light source) below the stage is focused on the object by the condenser lens, which is located just below the stage and adjustable with the condenser adjustment knob. The condenser focuses light through the specimen to match the aperture of the objective lens above, as illustrated in Figure 2.
Appropriate use of the condenser, which on most microscopes includes an iris diaphragm, is essential in the quest for a perfect image. Raising the condenser to a position just below the stage creates a spotlight effect on the specimen, which is critical when higher magnification lenses with small apertures are in use. On the other hand, the condenser should be lowered when using the scanning and low power lenses because the apertures are much larger, and too much light can be blinding. For creating the best possible contrast in the image, the iris diaphragm can be opened to make the image brighter or closed to dim the light. These adjustments are subjective and should suit the preferences of the person viewing the image.
When the light waves that have interacted with the specimen are collected by the lenses and eventually get to your eye, the information is processed into dark and light and color, and the object becomes an image that you can see and think more about.Resolution Limits Magnification
So the microscope makes small cells look big. But why can’t we just use more or different lenses with greater magnifying power until the images we see are really, really big and easier to see?
The answer is resolution. Consider what happens when you try to magnify the fine print from a book with a magnifying glass. As you move the lens away from the print, it gets larger, right? But as you keep moving the lens, you notice that while the letters are still getting larger, they are becoming blurry and hard to read. This is referred to as “empty magnification” because the image is larger, but not clear enough to read. Empty magnification occurs when you exceed the resolving power of the lens.
Resolution is often thought of as how clearly the details in the image can be seen. By definition, resolution is the minimum distance between objects needed to be able to see them as two separate entities. It can also be thought of as the size of the smallest object that we can clearly see.
The ability of a lens to resolve detail is ultimately limited by diffraction of light waves, and therefore, the practical limit of resolution for most microscopes is about 0.2 µm. Therefore, it would not be practical to try to observe objects smaller than 0.2 µm with a standard optical microscope. In addition, cells of all types of organisms lack contrast because many cellular components refract light to a similar extent. This is especially true of bacteria. To overcome this problem and increase contrast, biological specimens may be stained with selective dyes.
The Oil Immersion Objective
The lens with highest magnifying power is the oil immersion lens, which achieves a total magnification of 1000X with a resolution of 0.2 µm. This lens deserves special attention, because without it our time in lab would be frustrating.
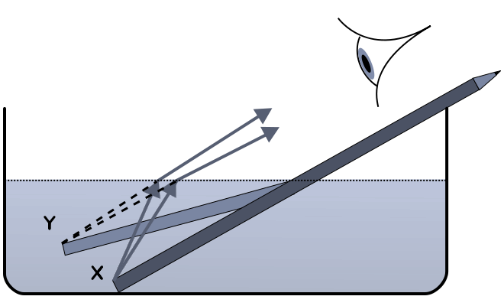
The resolving power of this lens is dependent on “immersing” it in a drop of oil, which prevents the loss of at least some of the image-forming light waves because of refraction. Refraction is a change in the direction of light waves due to an increase or decrease in the wave velocity, which typically occurs at the intersection between substances through which the light waves pass. This is a phenomenon you can see when you put a pencil in a glass of water. The pencil appears to “bend” at an angle where the air and water meet (see Figure 3). These two substances have different refractive indices, which means that light passing through the air reaches your eye before the light passing through the water. This makes the pencil appear “broken.”
The same thing happens as the light passes through the glass slide into the air space between the slide and the lens. The light will be refracted away from the lens aperture. To remedy this, we add a drop of oil to the slide and slip the oil immersion objective into it. Oil and glass have a similar refractive index, and therefore the light bends to a lesser degree and most of it enters the lens aperture to form the image.
It is important to remember that you must use a drop of oil whenever you use the oil immersion objective or you will not achieve maximum resolution with that lens. However, you should never use oil with any of the other objectives, and you should be diligent about wiping off the oil and cleaning all of your lenses each time you use your microscope, because the oil will damage the lenses and gum up other parts of the instrument if it is left in place.
Using the Microscope
If you are new to microscopy, you may initially feel challenged as you try to achieve high quality images of your specimens, particularly in the category of “Which lens should I use?” A simple rule is: the smaller the specimen, the higher the magnification. The smallest creatures we observe are bacteria, for which the average size is a few micrometers (μm). Other microscopic organisms such as fungi, algae, and protozoa are larger, and you may only need to use the high power objective to get a good view of these cells; in fact, using the oil immersion objective may provide you with less information because you will only be seeing a part of a cell.
This brings us to two additional concepts related to microscopy—working distance and parfocality. Working distance is how much space exists between the objective lens and the specimen on the slide. As you increase the magnification by changing to a higher power lens, the working distance decreases and you will see a much smaller slice of the specimen. Also, once you’ve focused on an object, you should not have to make any major adjustments when you switch lenses, because the lenses on your microscope are designed to be parfocal. This means that something you saw in focus with the low power objective should be nearly in focus when you switch to a high power objective, or vice versa. Thus, for viewing any object and regardless of what lens you will ultimately use to view it, the best practice is to first set the working distance with a lower power lens and adjust it to good focus using the coarse focus knob. From that point on, when you switch objectives, only a small amount of adjustment with the fine focus knob should be necessary.
Here is a final consideration related to objective lenses and magnification. Look at the lenses on your microscope, and note that as the magnification increases, the length of the lens increases and the lens aperture decreases in size. As a result, you will need to adjust your illumination to compensate for a darkening image. There are essentially three ways to vary the brightness; by increasing or decreasing the light intensity (using the on/off knob), by moving the condenser lens closer to or farther from the object using the condenser adjustment knob, and/or by opening/closing the iris diaphragm. Don’t be afraid to experiment to create the best image possible.
Guidelines for safe and effective use of a microscope:
1. Carry the microscope to your lab table using two hands, and set it down gently on the bench. Once placed on the bench, do not try to slide it around on its base, because this is extremely jarring to the optical system.
2. Clean all of the lenses with either lens paper or Kimwipes (NOT paper towels or nose tissues) BEFORE you use your microscope, AFTER you are done, and before you put it away.
3. When you are finished with the microscope, check the stage to make sure that you don’t leave a slide clipped in the stage. Make sure to switch the microscope OFF before you unplug it. Gently wrap the cord around the base and cover your microscope with its plastic cover.
4. Return the microscope to the cabinet before you leave the lab.
