
1 Laboratory Safety
Emilie Miller, Ph.D
In this course you will actually get to manipulate living things and see what happens…exciting! Working with living microorganisms also carries with it the risk of being harmed by these organisms. An infection contracted in a laboratory setting is called a Laboratory Acquired Infection (LAI).
Consequently, safety is a primary concern in this course. The techniques you learn are specifically designed to minimize the possibility that you will come into contact with a pathogenic microbial cell. All the lab procedures including clean-up and item disposal are in place to protect you, the student! This section is extremely important. Test and quiz questions will be taken from it throughout the course.
The World Health Organization classifies microbes into four risk groups as shown in Table 1.
Risk Group 1 includes nonpathogenic organisms commonly found in the soil, in the normal flora of humans and microbes used to make certain foods. Examples include Micrococcus luteus, Bacillus subtilis, Lactococcus lactus (yogurt), Staphylococcus epidermidis (human skin surfaces), E. coli type strain (human GI tract). If kept in their natural environment, these microbes pose no risk to most healthy individuals. Figure 1 (World Health Organization, 2004)
Organisms that cause fairly common human infec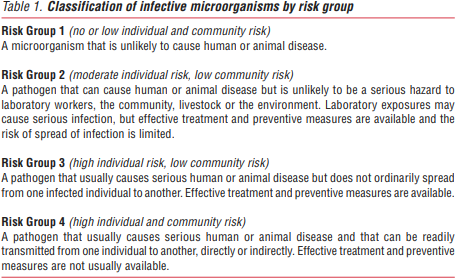 tions and diseases are in Risk Group 2. These diseases can be routinely treated with commonly available therapies. Examples include Staphylococcus aureus (skin and wound infections), certain E. coli strains, Salmonella.enterica (food poisoning), Streptococcus pyogenes (strep throat).
Risk Group 3 includes pathogens that cause more serious diseases requiring more aggressive treatments, but are not easily spread. Examples from this risk group are Bacillus anthracis, West Nile virus, and human immunodeficiency virus (HIV) (OpenStax CNX, 2018). Organisms in Risk Group 4 are the really “nasty bugs.” They include Ebola, Marburg, and smallpox virus (OpenStax CNX, 2018). Few, if any, effective treatments are available and they are easily transmitted from person to person.
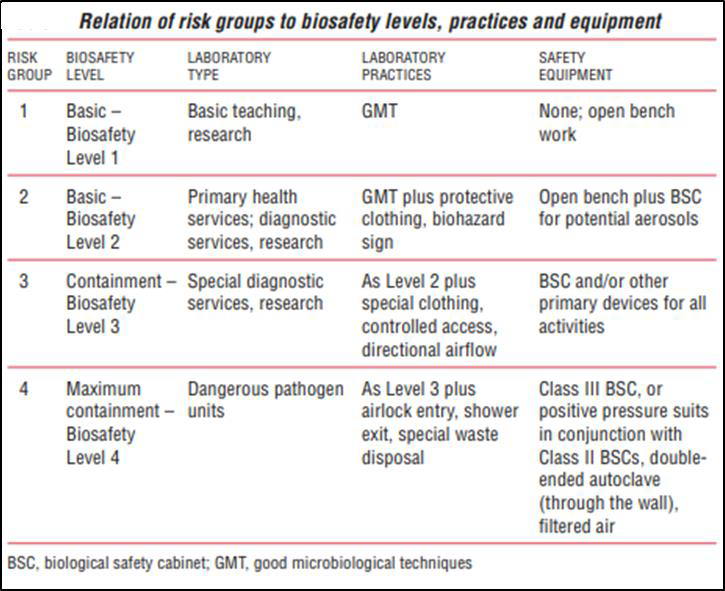
While organisms are classified into risk groups, laboratory facilities are classified into Biosafety Levels (BSL). The greater the risk, the more requirements are placed on the laboratory practices and safety equipment used to manipulate the organism. Organisms are often referred to by the BSL required to work with them because they generally coincide closely.
Figure 2 shows the relationship of the risk group to biosafety level.
In the microbiology teaching laboratories at CGCC, most of the organisms used will be from Risk Group 1. As the term goes on and the student becomes proficient with aseptic technique, some Group 2 microbes will be introduced. For simplicity, all of the laboratory procedures and policies will be appropriate for working with Risk Group 2. In other words, BSL-2 procedures will be in use throughout the term. Figure 2 (World Health Organization, 2004)
The following laboratory policies and practices adhere to the CGCC Biosafety Manual which uses guidelines established by the U.S. Centers for Disease Control and Prevention (U.S. Department of Health and Human Services, 2009) for biosafety level 2. These safety precautions aim to prevent contact with microbes via the skin and the mucous membranes of the mouth nose and lungs. Preventing the production of aerosols (tiny invisible droplets potentially carrying microbes) is a major concern.
CGCC Safety Procedures
- No eating or drinking in the lab. All food items must be placed outside the lab space. Do not apply cosmetics, lotion, Chap Stick, contact lenses while in the lab.
- Do not remove organisms from the lab or prep room.
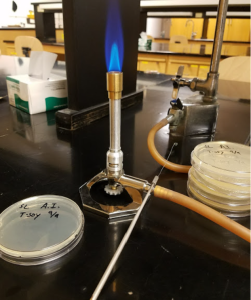
- Use extreme caution around Bunsen burners. Open flames are the MOST dangerous thing in the microbiology lab! Never leave a flame unattended. The Bunsen burner should be toward the middle of the lab bench so that students do not accidentally bump or need to reach over them.
- Students must come to lab fully prepared for the day’s exercise. Students who have not read the material and viewed any required videos will not only waste precious lab time, they will be at much higher risk for accidental exposure. Preparation is a matter of safety and is taken very seriously!
Primary Barriers
Primary barriers prevent the student from direct contact with an infectious agent. This begins with Personal Protective Equipment (PPE) and extends to laboratory practices.
- Students are required to wear protective eyewear or glasses when conducting procedures that have the potential to create splashes of microorganisms or other hazardous materials. This eye wear may be removed when using the microscope as long as staining and other culture transfer procedures have been completed.
- Hair must be kept off the shoulders and out of the face. Hair should never touch or come close to touching the work surface. If a student needs to bush the hair back from the face with a gloved hand the student will be required to wear a head band or use a rubber band to keep it in place.
- Closed toed shoes should be worn at all times. No sandals or flip flops.
- Well-fitting gloves will be worn when working with microbes. This includes handling inoculated plates and tubes. Gloves that are too large are dangerous because the extra plastic at the finger tips interferes with dexterity. Students must refrain from touching their face or hair with their gloved hands.
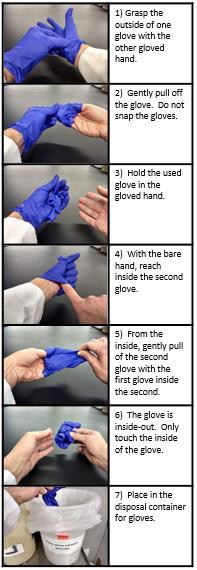
- Gloves should be removed properly to prevent the production of aerosols and contamination of the bare hand. See Figure 3. Used gloves should be placed in the biohazard trash.
- Students must wash their hands before leaving the laboratory to prevent the transfer of organisms outside the laboratory. Washing hands before beginning the lab will help prevent contamination of the pure cultures used in the experiments.
- If the integrity of the skin is compromised (open sore, dry cracked skin, other wounds) the student should be sure to cover the lesion with a bandage and then wear gloves. Double gloving may be necessary.
Figure 3 Safe removal and disposal of gloves. The entire process is accomplished without snapping the gloves.
Secondary Barriers: Laboratory Facilities:
- After the conclusion of the lab exercise, students must disinfect their work area to ensure no unseen contamination remains after they work. To disinfect, spray the area lightly with the disinfectant provided. Wipe with a paper towel to spread the solution into a thin film. DO NOT dry the surface with the paper towel. Allow the bench top to air dry.
- There is a biosafety cabinet (BSC) available for procedures with the potential for creating infectious aerosols or splashes.
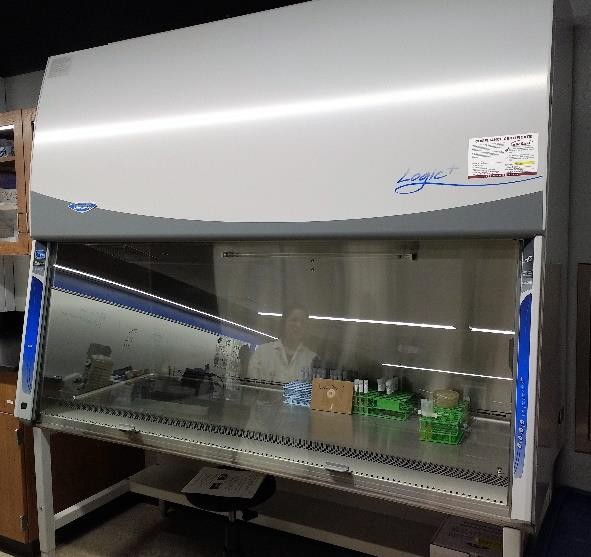 A fire extinguisher, first aid kit, eye wash station and safety shower are available. Students must know where these are located and how to use them. Figure 4 Biosafety cabinet In the UMKC Microbiology Laboratory
Disposal
- Paper towels used for routine purposes (hand drying, disinfecting the bench top) may be placed in the regular trash. Uncontaminated paper wrappers may also be placed in the regular trash.
- The broken glass box, lined with a plastic autoclave bag, will be used for any broken glass. Absolutely no glass is placed in the regular trash receptacle.
- Used slides will be placed in the red sharps containers.
- Used places, slants, and cultures will be placed in the biohazard trash.
Handling Cultures
- Gloves should be worn when handling all cultures, including placing them for incubation and disposal.
- All cultures must be properly labeled. At a minimum, every label must contain these 4 items: the student’s name, l date, medium and organism name. Sometimes additional information will also necessary.
- Tube cultures, regardless of the contents, or lack thereof, all tubes, must be placed in a test tube rack when not being used in a transfer. (Holding the parent tube while inoculating something else, is a common scenario for a culture spill.) All tubes must be in a rack while being carried around the room.
- Tubes are never laid horizontally on the bench top.
- Tubes are never handled by the cap. Caps are, by design, loose fitting to allow oxygen to reach the culture. If you grasp the cap when removing a tube from a rack, the tube may not come with it!
- Liquid tube cultures should never be shaken to mix the contents. Instead, they may be flicked to redistribute cells within.
- Plate cultures should be open as little as possible.
- Individuals should keep their face away from the plate when removing cells from a plate or placing an inoculum on a plate.
- Plates are always incubated and stored upside down. This keeps condensation from dropping onto the surface and moving cells around. This not only moves cells where you do not want them, but also creates the potential for the liquid to leak out of the plate and contaminate you or your work surface.
- Plates may be written on directly with a sharpie. Always label the base (the part containing the agar) of the plate. Lids can come off easily and get mixed up.
- Be sure you know what transfers are to be made before starting.
- Label all media to be inoculated before you make a transfer.
- Transfers are made without setting the transfer instrument down.
- After the transfer, the wire loop must be incinerated completely before setting it down. If cells remain on the loop, they can contaminate the bench top or any other object the loop touches. Other transfer instruments must be immediately placed in the appropriate container.
Remediation
As long as the student is following the lab procedures to the best of their ability, there is no penalty for accidental spilling! Let the instructor know so that they can help clean it up properly.
- Steps for a spill are as follows: a) Student or lab partner notifies instructor.. One person should remain with the spill to prevent other students from accidently coming in contact with the culture. b) Allow aerosol to settle. C) Gently cover spill with absorbent paper towels. d) Apply disinfectant starting at the perimeter and working towards the center, e) allow sufficient contact time (20 min) before clean up, f) place all paper towels and gloves used for clean up in the correct disposal container.
- If a culture spills on you, wash with soap and water.
- All individuals involved in a spill should wash hands and replace their gloves with new.
- If someone gets a cut or a puncture (percutaneous exposure), they must notify the instructor immediately and reported.
- If you splash culture in your eye, immediately flush both eyes with water for 15 minutes. Notify the instructor as soon as possible. There is an eyewash basin available for this use.
