
7 Gram Stain
Emilie Miller, Ph.D
Differential staining distinguishes organisms based on their interactions with multiple stains. In other words, two organisms may appear to be different colors. Differential staining techniques commonly used in clinical settings include Gram staining, acid-fast staining, endospore staining, flagella staining, and capsule staining. This link to the OpenStax Microbiology text provides more detail on these differential staining techniques. (OpenStax CNX, 2018)
The Gram stain is a differential staining
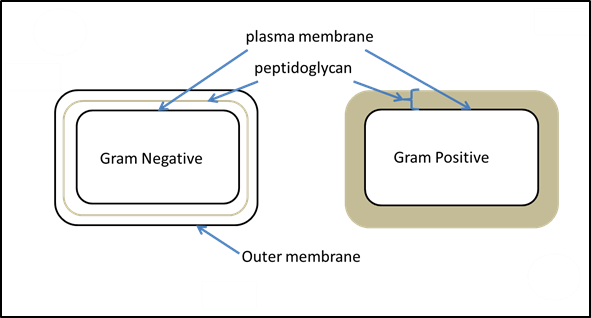 procedure that involves multiple steps. It was developed by Danish microbiologist Hans Christian Gram in 1884 as an effective method to distinguish between bacteria containing the two most common types of cell walls. (OpenStax CNX, 2018) One type consists of an inner plasma membrane and a thick outer layer of peptidoglycan. The other type consists of a double phospholipid bilayer with a thin layer of peptidoglycan between the two. The Gram Staining technique remains one of the most frequently used staining techniques.
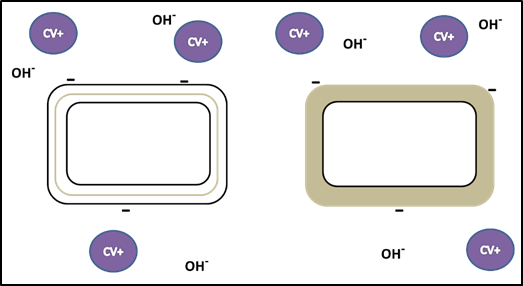
- First, crystal violet, the primary stain, is applied to a heat-fixed smear, giving all of the cells a purple color. You will recall that crystal violet is a basic stain (excess OH- ions). It adheres to the cell because the positively charged chromogen is attracted to the negatively charged cell as described in the Simple Staining exercise. (See figures 2 and 3.) This step is chemically identical to simple staining.

- Next, Gram’s iodine, a mordant, is added. A mordant is a substance used to set or stabilize stains or dyes; in this case, Gram’s iodine acts like a trapping agent that complexes with the crystal violet, making the crystal violet–iodine complex clump and stay contained in thick layers of peptidoglycan in the cell walls. All the cells become a deep purple color after this step.
- Next, a decolorizing agent is added, usually ethanol or an acetone/ethanol solution. Cells that have thick peptidoglycan layers in their cell walls are much less affected by the decolorizing agent; they generally retain the crystal violet dye and remain purple. These are termed Gram positive. In the cells with the thin layer of peptidoglycan, the decolorizing agent easily washes the dye out of cells leaving them colorless. Cells that do not retain the CV-I are called Gram negative. Because the reagent reacts differently depending on the cell wall, this step makes Gram staining differential and is the most crucial.
- Finally, a secondary counterstain, usually safranin, is added. This stains the decolorized cells pink. (OpenStax CNX, 2018) Like the primary stain, the counterstain step is chemically a simple stain. Its purpose is to make the colorless cells visible. The safranin chromogen actually adheres to all the cells. Because the Gram positive cells are retaining the dark purple CV-I complex, the pink safranin only shows up in the colorless cells.
- After crystal violet is added, all cells are purple.
 Iodine, the mordant, intensifies the color.
 After decolorizing, Gram negative cells are colorless and Gram positive cells remain purple.
The counterstain imparts color to the colorless cells as a simple basic stain.
 There are several important considerations in interpreting the results of a Gram stain. First, older bacterial cells may have damage to their cell walls. This is accentuated in Gram positive cells because the thick peptidoglycan begins to break down and cannot retain the CV-I complex as efficiently. The result? Gram positive cells appear pink and may be misidentified as Gram-negative. Thus, it is essential to use fresh (24 hour) bacterial cultures for Gram staining.
Second, errors, especially decolorizing too long, can affect the results. (OpenStax CNX, 2018) If exposed to the decolorizer too long, the CV-I complex can be removed from Gram positive cells along with Gram negative cells making all types appear pink at the end. Conversely, if the decolorizer is not applied long enough, the CV-I complex will remain in the Gram negative cells and they will appear purple and can be misidentified as Gram positive. This is the most common mistake students make in Gram staining. Always do a control smear when Gram staining an unknown culture to verify that your technique is correct. Getting the decolorizing step correct is tricky and takes some practice. (OpenStax CNX, 2018)
The third cause of inaccurate Gram staining is a thick smear. If cells are clumped together on the slide, the cells will not make contact with each of the reagents equally. Some individual cells may not be decolorized enough and remain purple when other identical cells become decolorized. This will result in some cells in a pure culture smear appearing different from others. (OpenStax CNX, 2018)
Besides their differing interactions with dyes and decolorizing agents, the chemical differences between Gram-positive and Gram-negative cells have other implications with clinical relevance. For example, Gram staining can help clinicians classify bacterial pathogens in a sample into categories associated with specific properties. Gram-negative bacteria tend to be more resistant to certain antibiotics than gram-positive bacteria. (OpenStax CNX, 2018)
Gram Stain Procedure
- Place a smear or drop of culture on a slide and allow to completely air dry.
- Heat-fix the slide by drawing it quickly over the flame of a Bunsen burner.
- Put a few drops of crystal violet on the fixed culture and allow to sit for one minute.
- Gently rinse with distilled water over a sink.
- Add Gram’s iodine to the fixed culture. Allow to sit for one minute. By discarding the first few drops of iodine, you ensure that the mordant is not diluted by excess water drops left on the slide from the previous rinse.
- Gently rinse with distilled water.
- Apply Gram’s Decolorizer to the slide until the stain stops coming off the slide and the decolorizer runs clear. This only takes 3-4 passes across the slide.
- Immediately, rinse with distilled water, gently. This will stop the decolorizing process.
- Apply the counterstain, safranin and allow it to sit for one minute.
- Gently rinse with distilled water.
- Gently blot in a fairly clean area of a bibulous paper book. Refrain from blotting after each rinse step. This is unnecessary and may result in the loss of cells from the slide making the few that are left more difficult to find.
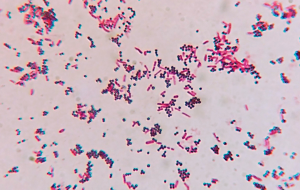
In this exercise you will stain a slide with 2 smears. On one side of the slide you will place a mixed culture containing E. coli, a known Gram negative rod and on the other side Staphylococcus epidermidis, a known Gram positive coccus. You will know you have stained the slide correctly if all the rods are pink and all the cocci are purple. Be sure you are looking for cell morphology and color. If you are not tuning into the details you may not interpret your results accurately. For example, in a cursory glance you may see both colors, but a closer look may reveal an unevenly stained slide with a clumped mass of cells (where you cannot distinguish individual cell morphology) retaining the purple color and individual cells, both rods and cocci, staining pink.
Materials per studen
1 Microscope slide
1 bottle Crystal violet stain
1 bottle Gram’s iodine
1 bottle Gram’s Decolorizer
1 bottle Safranin stain Sterile toothpicks
Bibulous paper, Bunsen burner, Striker, Inoculating loop
Cultures
E. coli
Staphylococcus epidermidis
Procedure
- On the left side side, aseptically make a smear with the E. coli. Be sure to sterilize your loop after spreading cells on one slide and before getting more cells . Be sure to make the smear about the size of a nickel.
 On the right side of the slide, aseptically make a smear with the Staphylococcus epidermidis
- With your inoculation loop, draw a small amount of each culture to the middle of the slide and mix with a drop of water if needed.
- Gram stain using the procedure above. Treat all parts of the slide the same.
- Find the cells under oil immersion. As always, you will need to start with the scanning objective. Follow the steps described in Microscope Theory.
- Evaluate your Gram staining technique by locating both rods and cocci. Determine if each is the correct color. Make sure that you are not just looking for both colors. You need to make sure that the rods are pink/red and the cocci are dark purple. Consult with your instructor. Note that on high power (high dry), the resolution is not good enough to determine the cell morphology and color. You must find cells under oil immersion to determine these characteristics.
- Use one row of the table for E. coli and the next line to make observations for the S. epidermidis. Remember, the first time you write the organism name, write it out in full scientific form.
- Dispose of your slide in the sharps container.
 Practice:
https://virtuallabs.nmsu.edu/stain.php
https://learn.chm.msu.edu/vibl/vibl/GramStain/gram_stain_HTML5Canvas.html
