
Chapter 4 Training Your Eye or “Seeing”
Training your Eye
Learning Objective
By the end of this chapter, you should be able to:
- Utilizing various observational skills and tools
- Define a basic unit, picture plane, viewfinder, negative space, proportion,
- Identify clues within a subject to aid in the drawing process
Now that you have a little practice using your arms and hands to establish lines and basic shapes, and have warmed up a bit, you can start train your eye to “see” like an artist. This is perhaps the most important part of drawing. As we considered in chapter one, how do you draw something if you don’t know what it looks like? Careful observational comparisons between your subject and your drawing is critical. In this chapter we will go over how to use various tools and techniques to help you interpret what you are seeing. It is important to know these observational aids are used to both analyze your subject and your drawing, as you compare the two. Next you will implement what you learned by finding and identifying clues within images. We will finish with a couple of fun exercises to play with your brain to help you see differently.
Measuring Tools
Below is a list of tools that can help with the process of drawing. Think of these tools as aids. The more you practice your visualization skills, the less you may need to rely on them. Tools can be used at any point during your drawing process, not just at the beginning or end of a drawing.
pencil
Your pencil can be considered a multitool. Not only can it be used to draw with, it can also be used to measure things. This may seem strange, but your pencil is one of the most important drawing tools. It is also the most used, even if you are not using it to draw. The pencil can be used to measure distances, angles, and as a way to check alignment.
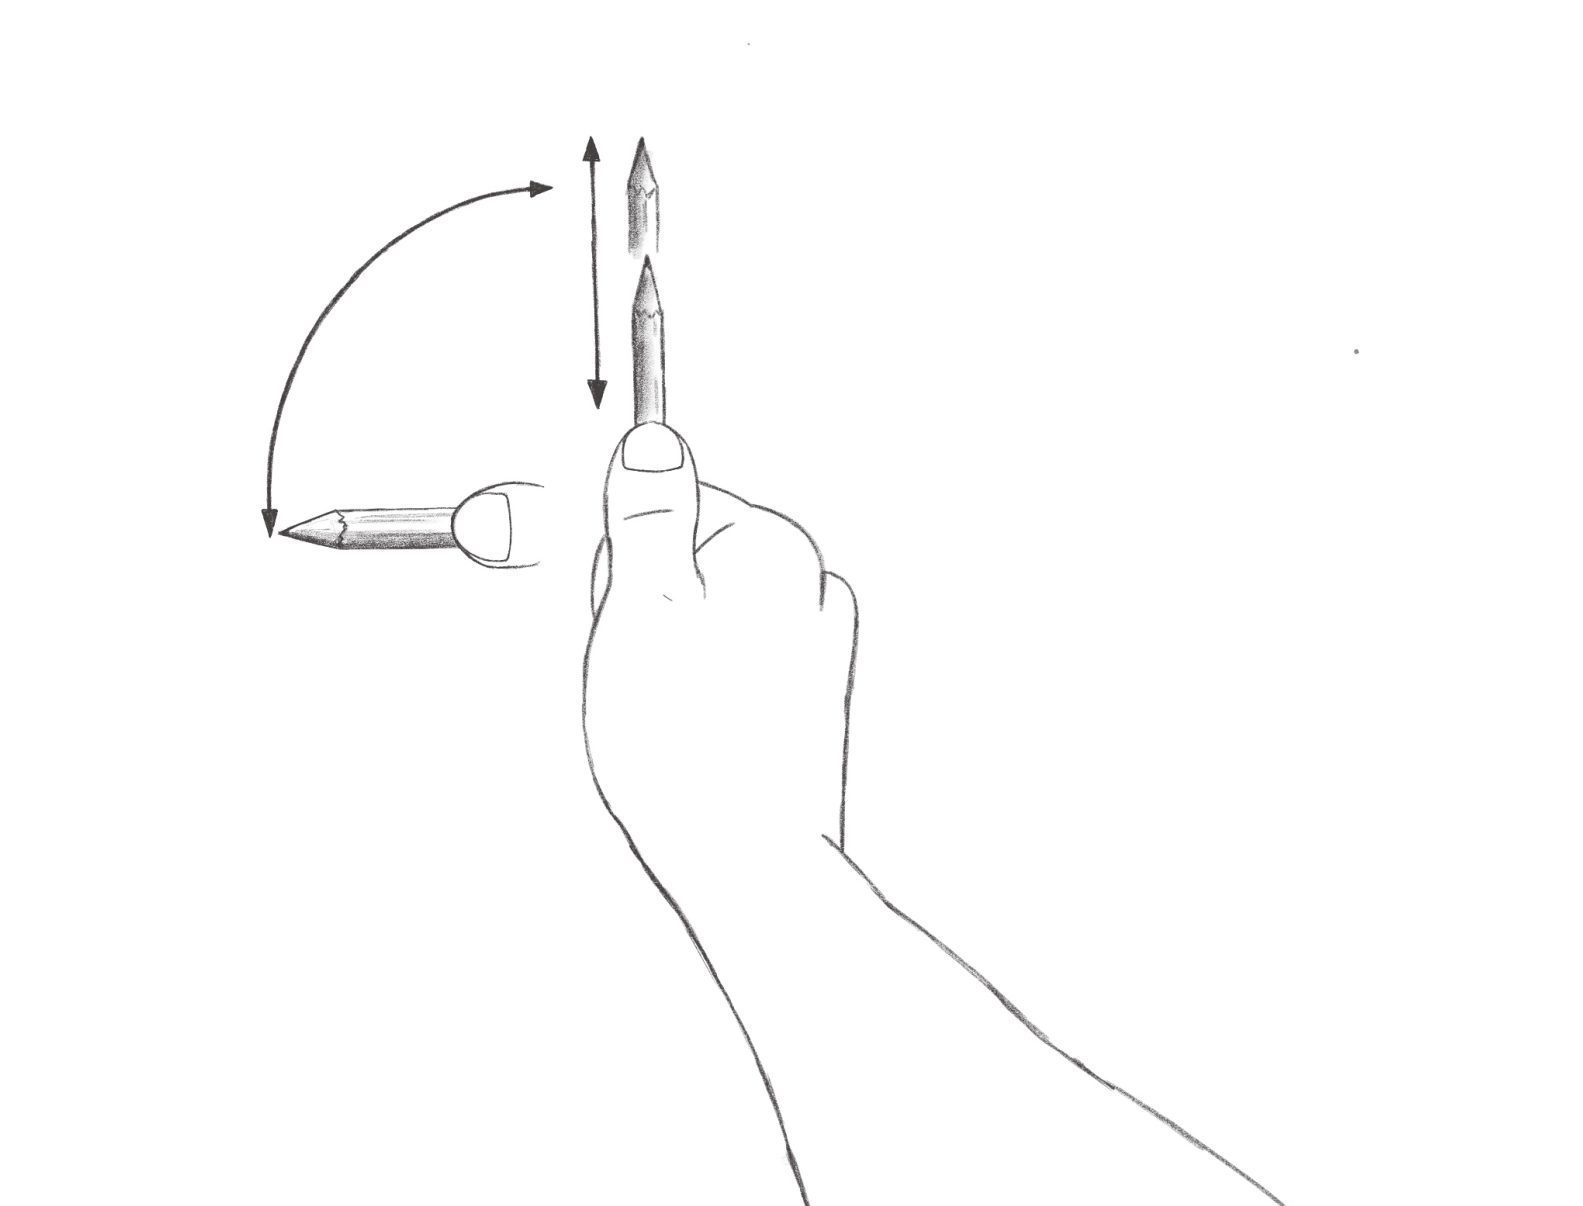
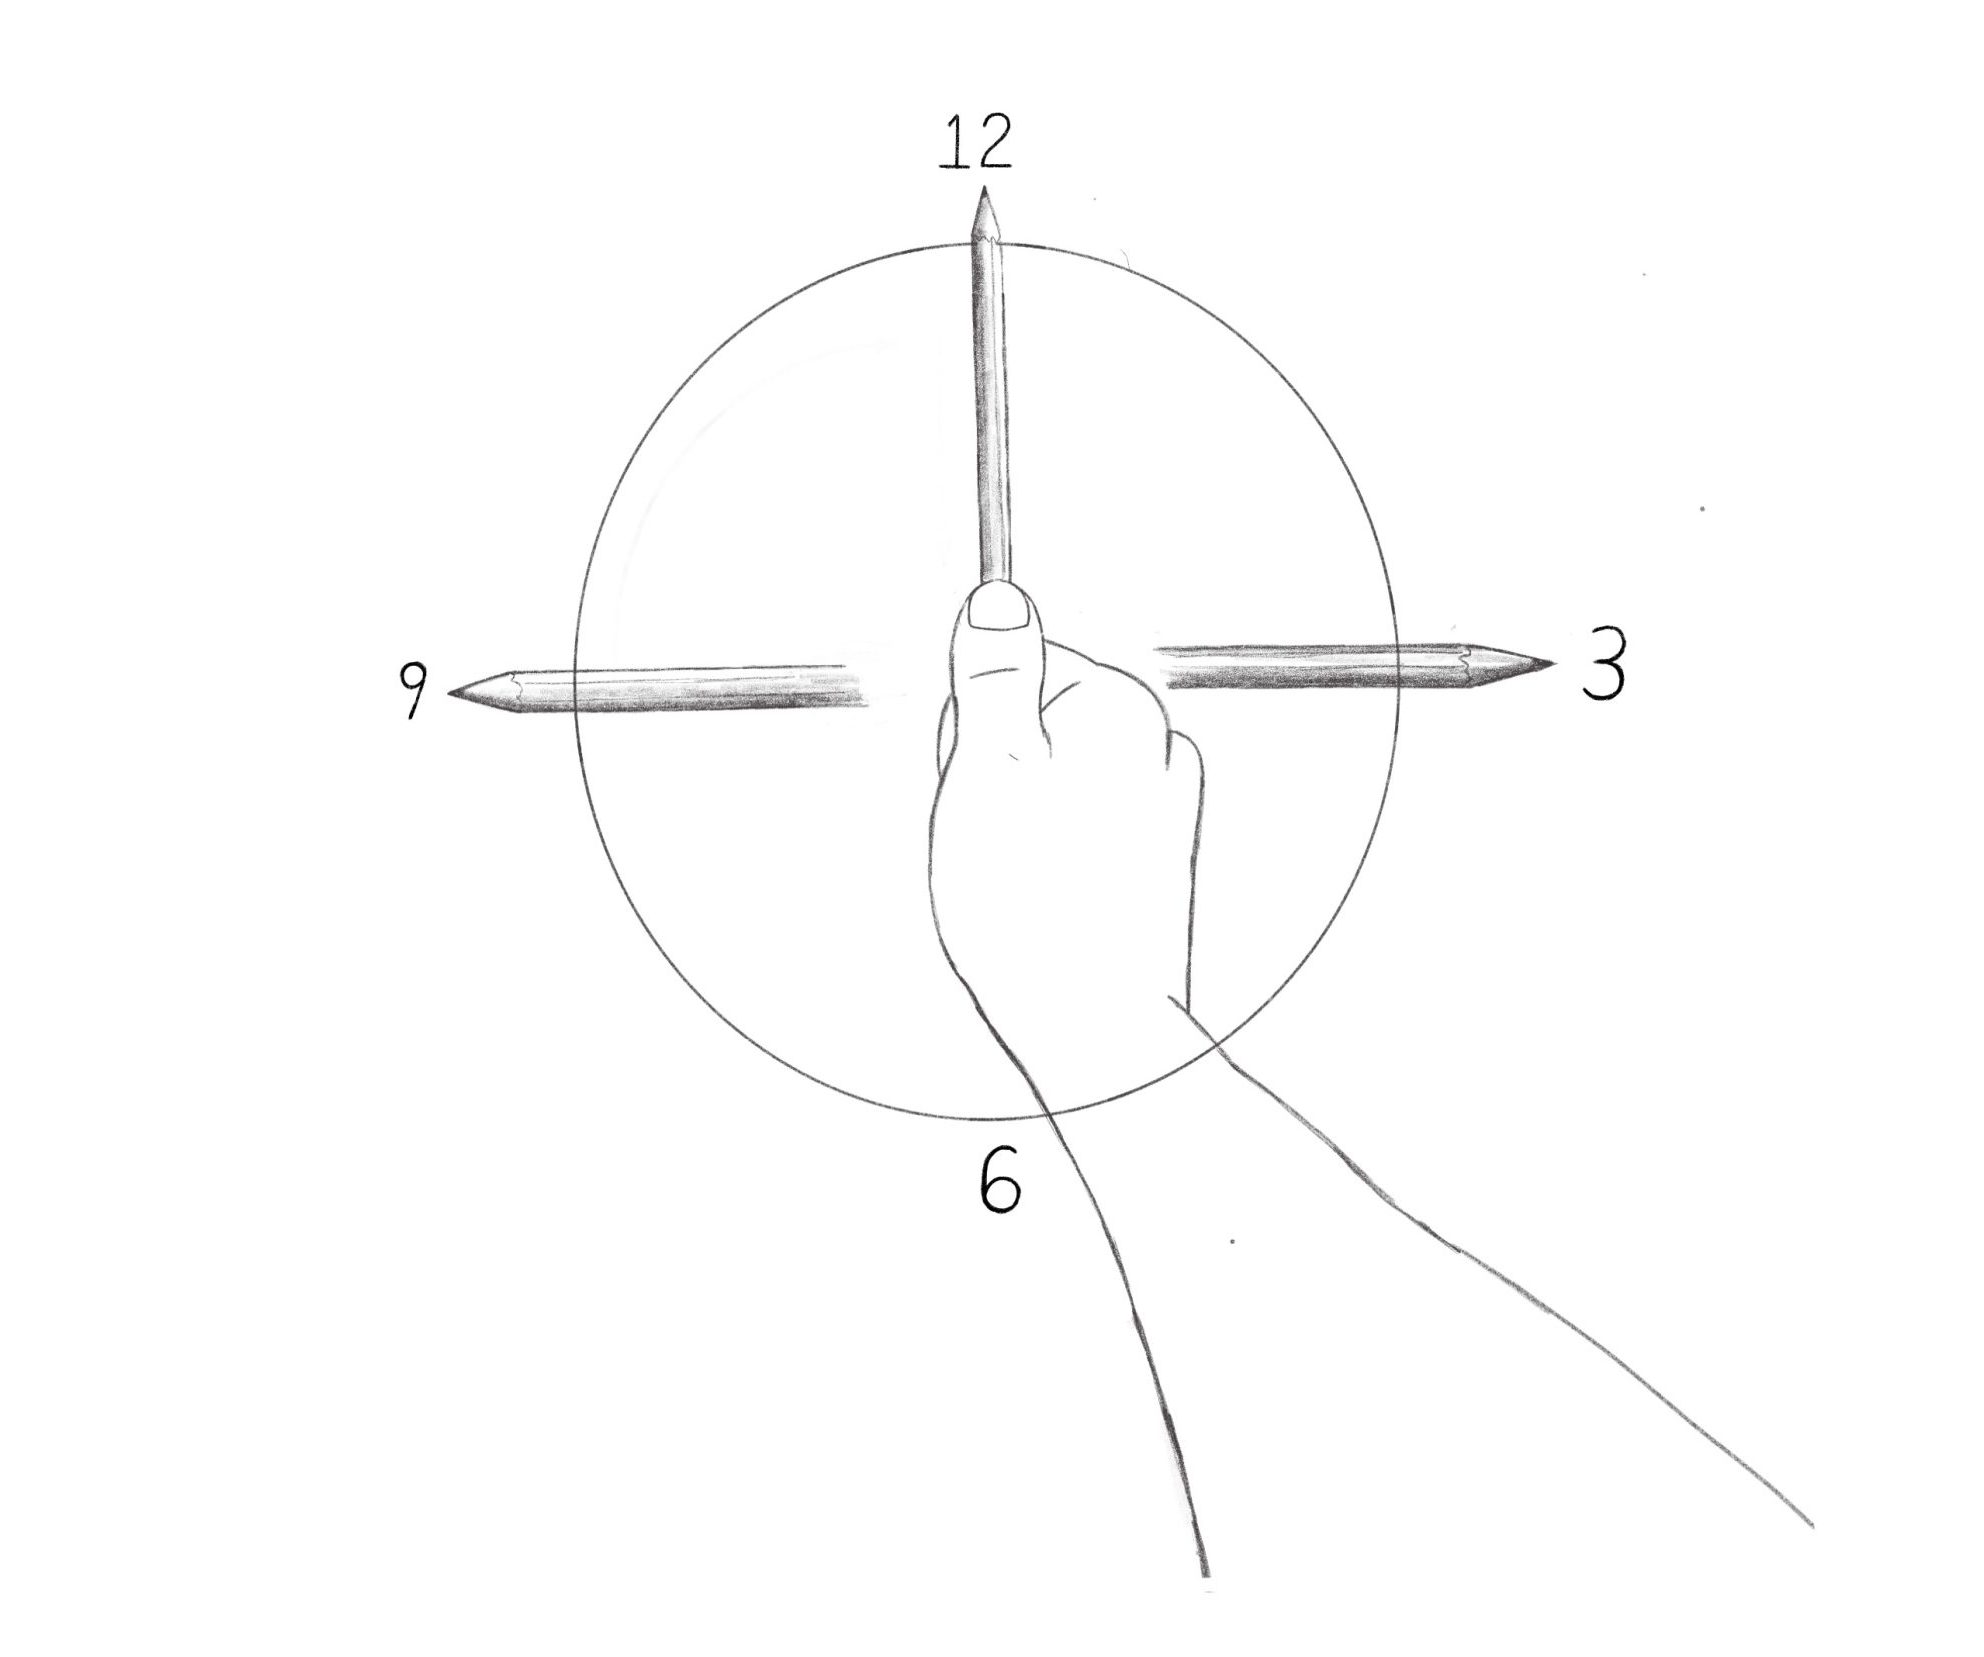
One very important aspect when using your pencil as a measuring tool is to keep it in the same plane. Pretend your pencil is one hand on a one handed clock and the clock is hanging flat on a wall straight in front of you. Now imagine that this one handed clock may be placed anywhere on the wall and the hand on the clock can rotate to any time. The pencil cannot point at the wall, only the side of the pencil can touch the wall. No matter how it is moved or rotated, the side of the pencil will always be touching the wall and cannot point away from or into the wall.
Pencil to find a Basic unit
The first way a pencil can be used as a tool is for measuring distances. These distances will be called a “basic unit”, which is a measurement you create and not a standardized measurement like you find on a ruler, such as an inch. How we find a basic unit is to hold the pencil out in front of you (remember the one handed clock) with your arm extended out all the way. You do not want the distance from your eye to your pencil to change or it will alter the measurements. The distance you will use is a measurement from the tip of the pencil to your thumb. The basic unit distance from your thumb to the tip of the pencil can be altered by sliding your thumb up and down your pencil. Below shows how to hold the pencil which can rotate like a clock hand.
You can use one or many different basic units throughout a drawing. To obtain a basic unit you will need to find an object or feature within your subject area to measure.
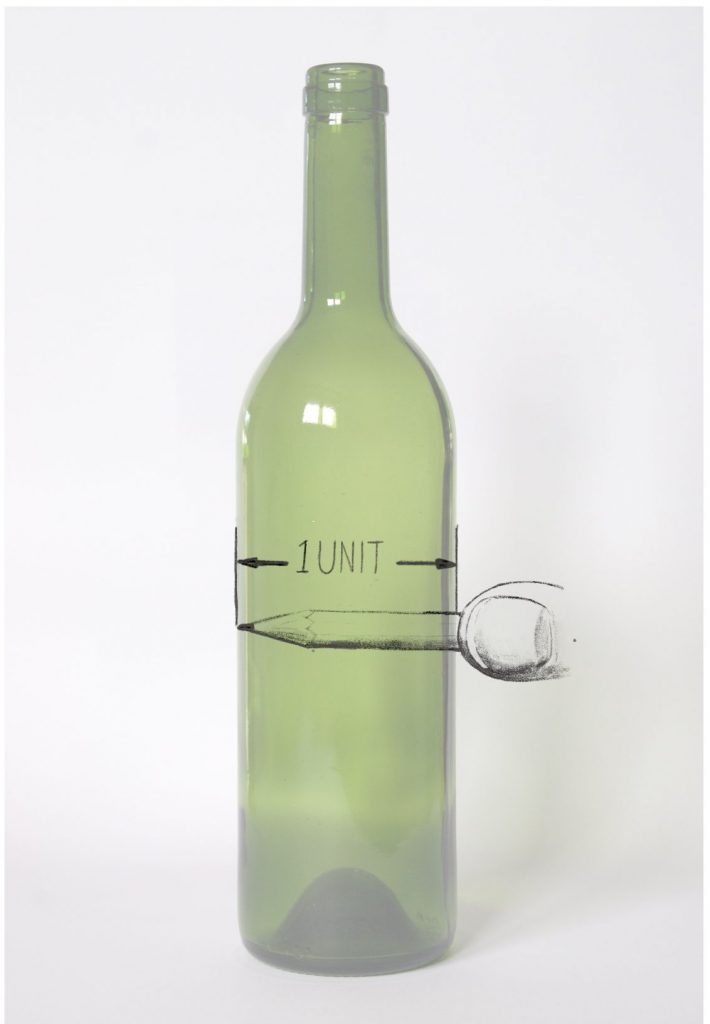
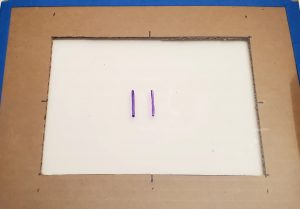
In the image on the left we obtain a basic unit by measuring the width of the bottle. It usually helps to find a basic unit that is smaller than most of the other features you plan on measuring.
Once you establish one basic unit, you can then use this unit to measure other areas of the drawing. Again, when you establish your basic unit, make sure to be careful with the distance from your eye to your pencil or your measurements may alter. We can now see how the width of the bottle relates to the height. If you rotate your hand so the pencil goes from horizontal to vertical, we can now count how many of the basic units are within the height.
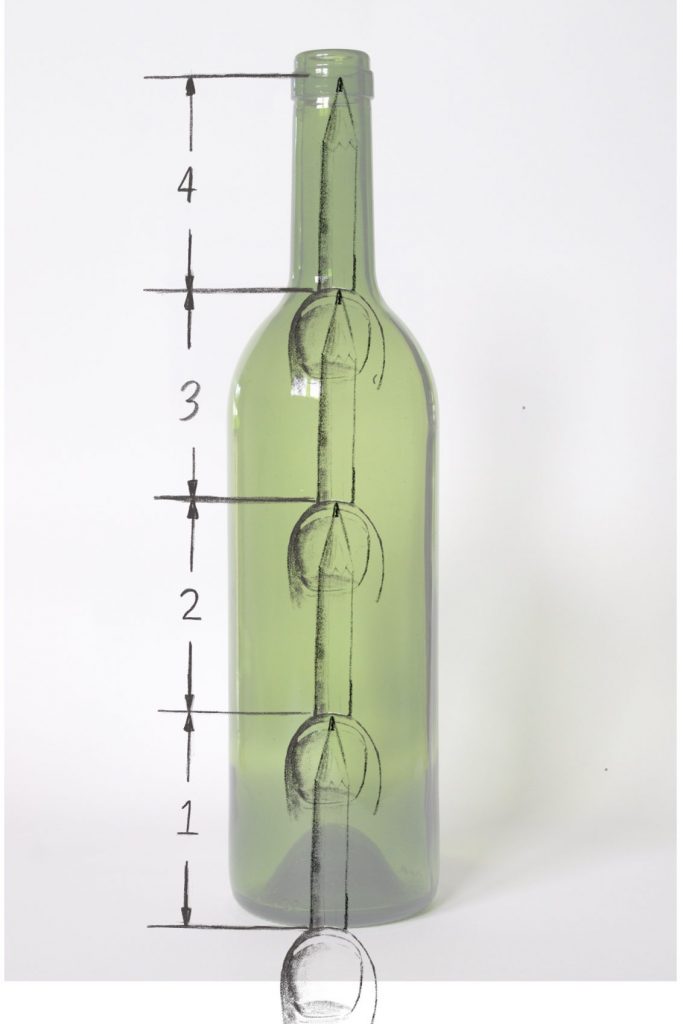
If you use the basic unit measurement you obtained from the width, you will find the bottle is almost four basic units high. Note the upper neck portion of the bottle is slightly over four basic units high and the bottom is at the lowest part of the ellipse (the bottom edge of the bottle). Give it a try and see if this is what you get.
 You can now look at your drawing of the same bottle and take a measurement across the width and find another basic unit. You can then use this basic unit to measure the height of the bottle on your drawing. The size of the bottle in your drawing doesn’t matter, it can be any size. What is most relevant in the drawing of the bottle is the proportion – that its height is a little over four times its width, just like the real bottle.
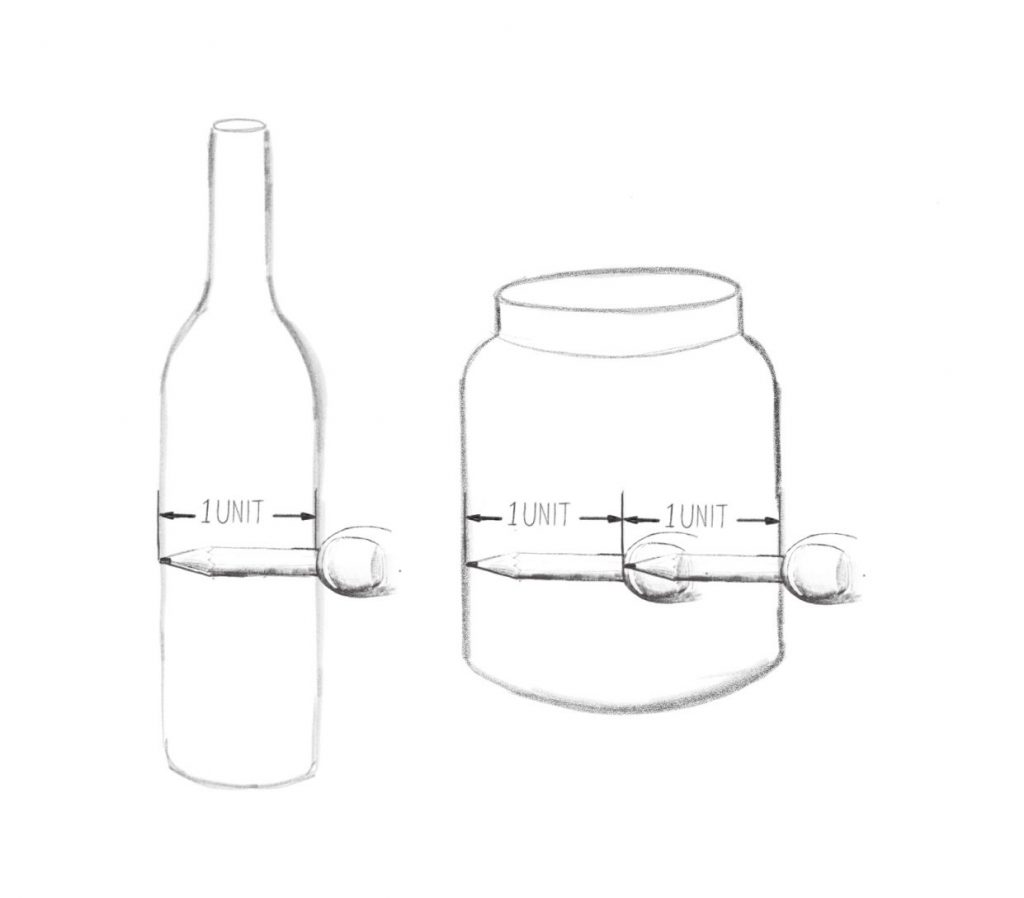
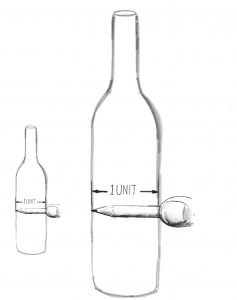
If there is another object next to the bottle, you can use that same basic unit to measure the other object, as well. By utilizing the basic unit from the first bottle to measure the second object, you will know how the two objects relate. This same basic unit can be used multiple times to measure any feature you wish and at any angle. This can help keep everything in your drawing in proportion, which we will cover below.
Pencil as an Angle finder
The next way you can use the pencil is for measuring angles.
 Again, think of your pencil as one hand on a clock. It is important to rotate the pencil around in an arc like it is a clock hand on a flat wall. With the pencil held up in front of you, rotate the pencil so it lines up with an angle in your subject. Imagine the angle of your pencil is around 2 o’clock, matching the angle of your subject. You will then compare the observed angle to the line on your drawing to make sure it is at the same angle as 2:00. If the subject is complex, then this tool can be used at many locations and various angles throughout the drawing area.
Let’s look at a subject in which we could use this tool. The image below has many angles where we can use the pencil as an angle finder.


Matti Blume, House, Ribnitz-Damgarten (P1070876), drawings added, CC BY-SA 4.0
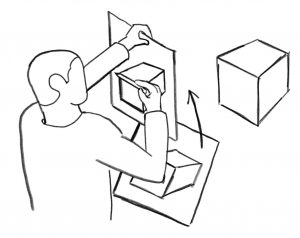
When measuring angles it helps to hold the drawing pad up to a position in front of you. If you line up the pencil with an angle on the subject and hold that arm still, you can place your drawing pad up against the pencil and check your angles. In the image below, the person would first look at the subject and line up the pencil with the top front of the cube. With the right arm held still, the person could hold up the drawing pad with their left hand and check to see if the angle is the same.
Pencil as an Alignment tool
Another way to use your pencil is to check if various features within the drawing area line up with each other. This tool is similar to how you would measure angles with your pencil, but this time you only hold it in a vertical or horizontal manner. If you notice that a couple features of your subject line up either vertically or horizontally, you can use your pencil to check this.
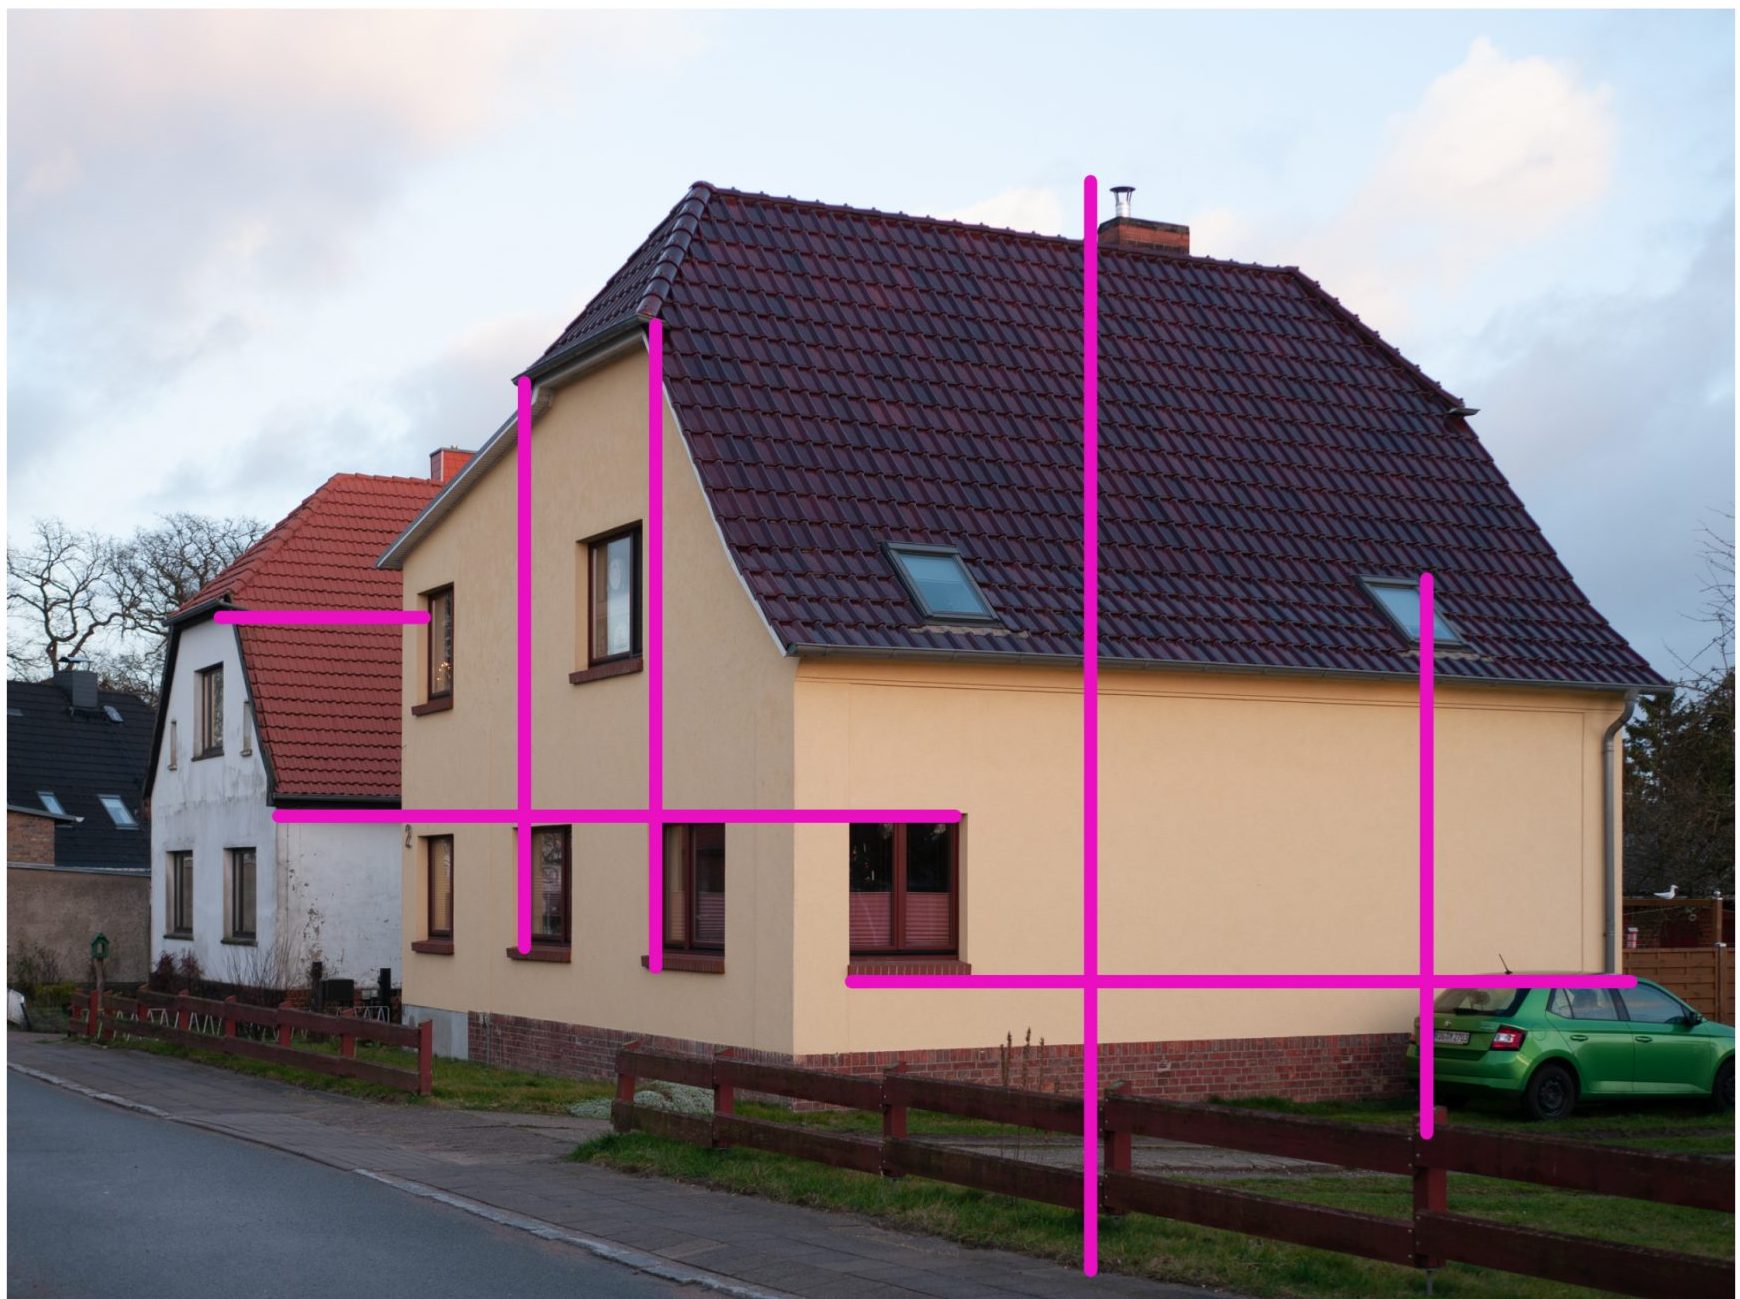
The magenta lines in the image to the left show a few items that line up, which can be checked with your pencil. For instance, the left edge of the chimney lines up with the left side of one of the fence posts. Sometimes it helps to move your pencil left to right or up and down to see if any unique features line up with each other.
Hands for Framing
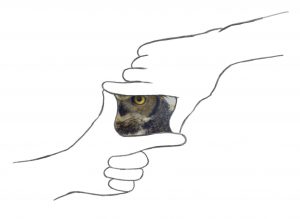
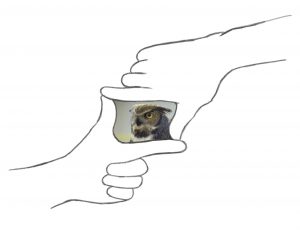
Another simple tool you have readily available are your hands. This tool comes in handy when you are not sure how you want to frame the area you intend to draw. Think of this tool as the zoom or cropping feature on your camera. To use this tool, create two “Ls” with your two hands and hold them up in a manner that creates a rectangle or square. As you move your hands in and out away from your eye you can visualize more or less of the area, similar to having zoom on a camera. In the left side image below, the owl fills the area too much. In the right side image, the owl is sized more accurately. You can now better visualize how you should fit the owl in your drawing area.
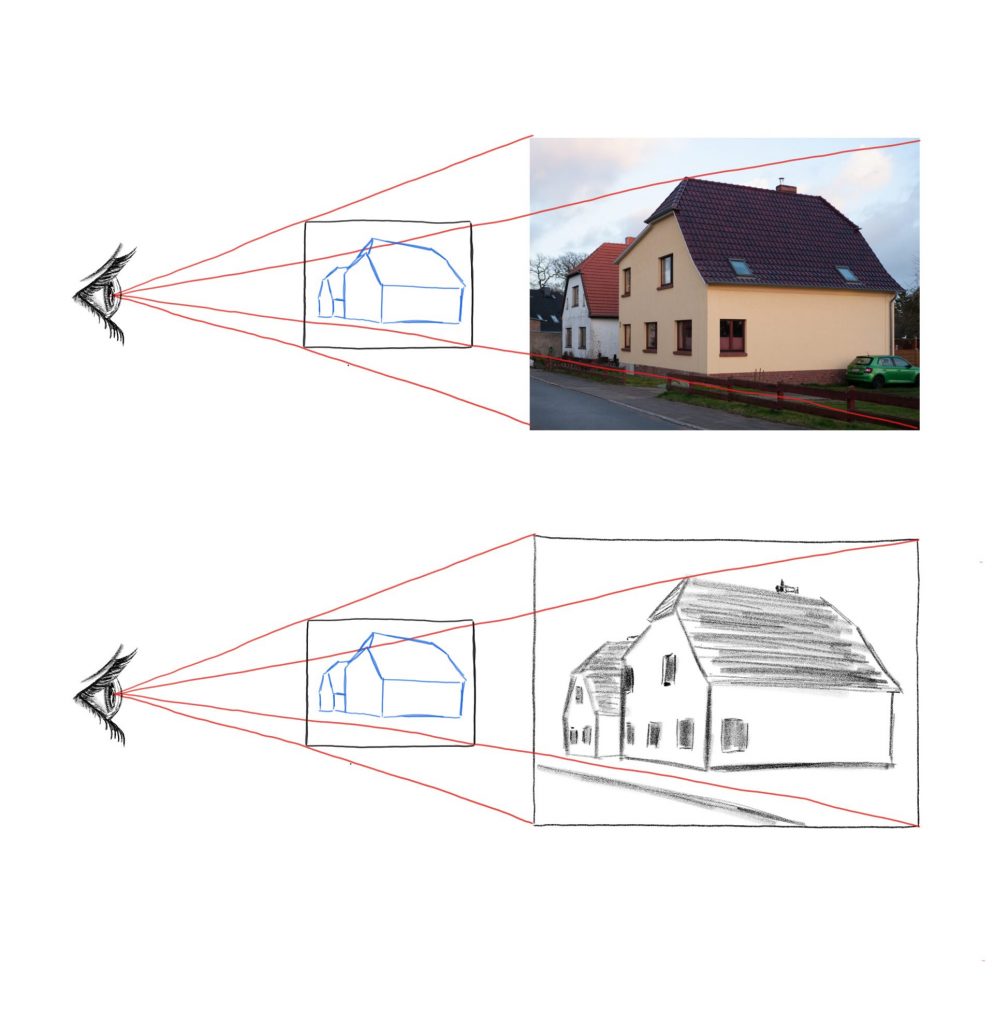
Picture plane and viewfinder
The picture plane and viewfinder have some similarities to framing your subject with your hands, however, you can do a few more things with it than with your hands. These two terms, picture plane and viewfinder, are sometimes used interchangeably, though they are not the same things. A viewfinder is a physical tool. The picture plane is the viewing and drawing area that the viewfinder helps create. Think of the viewfinder as a small window frame with a glass face that you can hold easily. Unlike using your hands just to frame, you can both frame and draw what you see directly on the viewfinder surface.
Your viewfinder can help you find many of the same clues as your pencil. With an erasable marker, crosshairs can be drawn on it. You can then move the crosshairs around to help search for vertical or horizontal alignment points. Angles can be drawn directly on the viewfinder when held up to the subject and then compared to your drawing. Two parallel lines that create a basic unit can even be drawn on the viewfinder for measuring.
In the image below, you see two eyes on the left. The top eye is looking through the viewfinder at the subject you are drawing. What you see within the frame of the viewfinder is what is considered the picture plane.
What is nice about the viewfinder is that you are able to hold it up in front of you and draw your subject directly on it with your wet or dry marker. You are then able to align your drawing on the viewfinder with your drawing area. You can check to see if your drawing is similar to what you drew on the picture plane. It is really important to keep your viewfinder steady while drawing on it. It helps to keep the drawing on your viewfinder simple and check alignment for each line you draw.
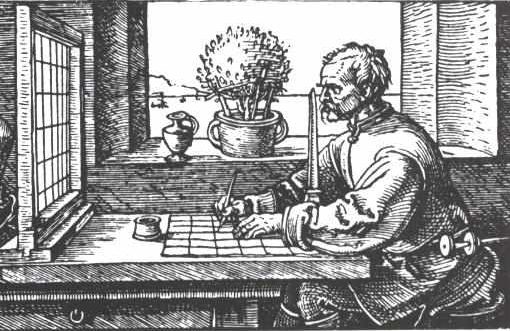
A viewfinder can either be purchased or you can make one yourself. A viewfinder does not need to be large. It can have a window size of around 3-4 inches or a little more. You can create a simple viewfinder out of a transparency sheet taped to piece of cardboard. What works great is a mat board picture frame wrapped in plastic shipping material, which you can draw on directly.
Grids or Guidelines
Another measurement tool you can utilize is a grid. A grid has both horizontal and vertical lines that are spaced evenly over the area you are drawing to help pinpoint various features or locations. A grid can either be drawn on a photo, as shown in the image below, or you can draw a grid on your viewfinder and hold that up to measure with. A grid can help with increasing or decreasing the size of your drawing, due to the ability of altering the size of the grid. Just as long as the number of lines and width and height ratio in the grid are the same, the drawing should come out the same as the subject. Below is an image of a bird with an evenly spaced grid placed over it. You can now find some clues for the placement of some of the main elements within the image. Can you find some features that relate to the grid?
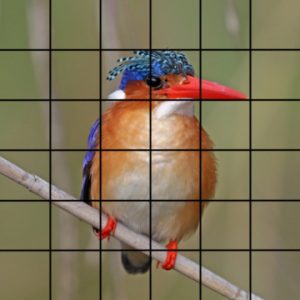
One feature that stands out is the tip of the beak. There are also a couple of other areas that may not be at a grid point, but with the help of the grid we can get a rough idea. In the image below you will notice three more crosses marked, such as the placement of the eye and where the two ends of the branch go off the page. Another thing you can look at is how the overall dimensions or sizing of the bird fit into a box shape and how this fits within the grid. These key features are marked on the image below with “+” and the white box surrounding the bird.
The drawback to using a grid in your drawing process is that it can be somewhat time consuming. First, a grid has to be placed in front of a subject by some means. This could either be done by taking a photo of the subject and then creating a grid on top, like the example above, or a grid could be incorporated into your viewfinder with lines drawn on the window. A grid would then be drawn lightly on your drawing paper. You complete your drawing, then erase all the grid lines.
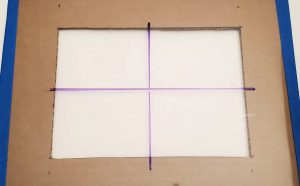
An easier way to incorporate a basic grid is to put tick marks around the perimeter of both your subject area and drawing area. An easy way to do this is to divide both the subject and drawing in four equal parts. The would first be in half, and then these two distances in half again to get four equal distances. You will then end up with four equally spaced areas. This is also an easy and quick way to increase or decrease the size of your drawing in comparison to the subject area.
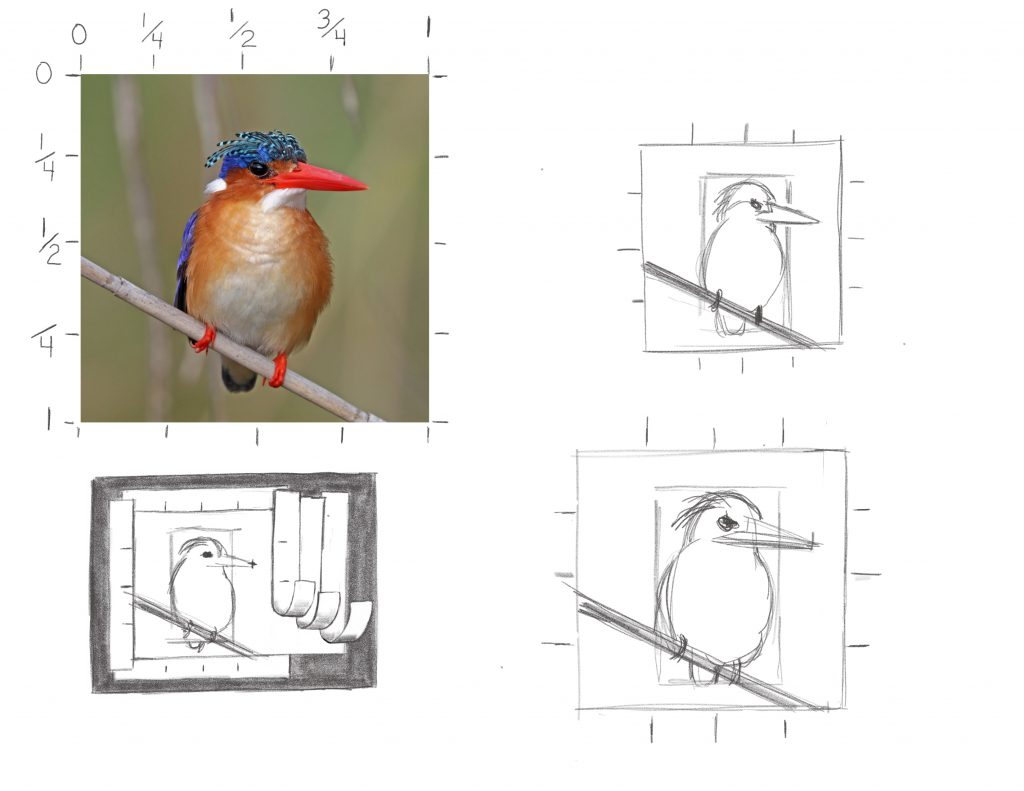
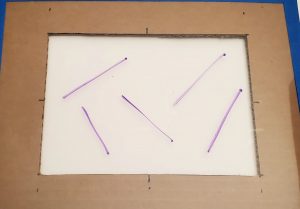
In the example to the left, the top right corner image shows what it looks like when you divide the area in half first to obtain the 1/2 mark and then again to create the 1/4 and 3/4 marks. The lower left drawing is of a rectangular viewfinder, which has been cropped with tape so it fits the square dimensions of this subject area. The area is then framed with more tape and tick marks are then placed around the perimeter. Notice how the two drawings on the right are easily scaled up or down by altering the spacing of the tick marks. Also, when dividing the perimeter you do not need a ruler. Use your pencil similarly to how you found a basic unit to create even divisions.
Other visualization methods
There are a few other visualization methods that we can use that do not require physical tools. However, these visualization methods can utilize the physical tools and methods listed above to help.
Negative space
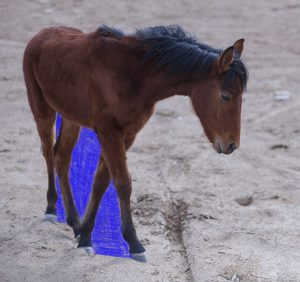
One way of visualizing a subject is to not look at the actual subject. This may seem strange, however, there may be shapes that are behind the object that helps define the subject. Look past the main subject and find shapes that are not typically the main focus. In the example below, we could either look only at the horse, the areas behind the horse, or a combination of both. The blue colored shapes are areas in negative space that we could consider when drawing the horse. If the horse is correctly drawn, then the shapes in the blue areas would also look correct.
Proportions
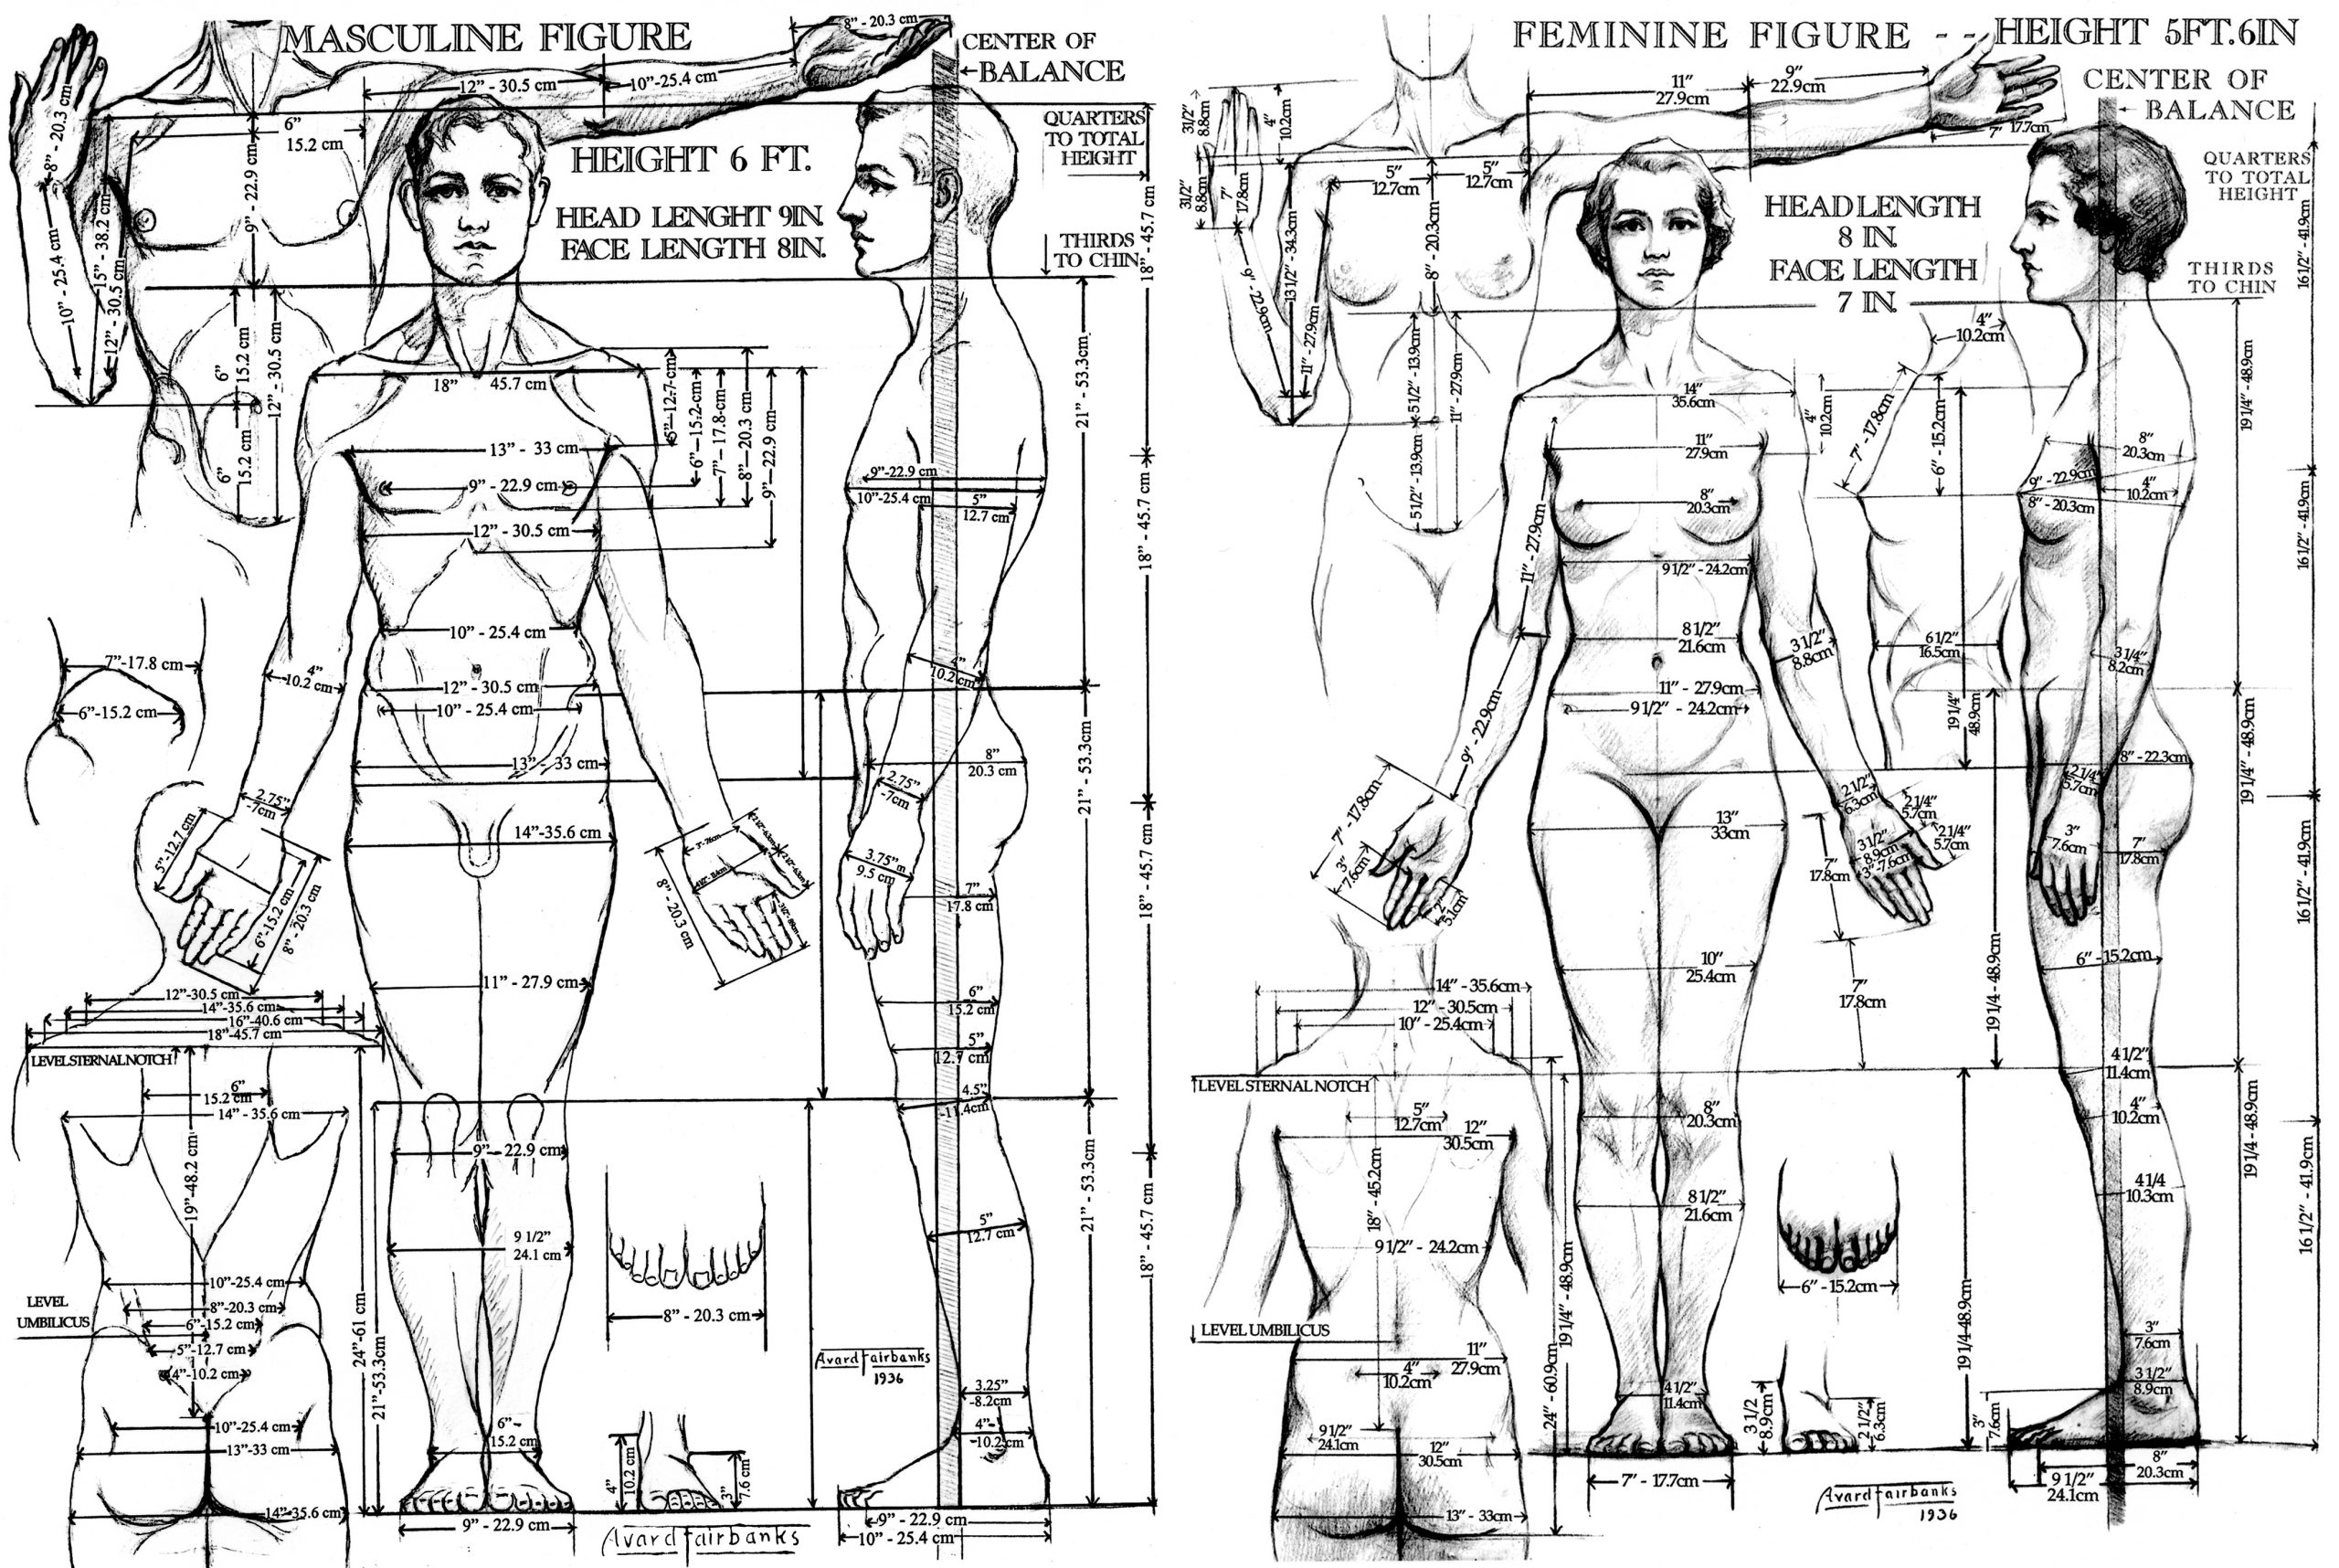
When we talk about proportions, we are talking about how various parts of a subject relate to each other in size. We could simply just observe that one item is bigger than another, or we could get more accurate and measure, using something like the basic unit or ruler. Below is a highly detailed representation of how the proportions of the human figure can be measured. Every object we intend to draw will have a proportion that we can measure and compare to another object. When drawing, the idea of how one object’s size relates to another should be constantly considered. In the image below, the figures are precisely measured. However, we can instead make some estimates. For example, we could look at how big the head is in relation to the rest of the body, or we could use the head height as a basic unit to measure a person’s overall height.
Finding Basic Shapes
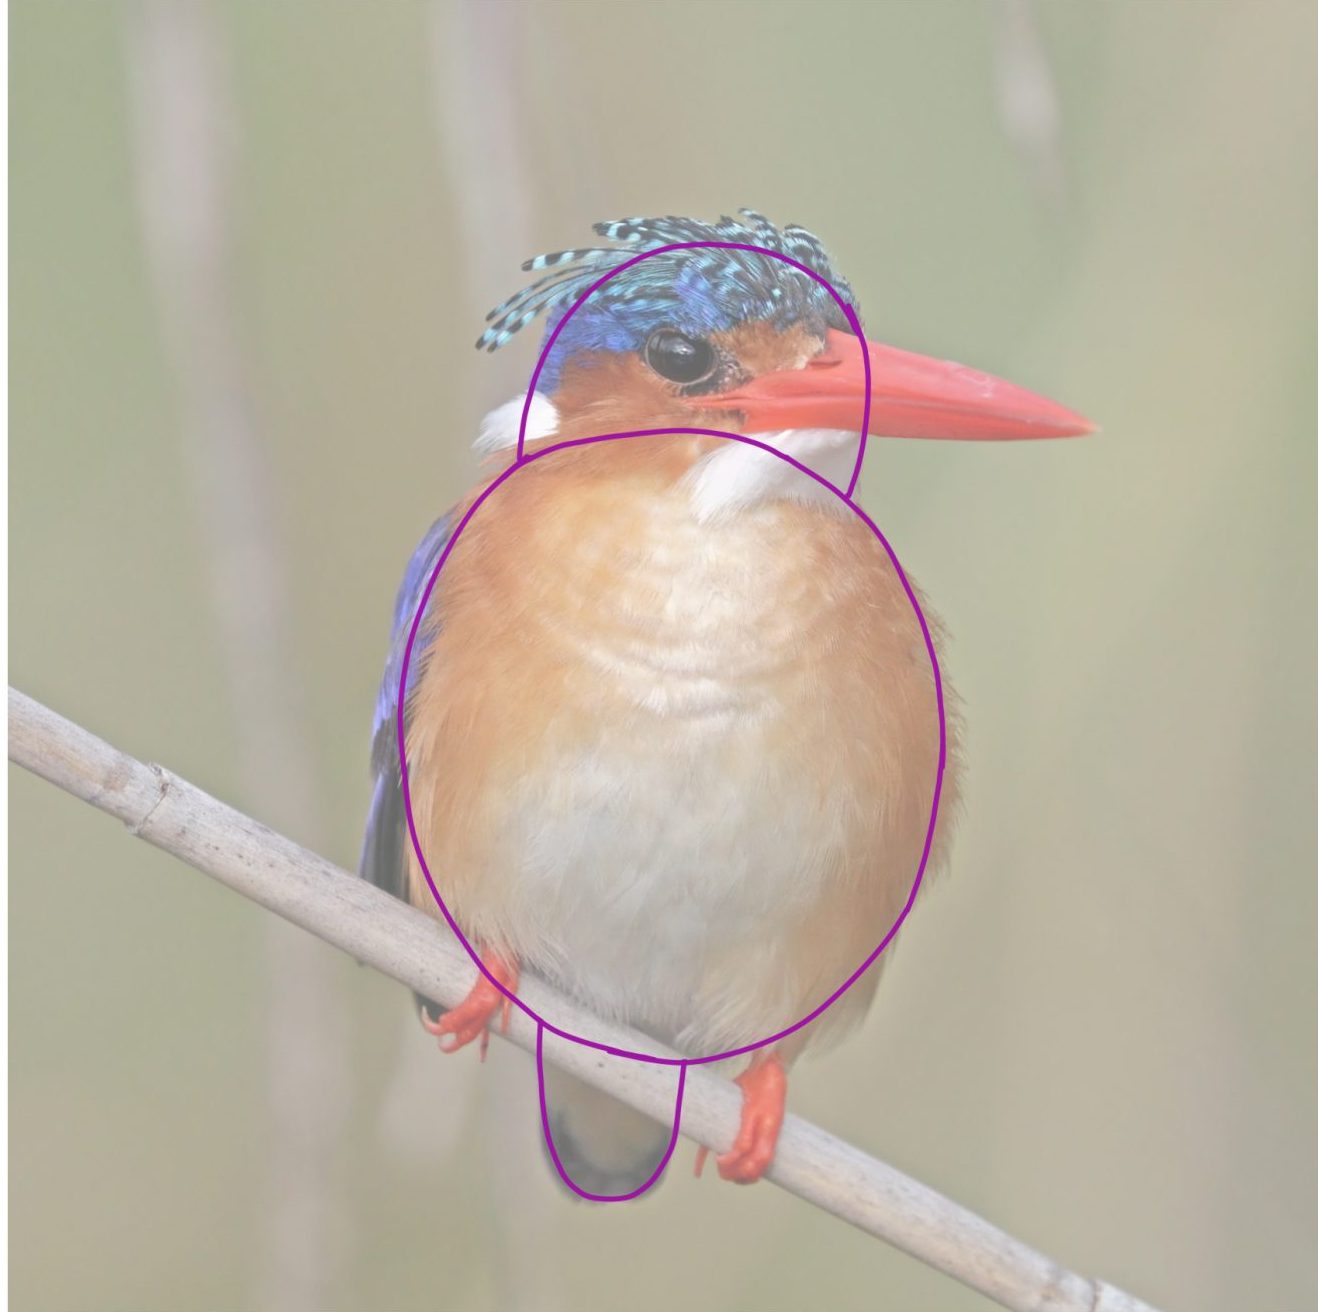
Another way to look at a subject is to identify shapes within the subject. This can help break down a complex subject into simple basic shapes. These shapes can be drawn lightly in the initial phases of a drawing to help figure out how the proportions relate to each other. In the image below, the bird’s main body is broken up into three main shapes: the body, head, and tail. Note how the shapes are not exact, however, they do represent a good idea of the sizing of each part. If you draw these three basic shapes first, then you can quickly see it they are sized correctly and make alterations prior to further development. Also, if the image had more birds of varying sizes, you could compare the size of each bird’s basic shape and compare their proportions to one another.
Now remember, these tools can be use at any time during the drawing process. When and where you utilize them will differ from person to person. As your observational skills develop, “seeing” your subject will become more intuitive and natural.

.jpg)
_Namibia.jpg)