
Chapter 5 The Drawing Process
The drawing process
Learning Objectives
By the end of this chapter, you should be able to:
Implement various observational skills and tools into your drawing process.
Now that you have some understanding of how an artist “sees”, you can start drawing more complete subjects. For this chapter, you will implement some of the techniques explained in chapter four to create some basic line drawings. Recall from the introduction drawing a duck is more difficult without close observation. It is crucial to continually compare your drawing to your subject during the drawing phase. Try to split your attention between the drawing and subject equally. Remember, drawing is as much about observation as it is about putting pencil to paper.
Any of the drawing tools and visual aids from chapter four can be utilized in any order and at any point during your drawing process. It is important to trust what the tools and observations are telling you, even if you do not believe what you are seeing. One of the biggest hurdles while drawing is trusting your eye and not going with the misconceptions of what your brain is telling you to draw.
Basic Steps in the Drawing Process
You now know how to warm up and create various lines and have observational tools at your disposal. Where do you start? How do you initiate a drawing? Below are some basic steps to think about at the start of a drawing. Any initial line work, including guide lines, tick marks, or parts of the actual object, should start out as light as possible, preferably using a hard pencil. If you start light, it makes it easier to fix mistakes by not having to erase as much or maybe at all. If you make a mistake, for instance if the line is in the wrong position or the curve is not correct, do not erase it. Just make adjustments to it by drawing a new, slightly altered line. Try to feel out the form with multiple light lines. Another benefit to starting a drawing lightly is if you are going to add certain types of shading, in which you may not need to erase the lines at all.
Basic step by step drawing process:
- Frame your subject area and find the height to width ratio of the picture plane. You can either use your viewfinder or your pencil to do so. Remember, the shape of your viewfinder window and the shape of your drawing area (which isn’t necessarily the same as your entire sheet of paper) should be the same ratio.
- Frame your drawing area to the same height to width ratio. The area can be scaled up or down as much as you want, just as long as the ratio is the same as the picture plane you see in the viewfinder. What is the shape of your window? If it is a rectangle, then the shape of the rectangle needs to be the same for your viewfinder and your drawing area.
- Closely look over the area you will draw. Use any observational tools to help you analyze what you are seeing. Add any tick marks or guide lines that may help you with placing distinctive features of the object(s).
- Slowly and lightly add in the distinct main elements of your subject to the drawing. Work around the drawing as a whole. Try not to dwell on or develop one area at a time. As the drawing develops, keep using your visualization tools to compare your subject to your drawing. At the end of this step, you should have a generalized line drawing of all main elements.
- After all the main elements are in, sit back and do a little extra comparing of your drawing to your subject before going any further. Even though you may have been closely observing in your drawing process so far, it is good to make sure you didn’t get off track. Go over the entire area utilizing the measurement tools to see if you can find anything wrong. If you see anything incorrect, fix it with a new line. Remember, everything is still lightly drawn and easy to repair.
- Once the main elements look correct, it is time for refinement. You have to ask yourself how far you want to push the details and shading. At this point is when your drawing really becomes yours. How the drawing is further developed with shading and details can vary greatly between one person to the next. You can now switch to a darker pencil and put in the middle grays or darken up the line work. There are many directions you can go in. Again, don’t dwell on one area. Move around and develop the whole of the drawing at the same rate.
- At the end of the drawing process is when any fine details or dark shading is added. It is better to put these in at the end of the drawing process because their location will be well established. Dark shading is hard to erase and you don’t want to have to redraw fine details that took a long time to develop.
implementing the tools and other aids
In the last chapter we covered how to use tools and visual aids to help us “see” the subject in a different way. Now we need to tie it in with the drawing process. These tools can be used at any time during the drawing process. When and where you utilize them will differ from person to person. As your observational skills develop, “seeing” your subject will become more intuitive and natural.
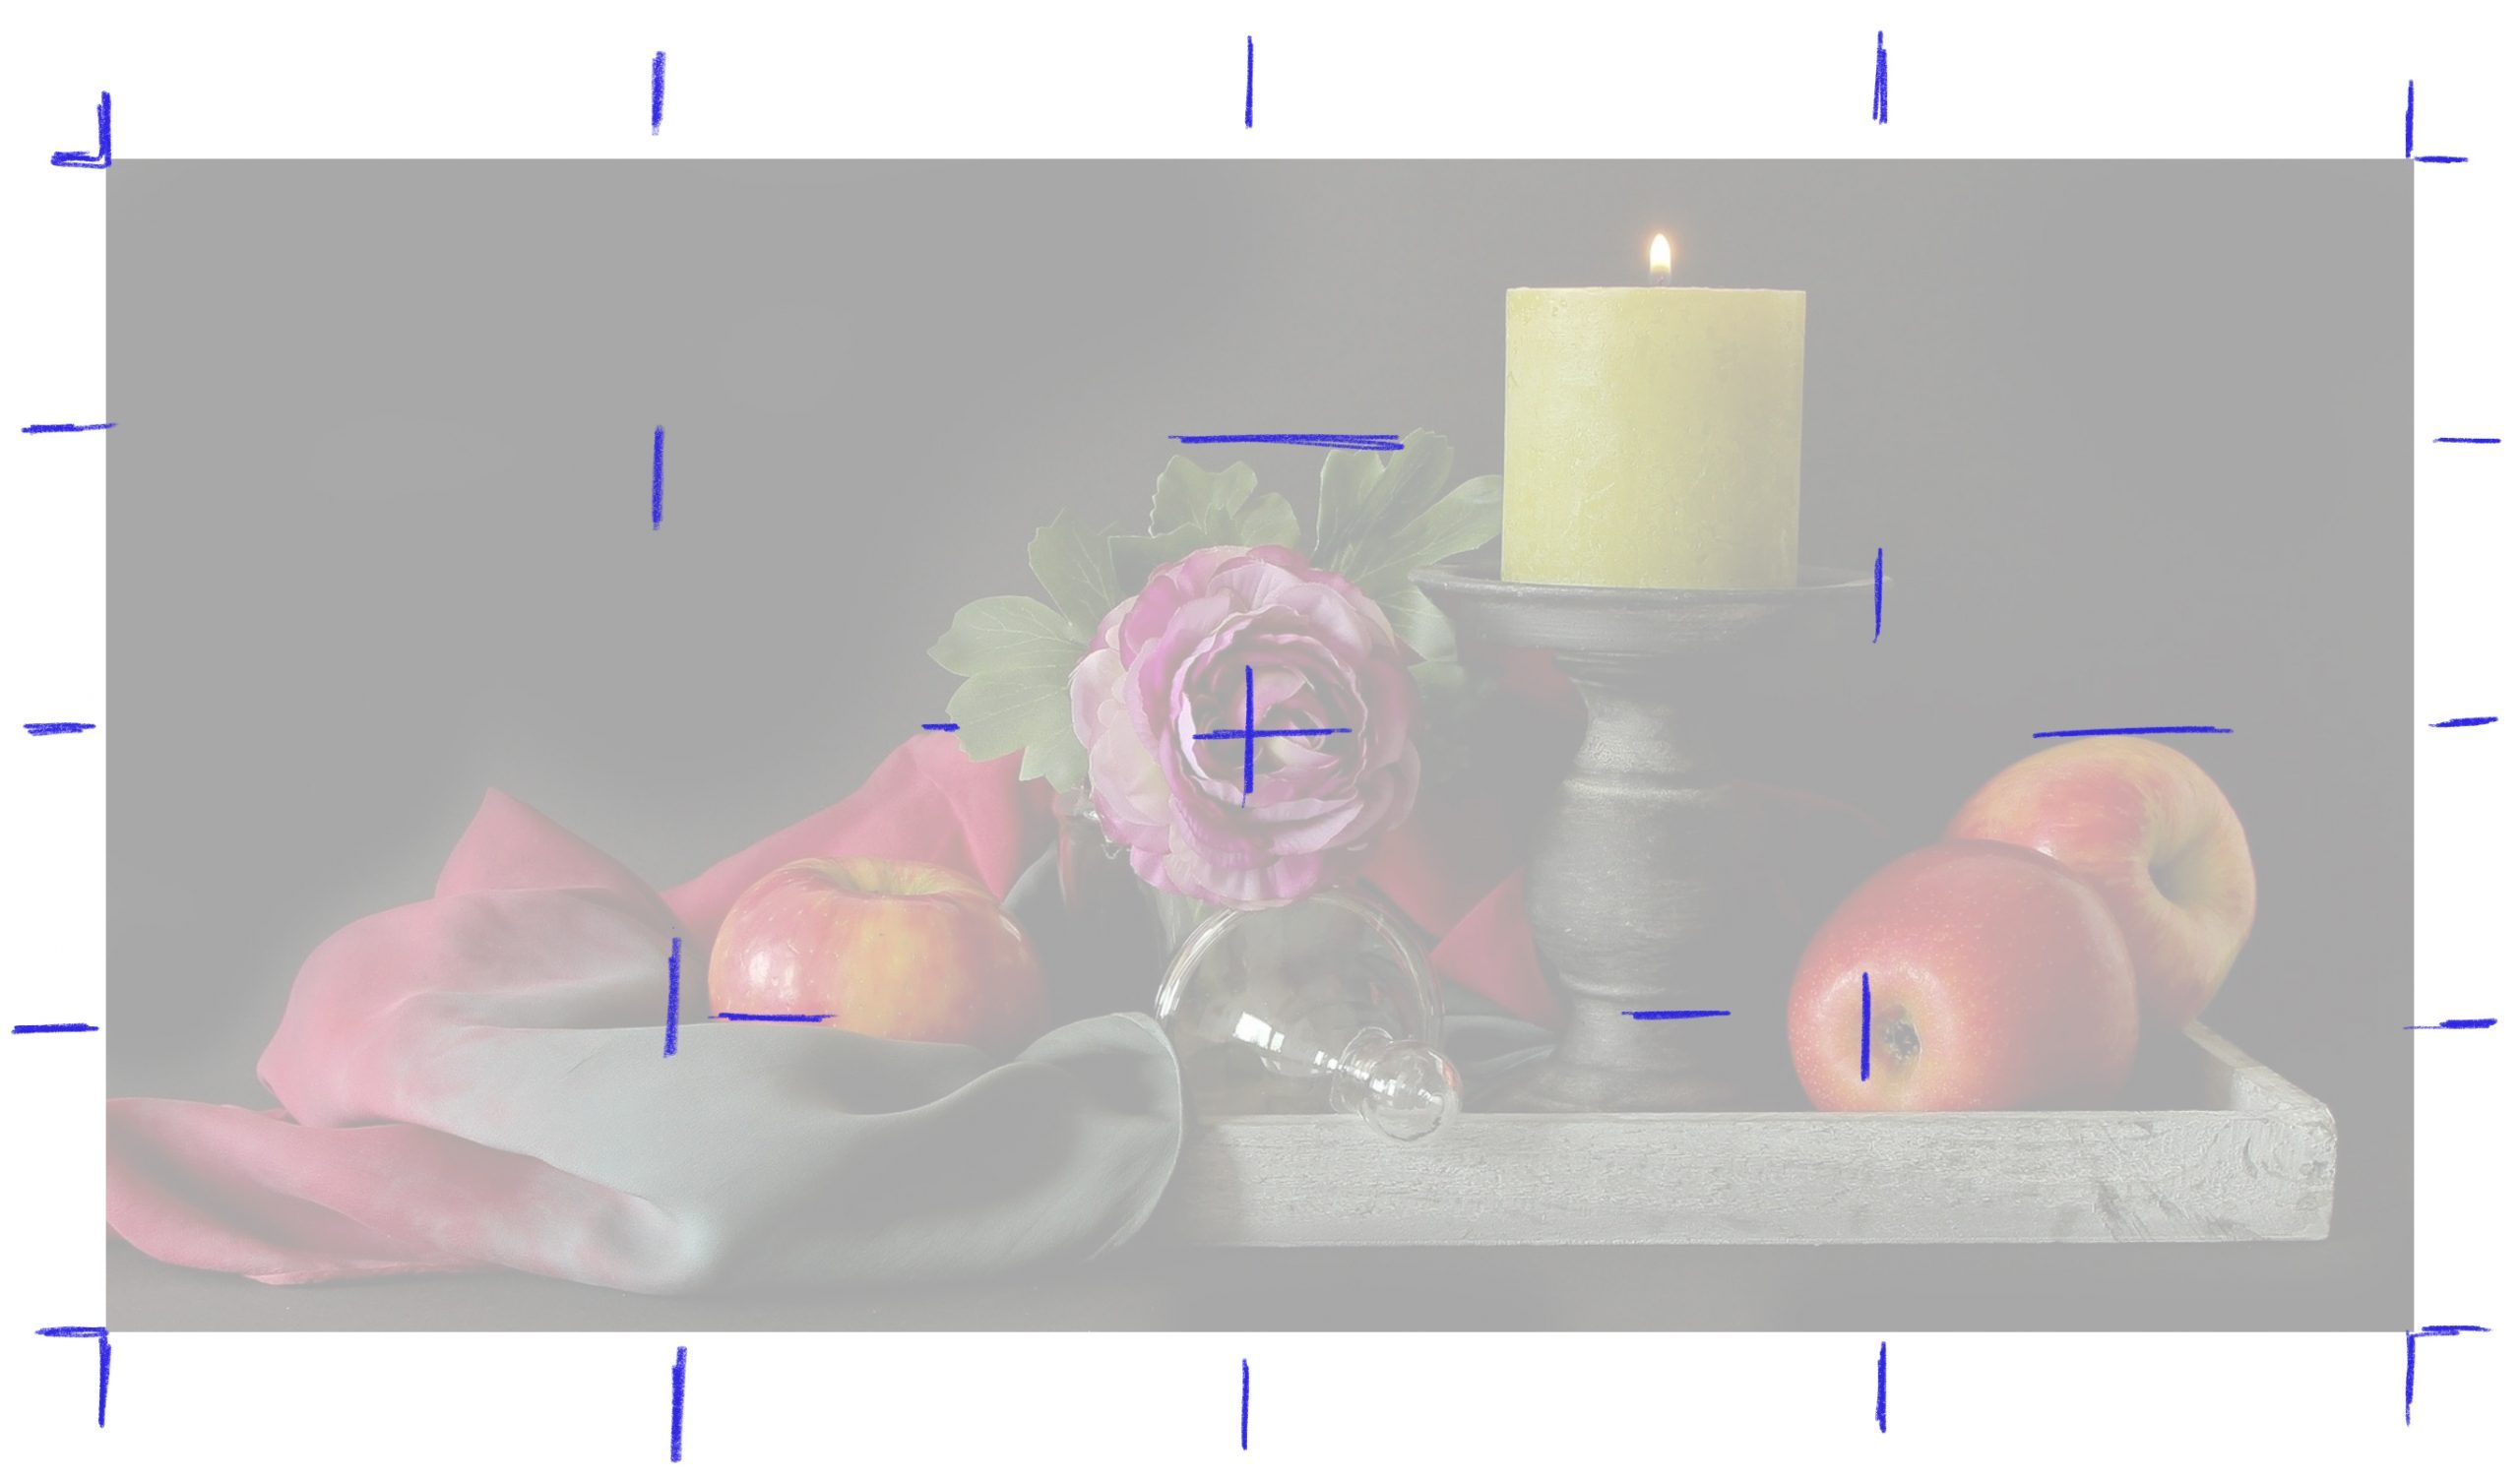
Below is a complex image of a still life that we will be covering a bit more in chapter eight. The image may look daunting, however, you now have some tools to help you “see” the area like an artist. We will first take a look at the image to “see” anything that may help us understand the subject.

Look over the image and use your observational tools and techniques to find some clues. Below are some options you could use to look at this image.
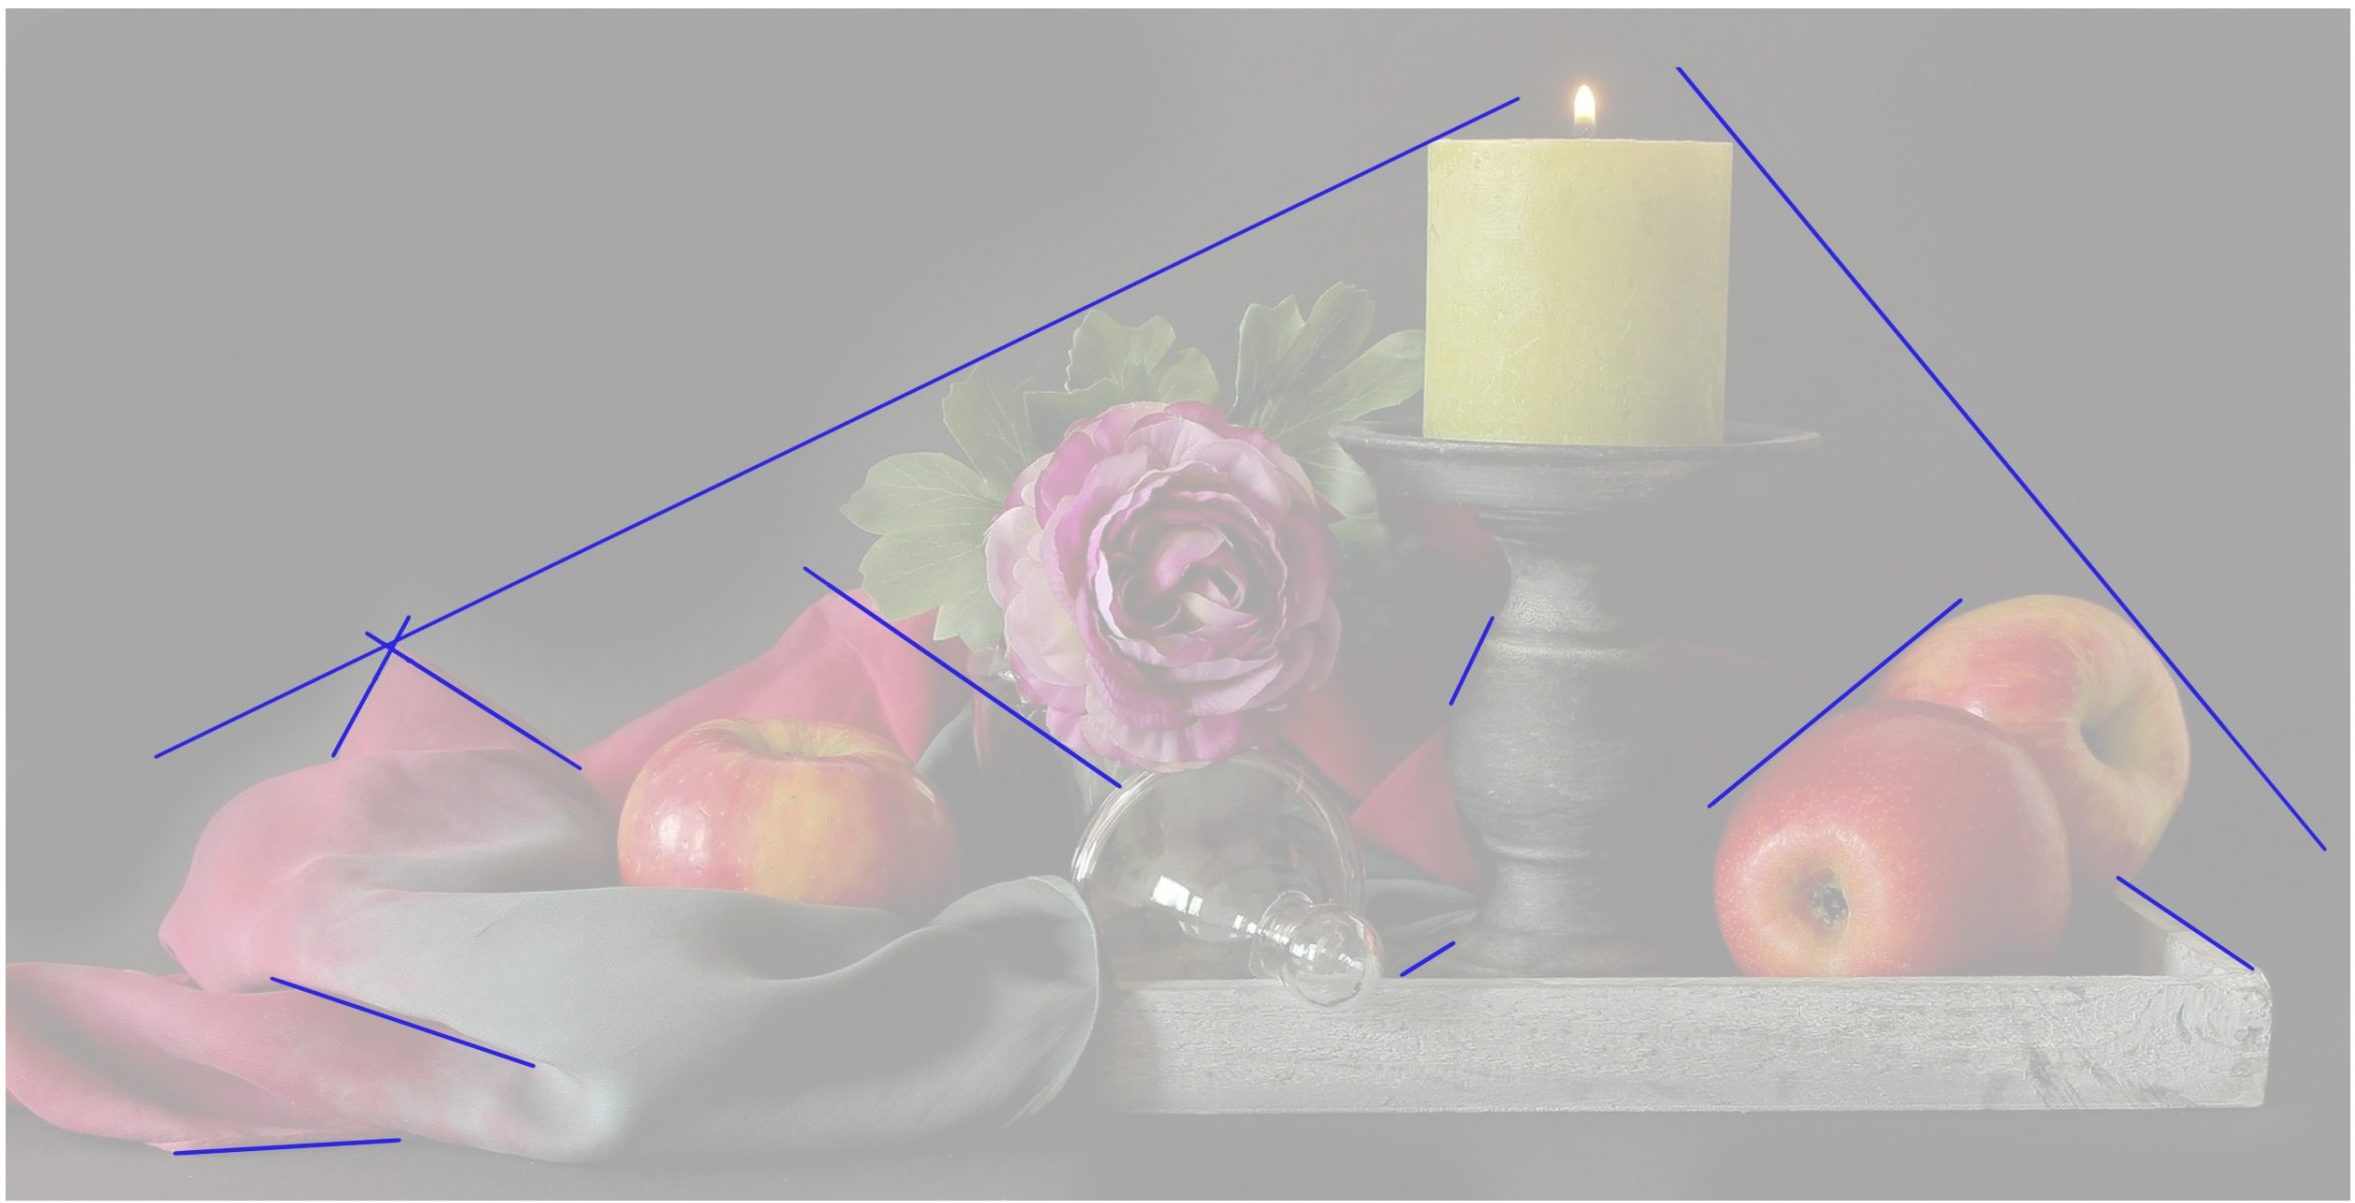
First, you can find some of the hidden angles that may aid in your visualization process. These angles can be found with your pencil or drawn on your viewfinder. There are not many objects that have straight lines in this image, other than the wooden tray at the bottom. However, there are angled lines you can visualize between two points that may stand out to you. An example of this is the upper left corner of the candle and the upper left peak of the cloth. Another angled line is created by a line touching the outer left curves of the two apples on the right. There may be an endless amount of angles that one could find hidden within an image using the method of finding distinct points and the angle between them.
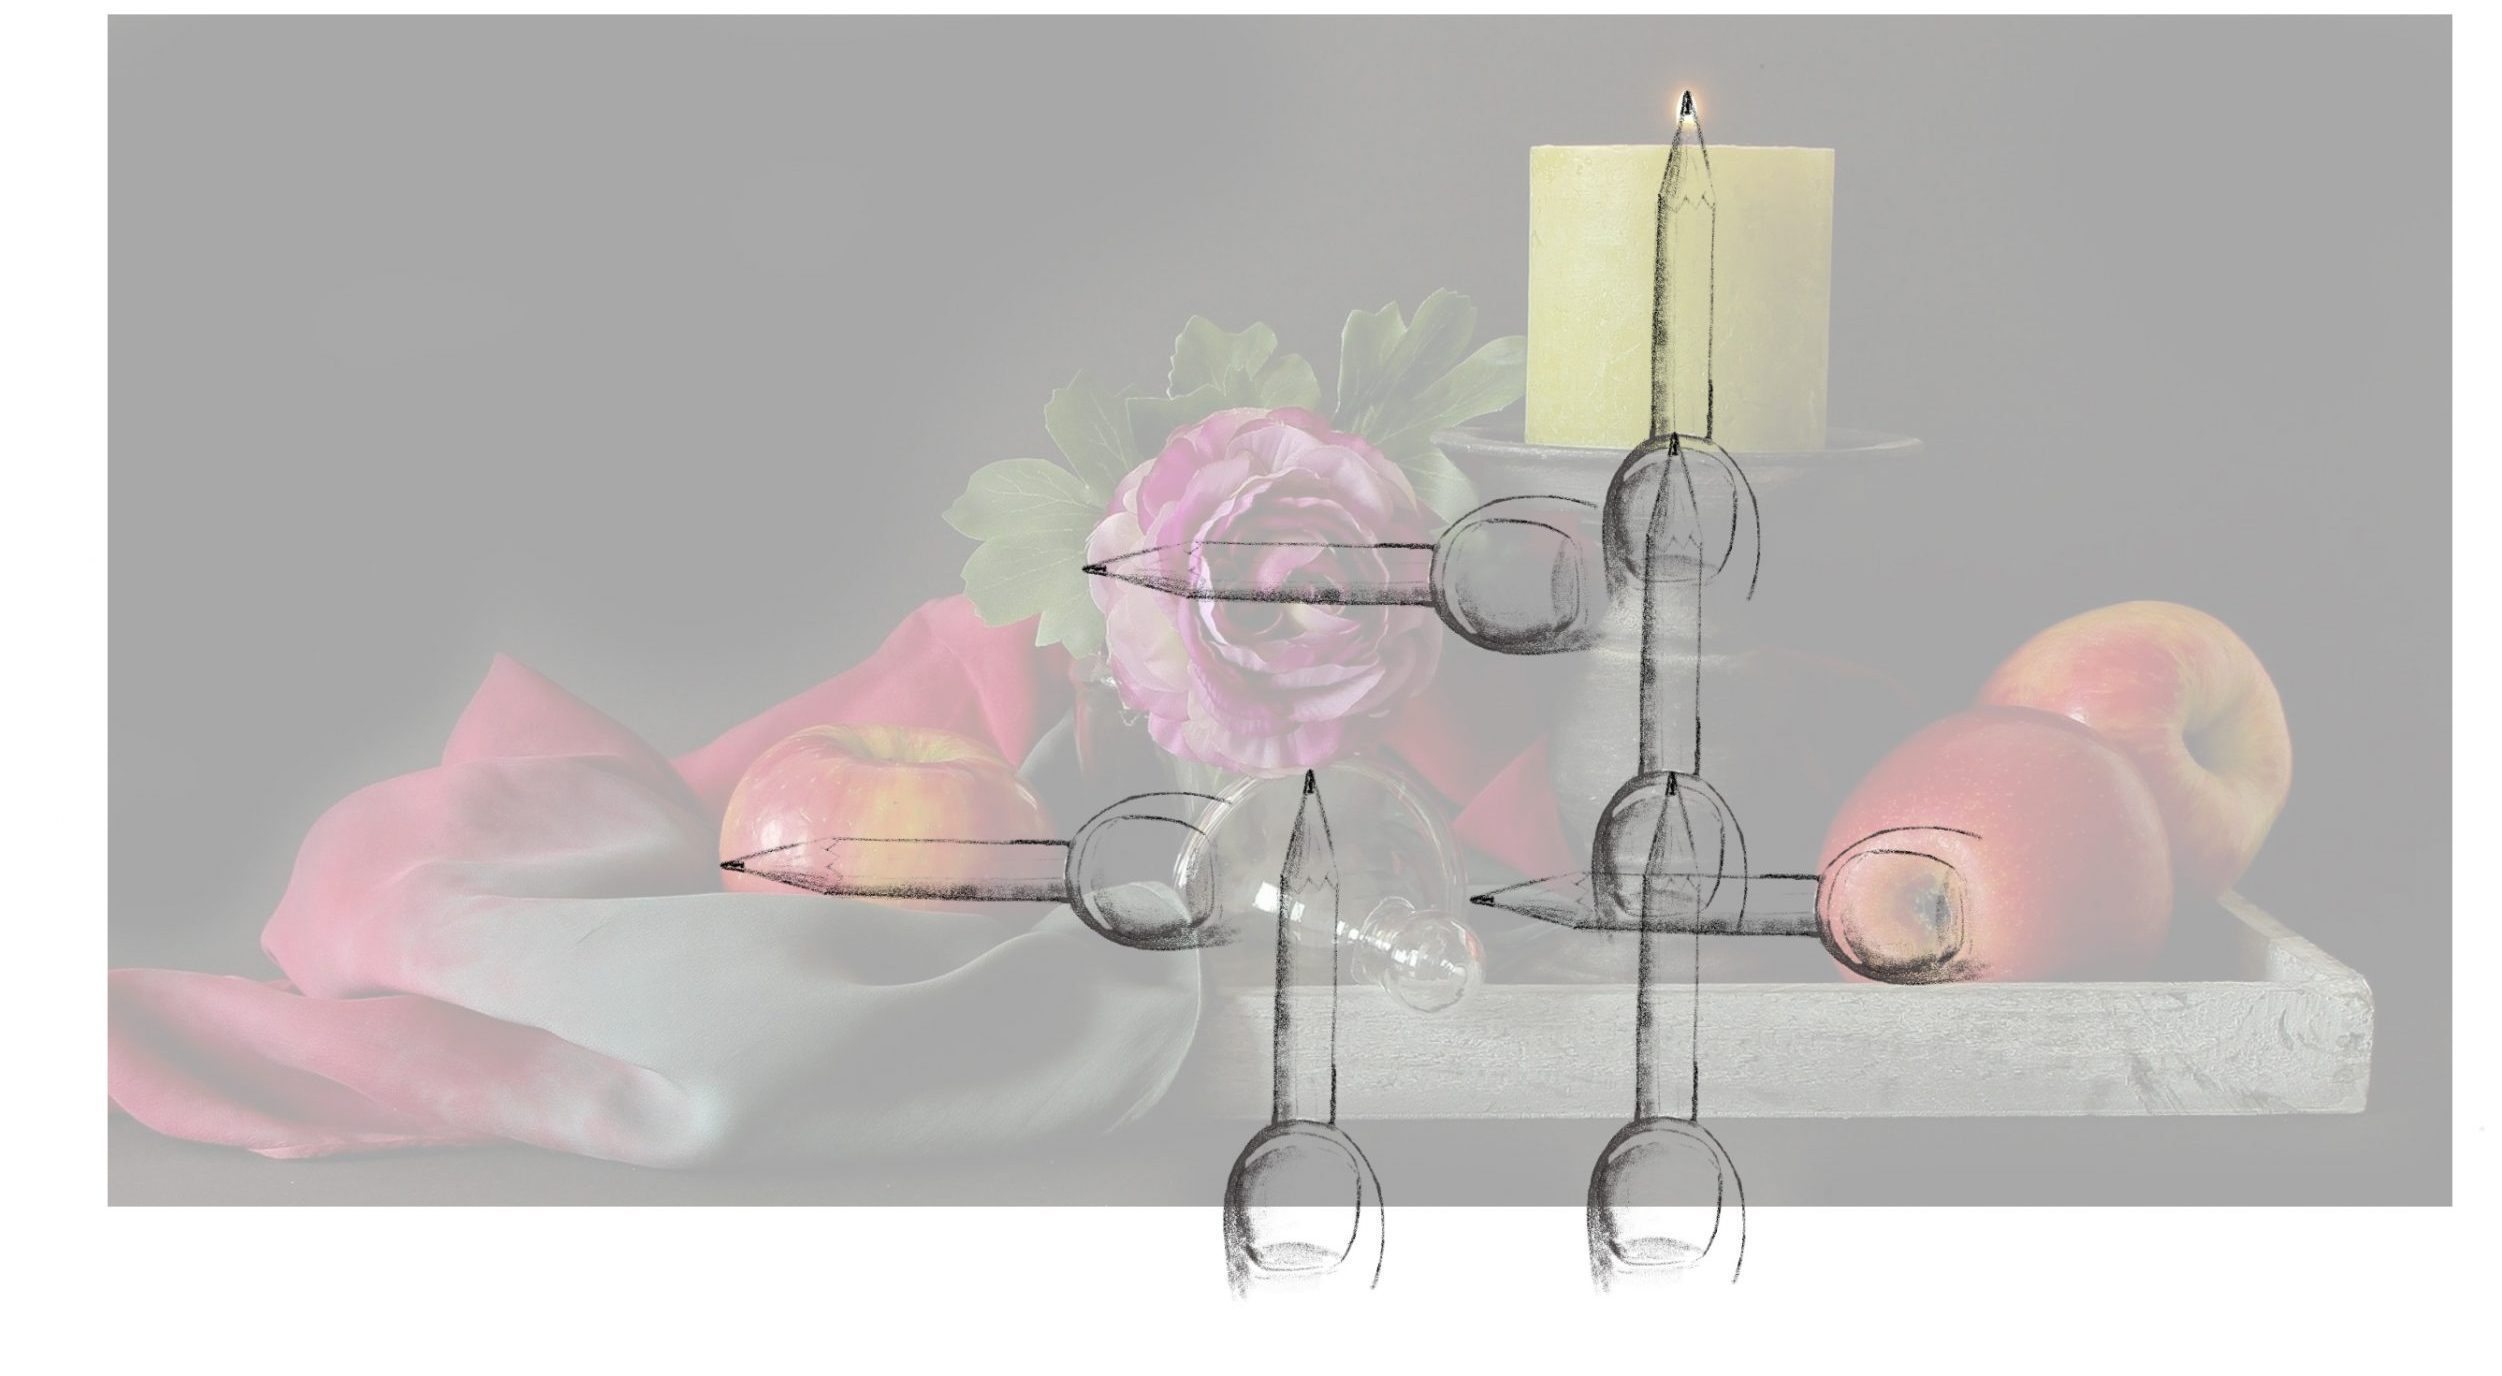
Now let’s find some initial basic units to go along with your other measurements. This can be done with a pencil or viewfinder. For this example, one basic unit is using the width of the apple on the left. If you continue to use that basic unit, you will find the flower is also one basic unit wide. The distance from the bottom of the wood tray to the top of the glass object is one basic unit high. Also, the bottom of the wood tray to the top of the candle flame is three basic units. These are only a few ways you can use the basic unit. You can also use the basic unit in conjunction with the angles you just found. You do not need to adhere to the vertical or horizontal plane.
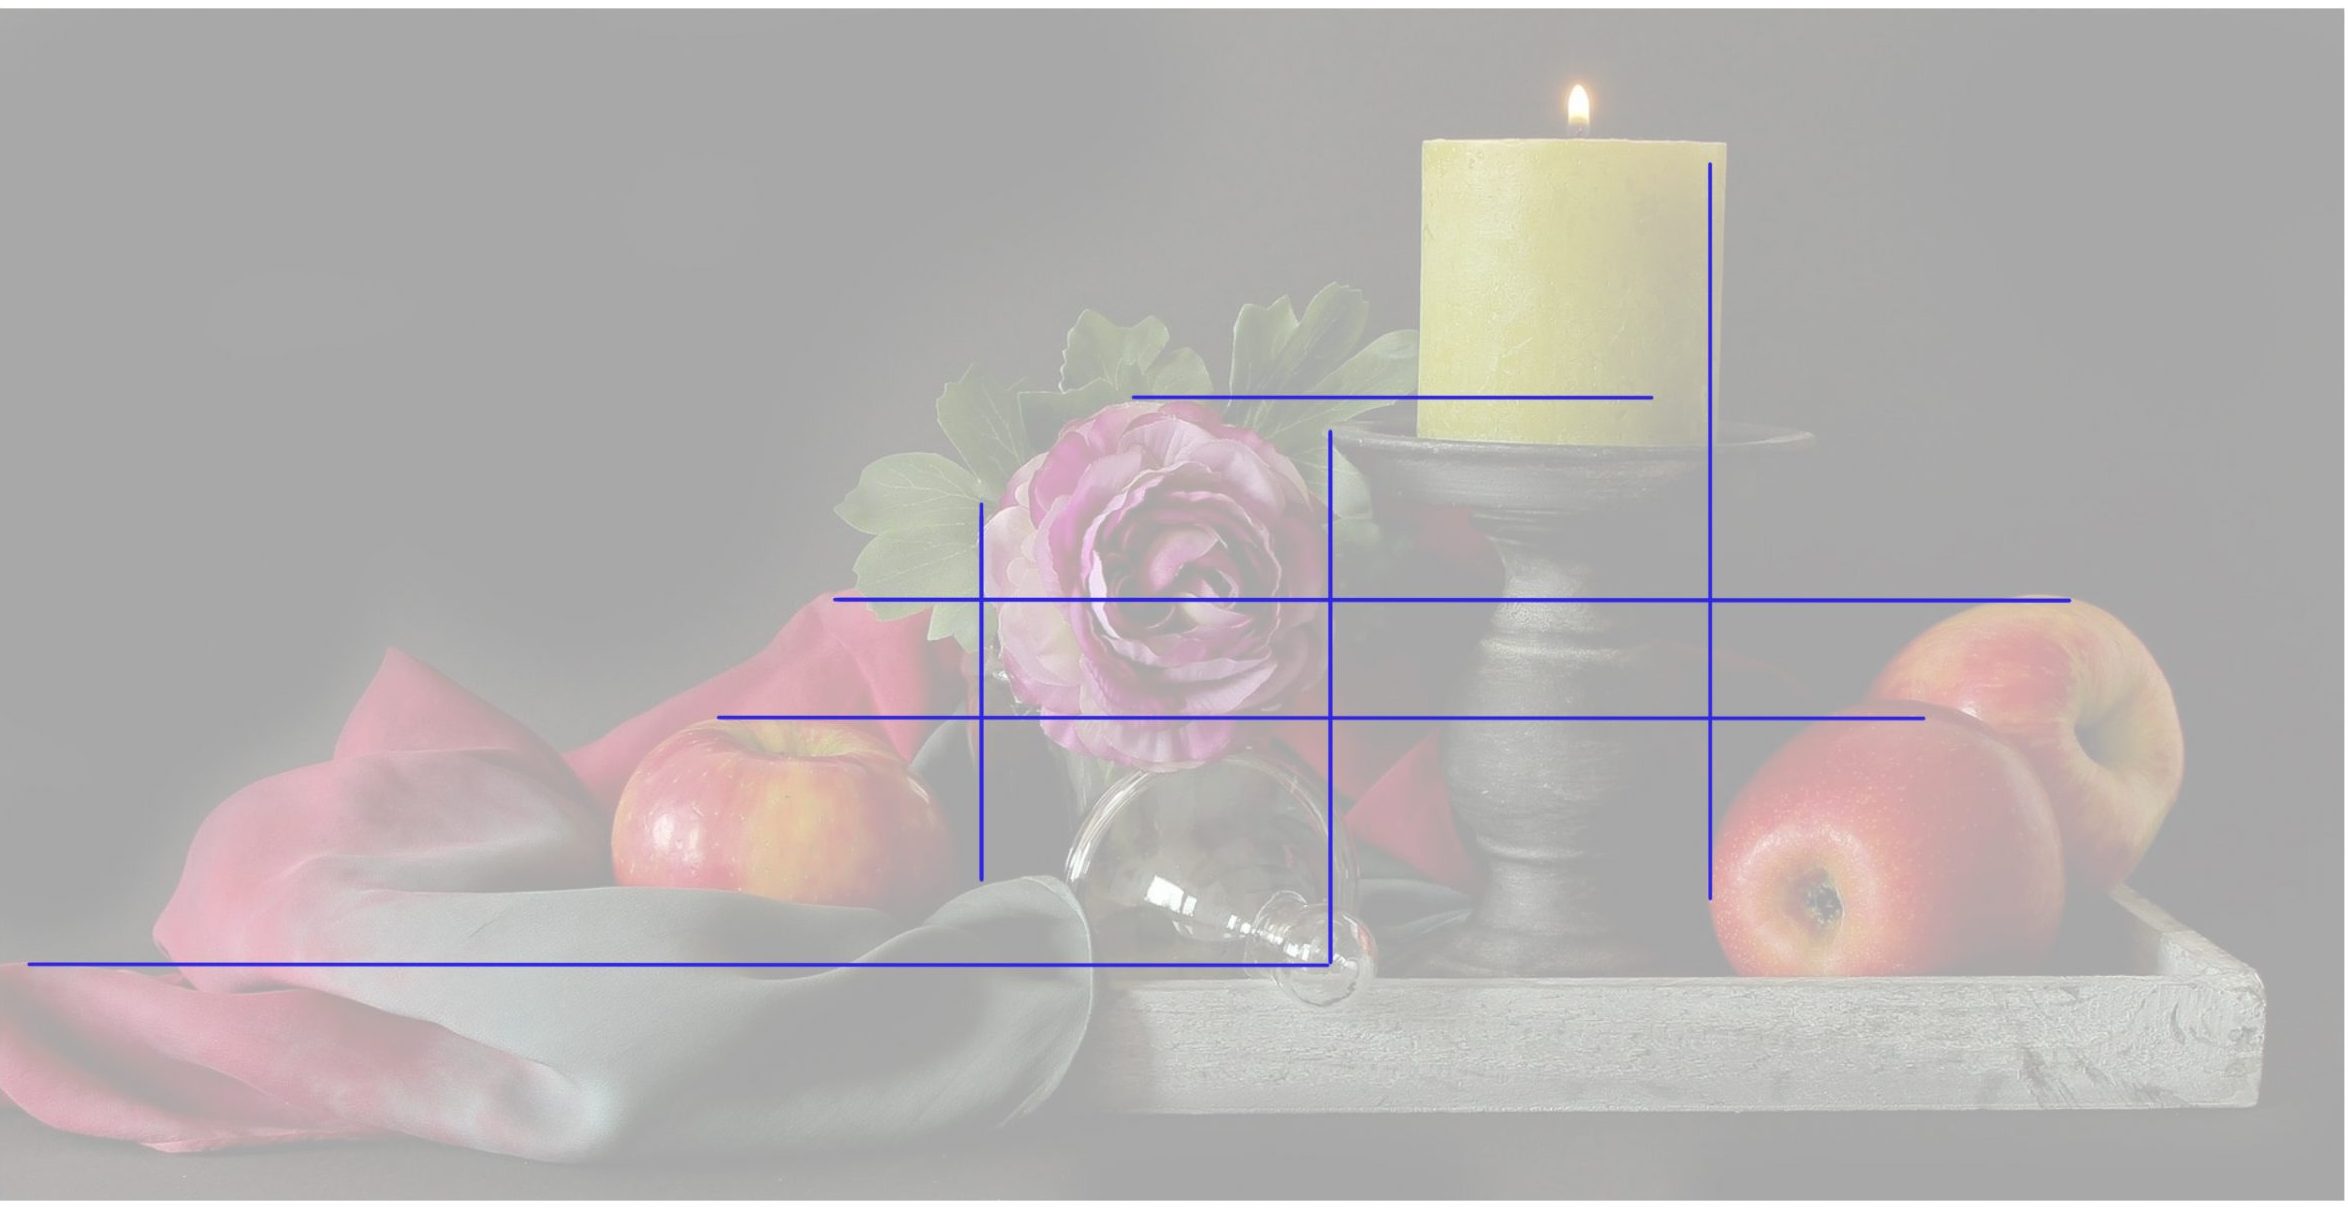
Another thing you can do is look to see if there are any horizontal or vertical relationships between any of the objects. For this step you can either use your pencil or viewfinder to find these relations. You may notice how the outer left edge of the middle apple lines up vertically with the right edge of the candle. The top of the far right apple lines up horizontally with the center of the flower and the top point of the cloth. The top edge of the wood tray lines up with the center of the round end of the glass object. The center point made by the end of the glass object also lines up vertically with the right side of the flower.

Lastly, you can look for the spaces between your main objects. This is negative space. In the image to the left you will find a shape that makes up the area between the candle holder on the right and the glass object and flower on the left.
Now that you had a look at the subject, you can get started with drawing. In the next section you will be walked through how to get started with setting up the drawing and creating a simple line drawing.
Getting Started
Start with finding the size of your drawing area. If you are attempting to draw an object or area that is not framed like the still life image is, then you would just use the area you see in the viewfinder. Recall from the last chapter that the viewfinder area shape can be altered with tape if needed.
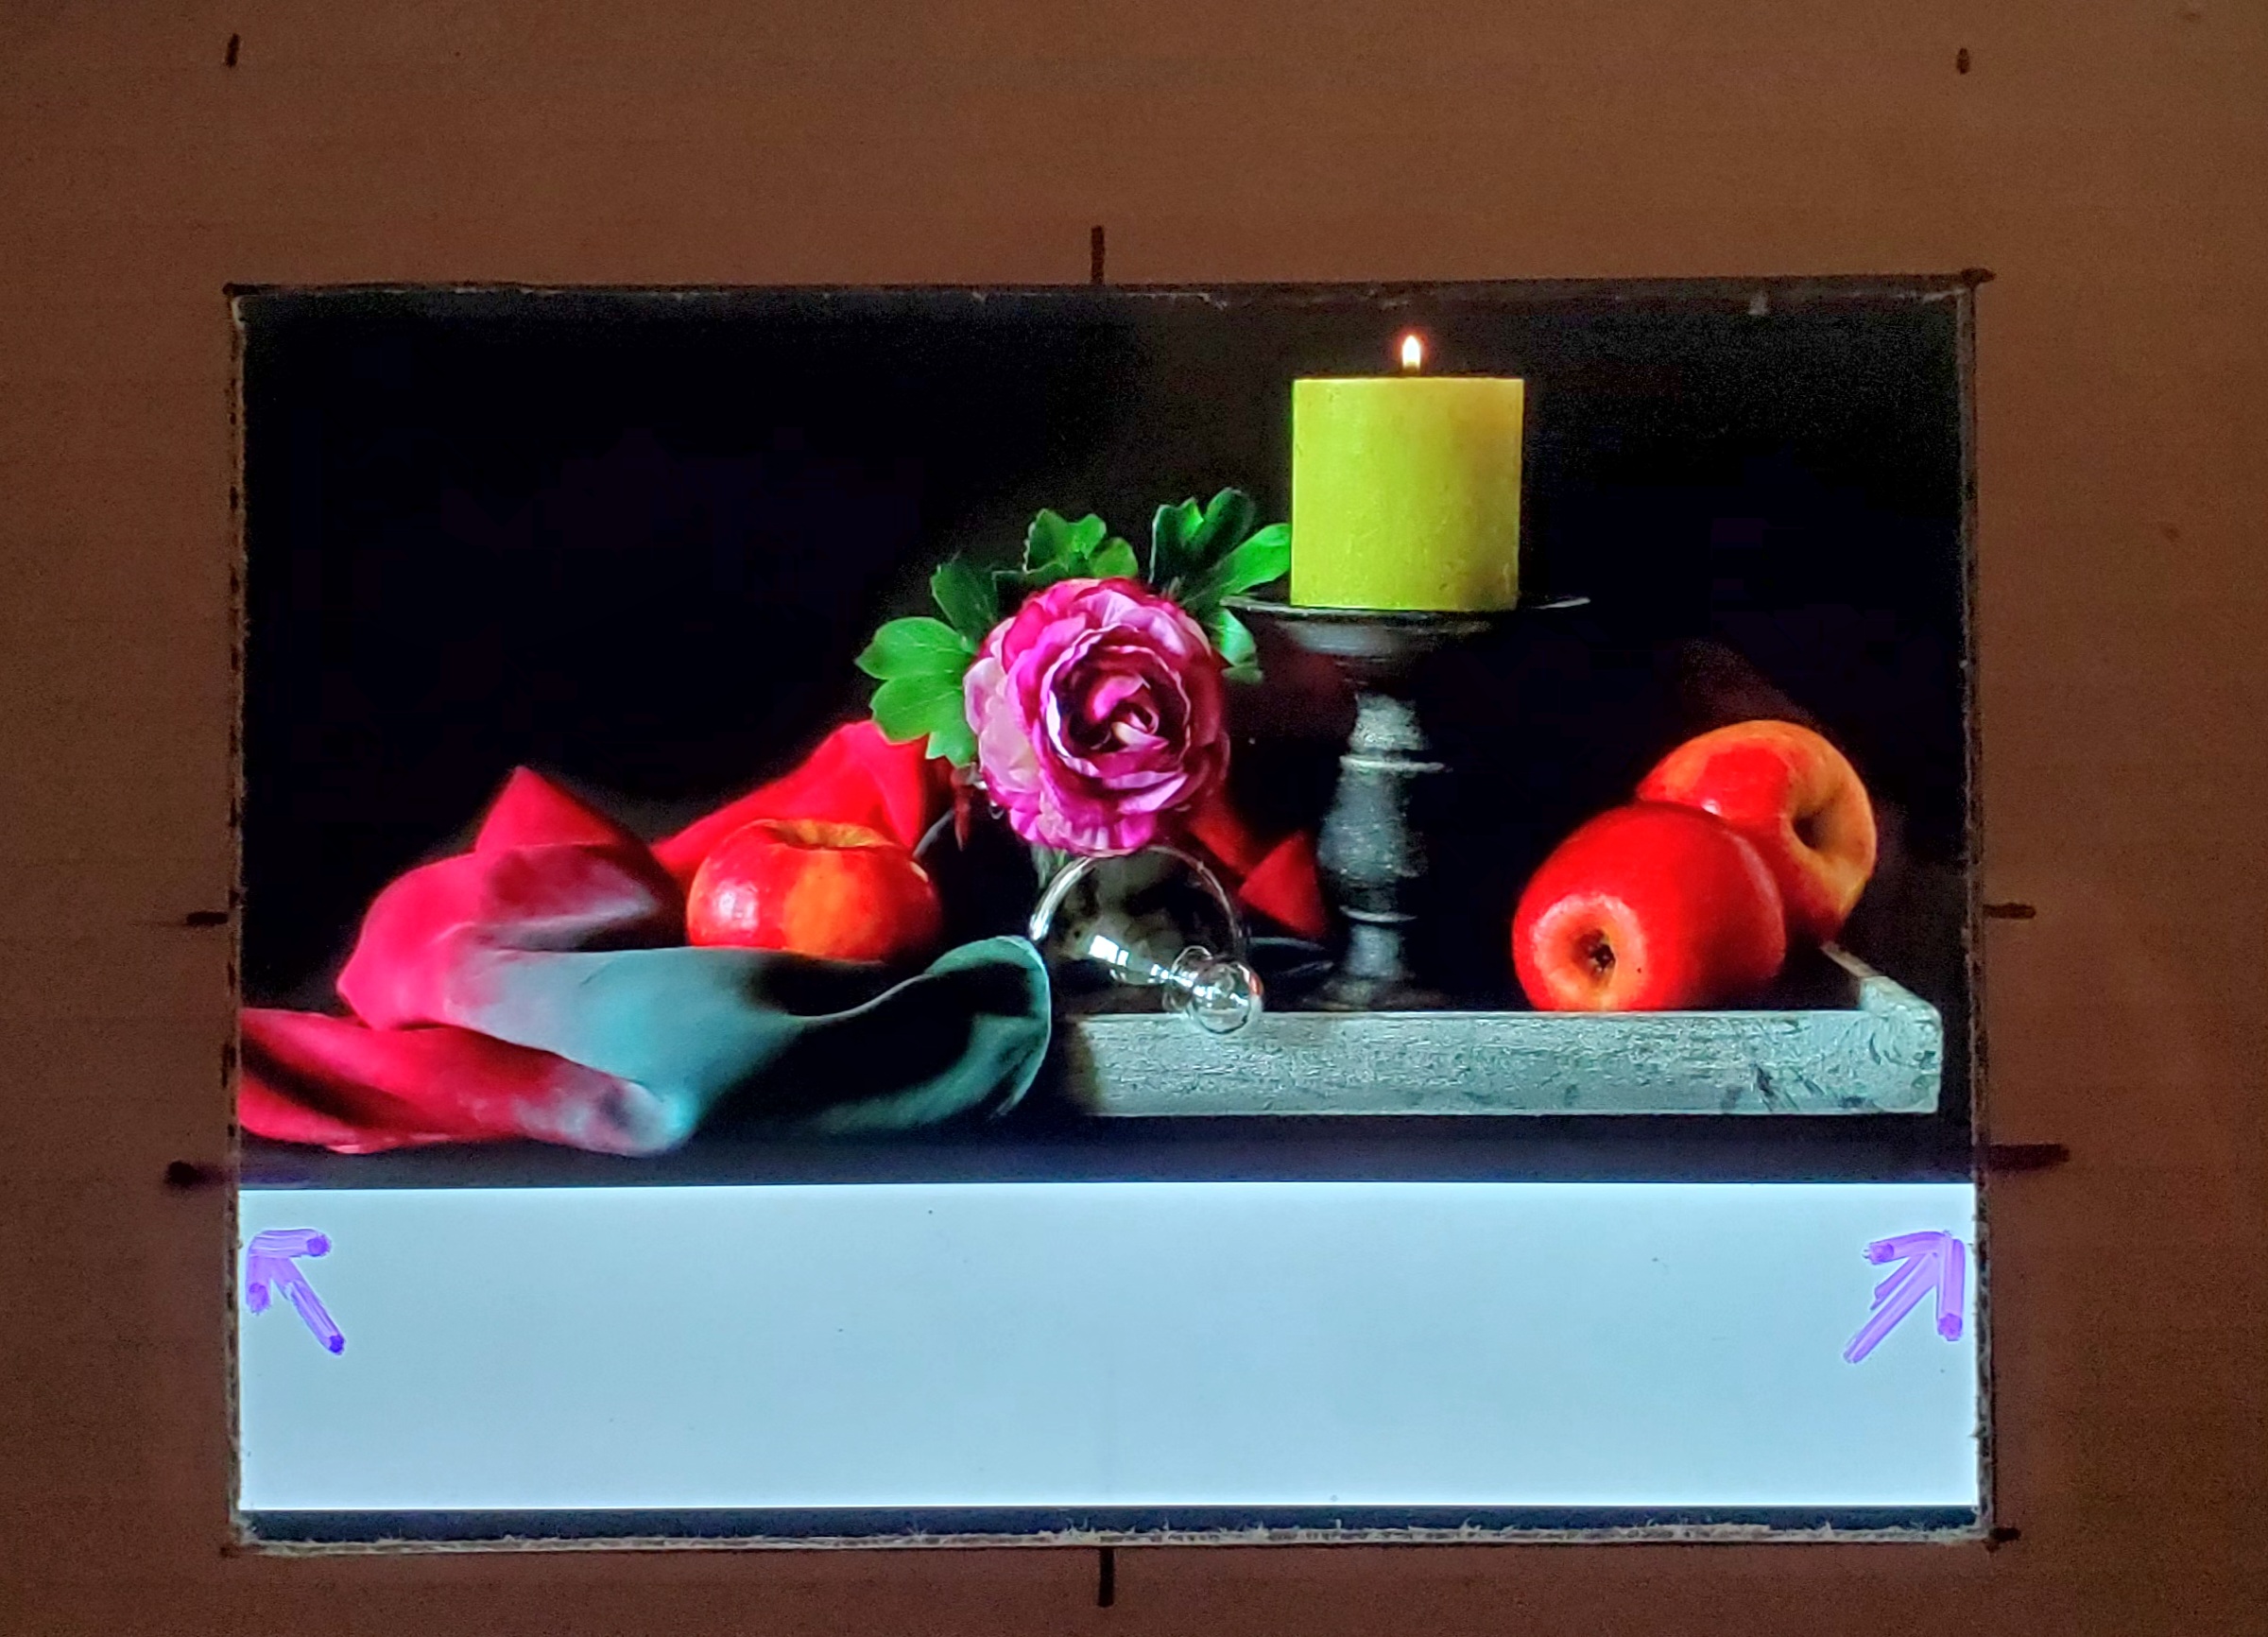
Since the area of this image is a long rectangle and differs from the shape of your viewfinder, you will need to make some alterations to it. If you hold up your viewfinder so three sides of the viewfinder line up with three sides of the image, you can then add two tick marks with your erasable marker to the viewfinder at the spot that will be cropped (indicated by arrows). The white area at the bottom of the viewfinder can be masked off if it helps. What you see in the viewfinder is considered the picture plane and should have the same height to width ratio as your drawing area. When you hold up the viewfinder to your drawing area the corners of both should line up. This makes it easy to compare the subject area and picture plane to your drawing area. The drawing area can be as big or small as you wish, just as long as the height to width ratio is the same as the picture plane.

Another way to start a drawing, if you do not have a viewfinder, is to use the basic unit technique. To do this you take a measurement to create a basic unit off of either the height or width of the area you are going to draw (it is a little easier to use the shortest one). You then turn your hand 90 degrees so you can now go across the area to see how the height and width relate. As the image above shows, the width is roughly twice the height. We now have an idea of the drawing area. Whatever size the drawing is doesn’t matter. All you need to check is that the width is twice the height in length. Now you can add some tick marks at the corners of your drawing area to help frame the area. You don’t actually need to draw a frame around this area. The actual size of the image is not important. It is the ratio of height to width. You can make the drawing as big or as little as you like.
Once you have the sizing of the drawing area correct, you can add evenly spaced grid tick marks around the perimeter of your viewfinder and drawing area. Start with marking the half way points from all four corners first. You are dividing each side of the perimeter in half. You can keep dividing these lengths in half as many times as you would like. It depends on how many lines in the grid you want. The example image is divided by four in each direction. This will help us visualize the area and find what lines up between the tick marks. Notice how the center of the flower lines up with the middle tick marks in both the horizontal and vertical planes. The apple on the far right is at the half way tick mark horizontally. And the top of the leaves are 3 tick marks or 3/4 of the way up from the bottom of the area.
Based off the tick marks, some guide lines within the drawing area can be added to help show how they relate to objects or features.
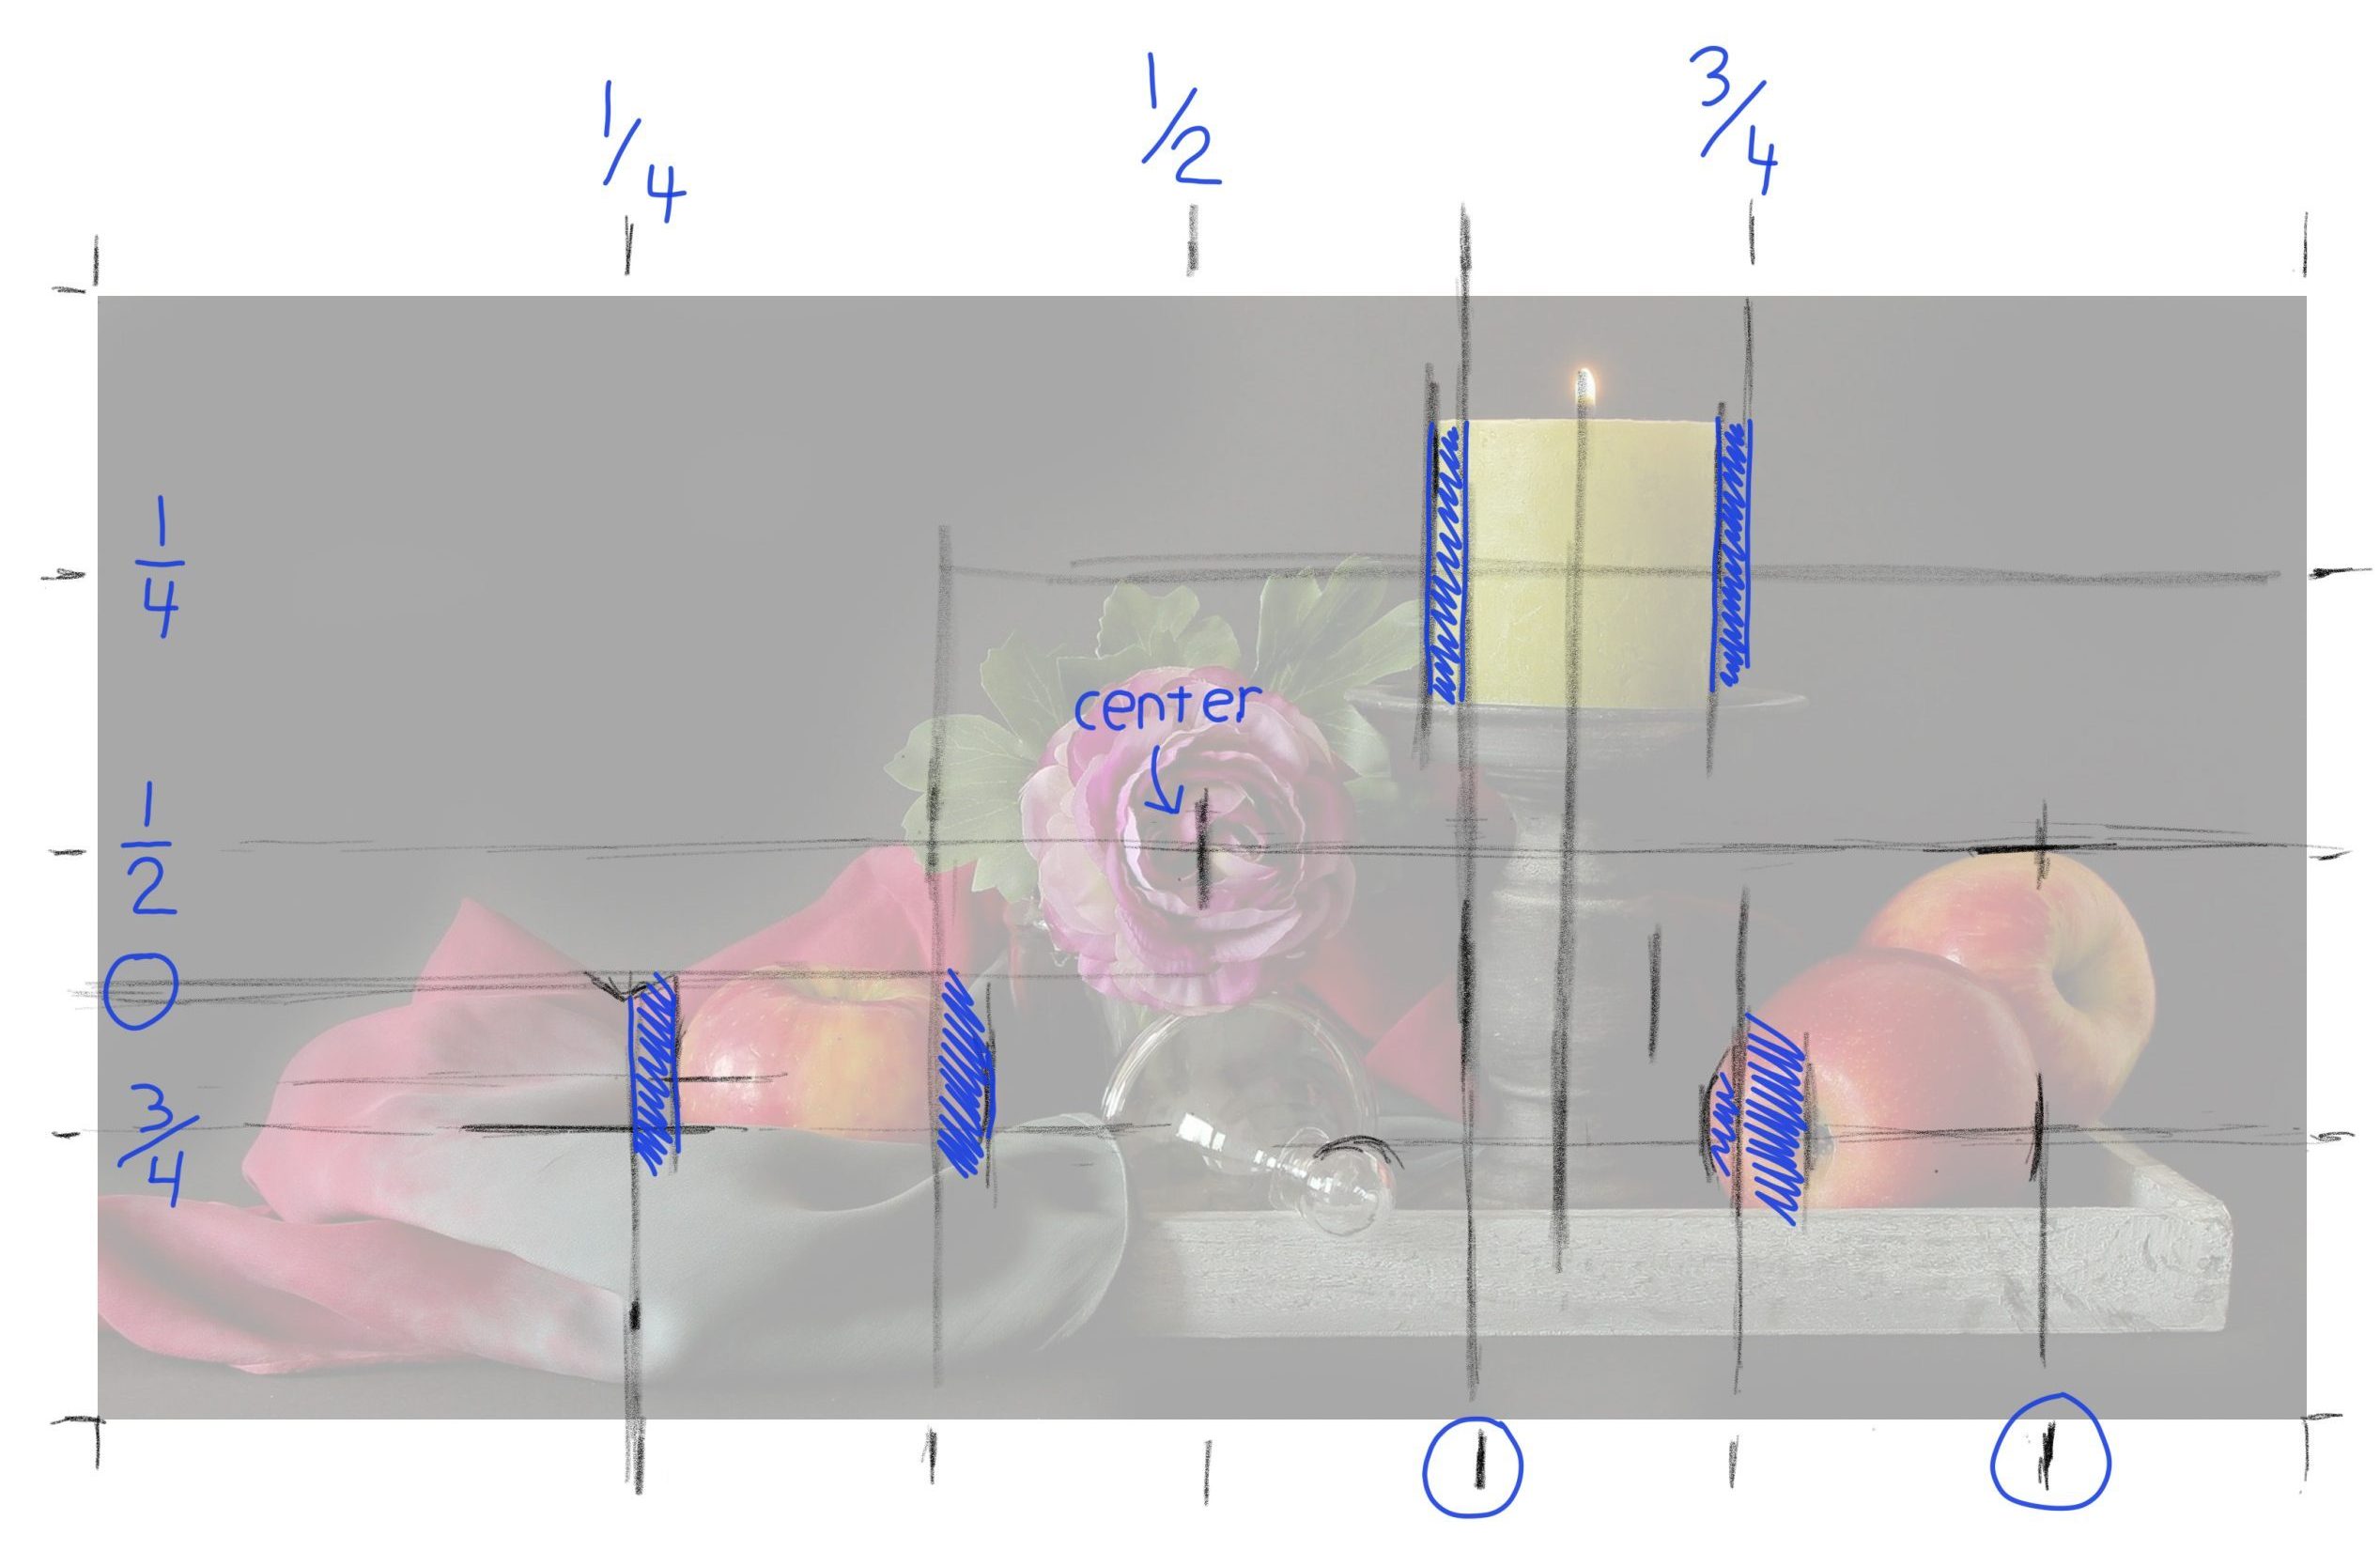
Any guide lines should be done very lightly. This way they may not need to be erased. The lines in all of the examples are much darker in order for you to see clearly. The filled in blue areas are to show the distances from a grid tick mark to the edge of a major object, showing if the subject line is right or left of the tick mark and by how much. Some additional tick marks (circled on the image) are added simply by dividing the distance between tick marks in half again. Technically these are 1/8 tick marks.
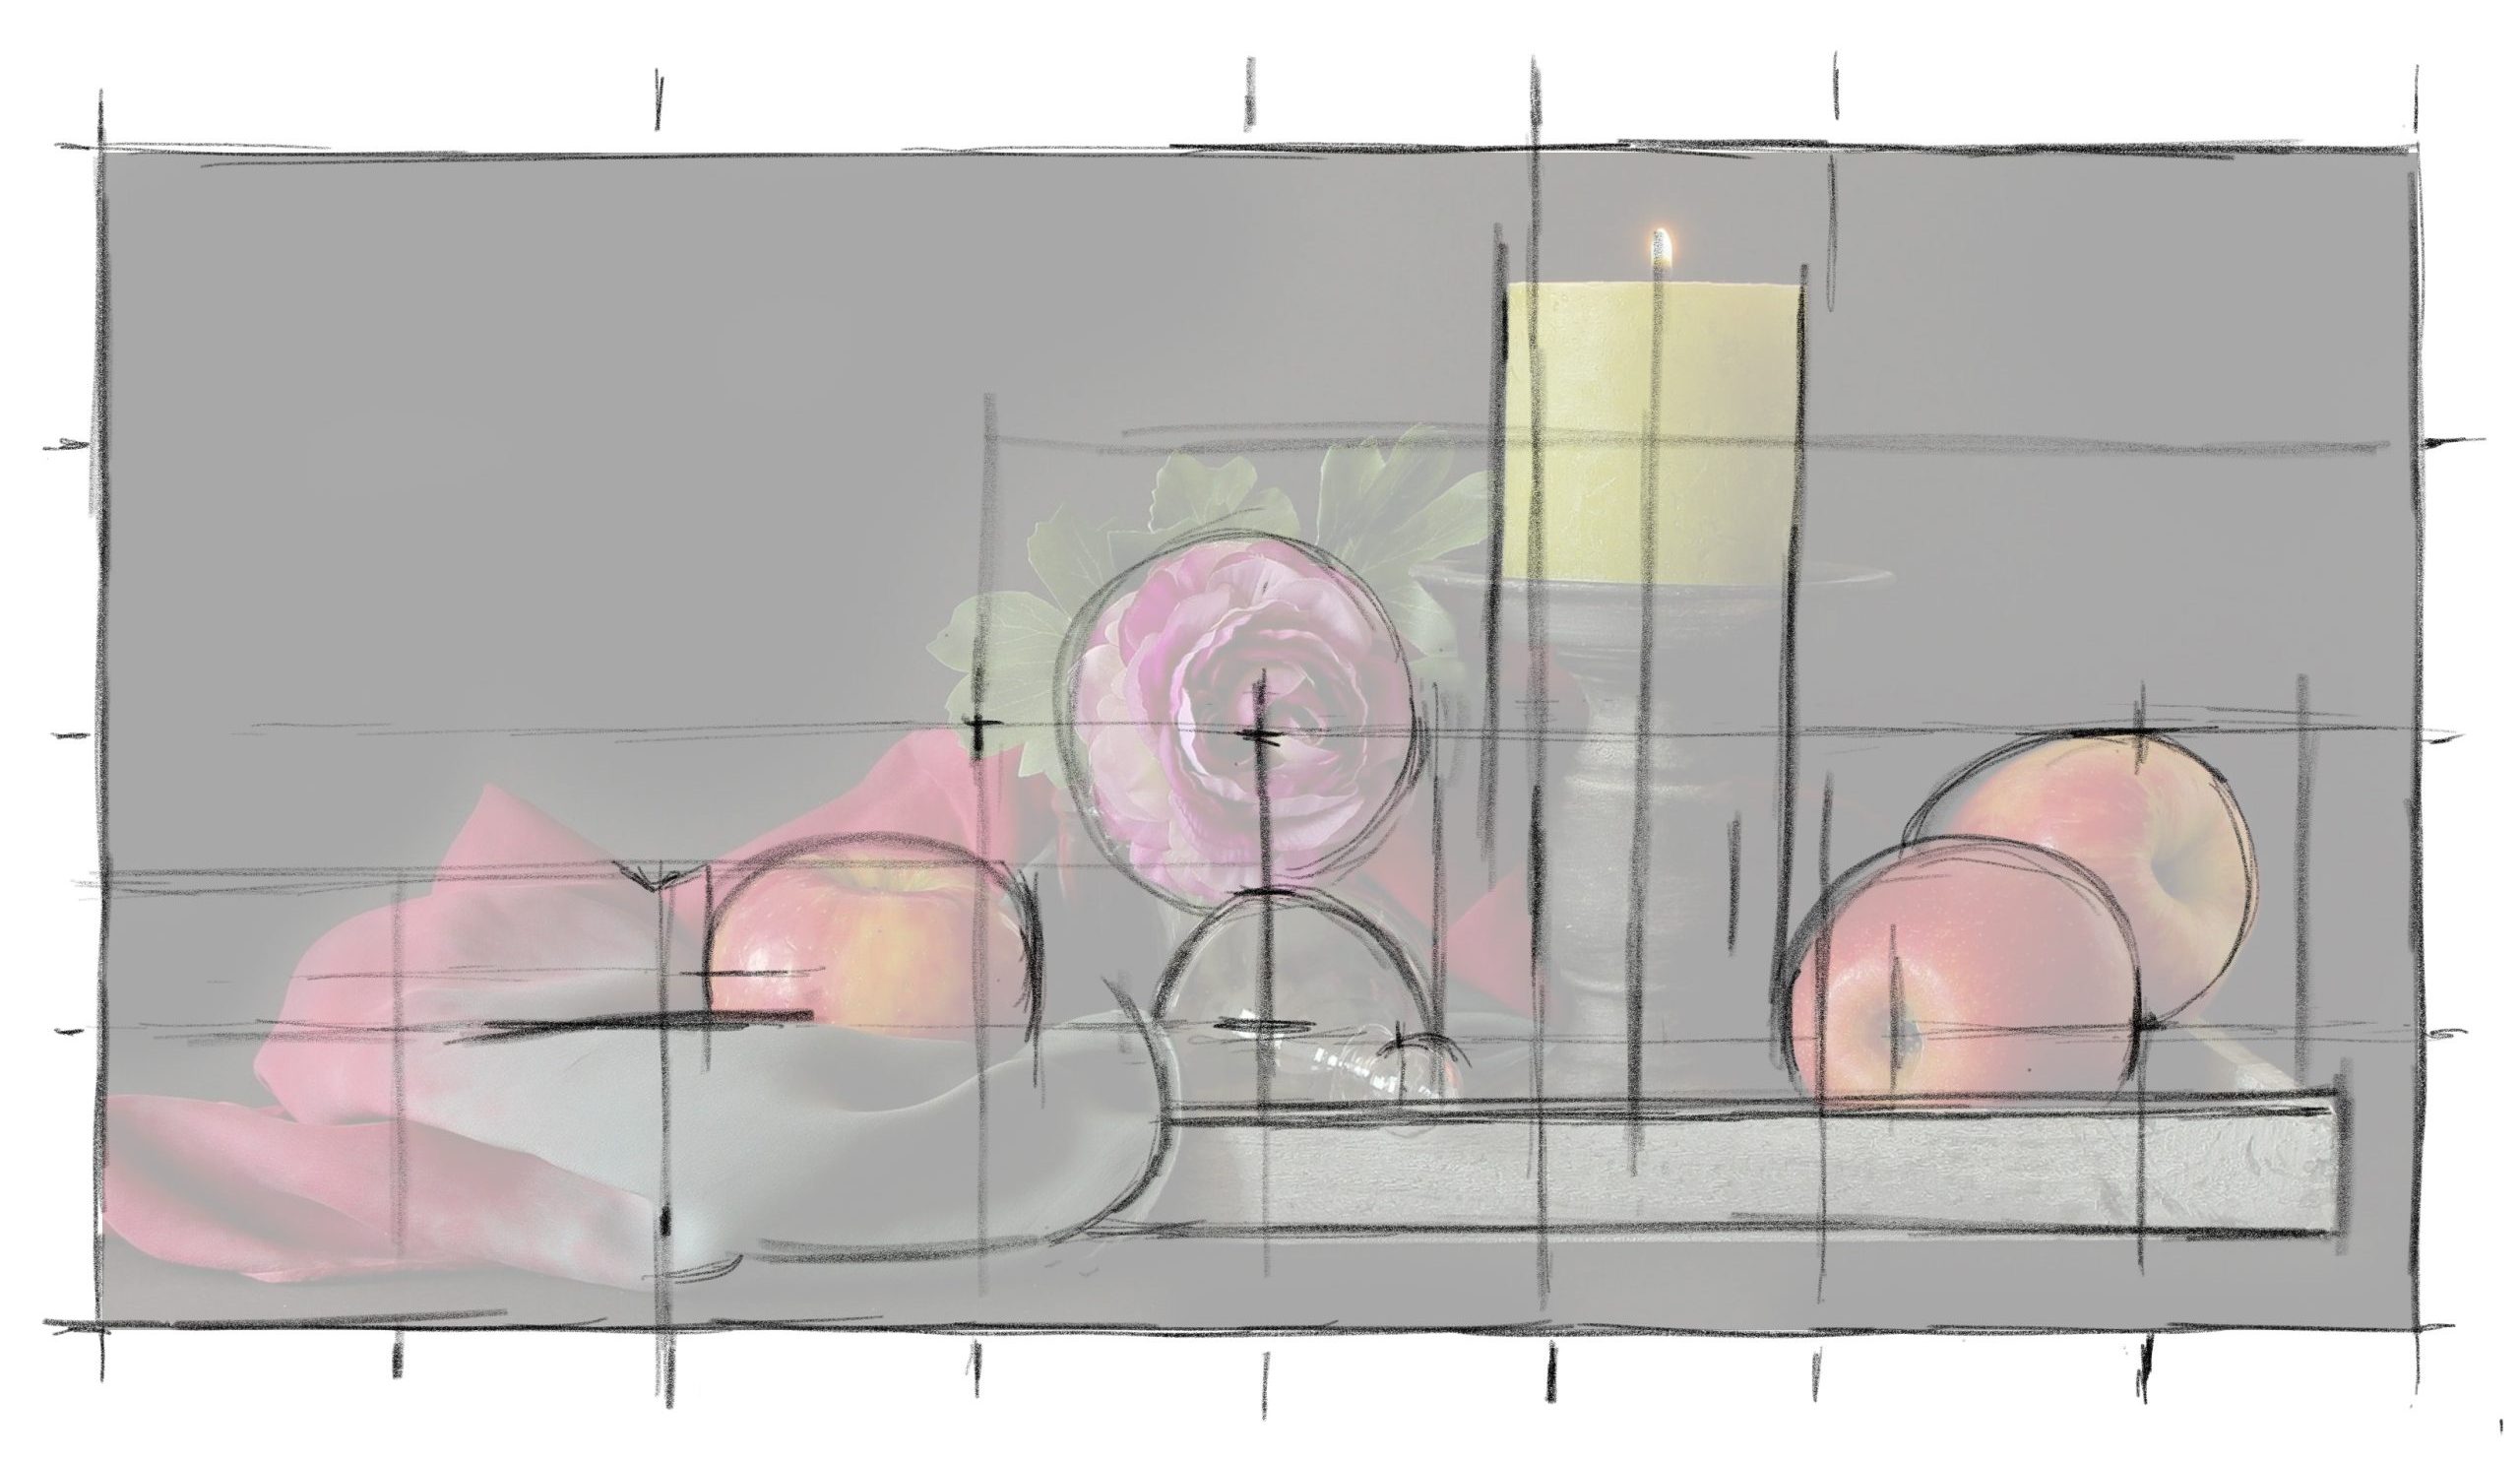
Above, some additional tick marks and guide lines are added. You now have an understanding of how to place the objects within your drawing area. Basic shapes can now be slowly incorporated into the drawing. It helps to start with the obvious and simple forms and then slowly work around the drawing to develop other areas. This process builds into a basic line drawing so you can check how the main elements look. Remember to utilize your tools and visual aids throughout the drawing process.
The above step shows a basic line drawing and everything is close to being in the correct position. At this point you can go in many different directions with how or to what level you want to further develop the drawing. You could start developing detail or add shading. For this chapter, we will concentrate on the line work of the main objects and make sure they are in the correct place.

The finished example above has shading added to give the objects a better appearance of shape by using highly contrasting tones on the objects’ surfaces. Notice how dark the shading is and how many of the guide lines and marks would end up disappearing into the dark shading. Also note even though the drawing had many lines defining each of the objects’ shapes prior to shading, the end result has little to no lines.
The still life example may have seemed complex at first, but now you can start to understand how an artist would visualize the area so it is easier to comprehend and navigate through to a finished piece. You will be experimenting with the use of your visual observational tools and your drawing developmental skills in the proceeding exercises. To start off with, exercise 5.1 will walk you through with a step by step process of how to accomplish the first drawing.
