
Chapter 9 Human Profile and Portrait
Human Profile and Portrait
Learning Objectives
By the end of this chapter, you should be able to:
Create a template to aid in the drawing of a human profile.
Create a template to aid in the drawing of a human portrait.
Understand how we are all vary similar to each other.
Drawing a human profile (side view) and portrait (front view) at first may seem rather daunting, however, there is a very useful way to help you get started. Luckily, people are generally similar. If you measure many people, you will find some general measurements that work for everyone. Throughout this chapter, the general human head measurements will be used in basic templates that show all these measurements, so you can skip some of the work in finding them on your own. Remember, we are generally similar. It is how we deviate from or within these basic template measurements that makes us unique.
For this chapter, you will be drawing a side profile of another real life person and a self portrait. The process for doing this will be more streamlined with a template. However, it is important to create an accurate template. You will not need to make any measurements with a ruler. Measurements can be done either by trial and error or, more accurately, by making up a basic unit to help you measure.
Human Profile
The human profile is a good starting point. It is a little easier than a frontal portrait and uses some of the same measurements.
 The template to the left may look a bit confusing at first, but don’t be intimidated. We will go through it step by step to understand what it all means and how to assemble it in a reasonable manner.

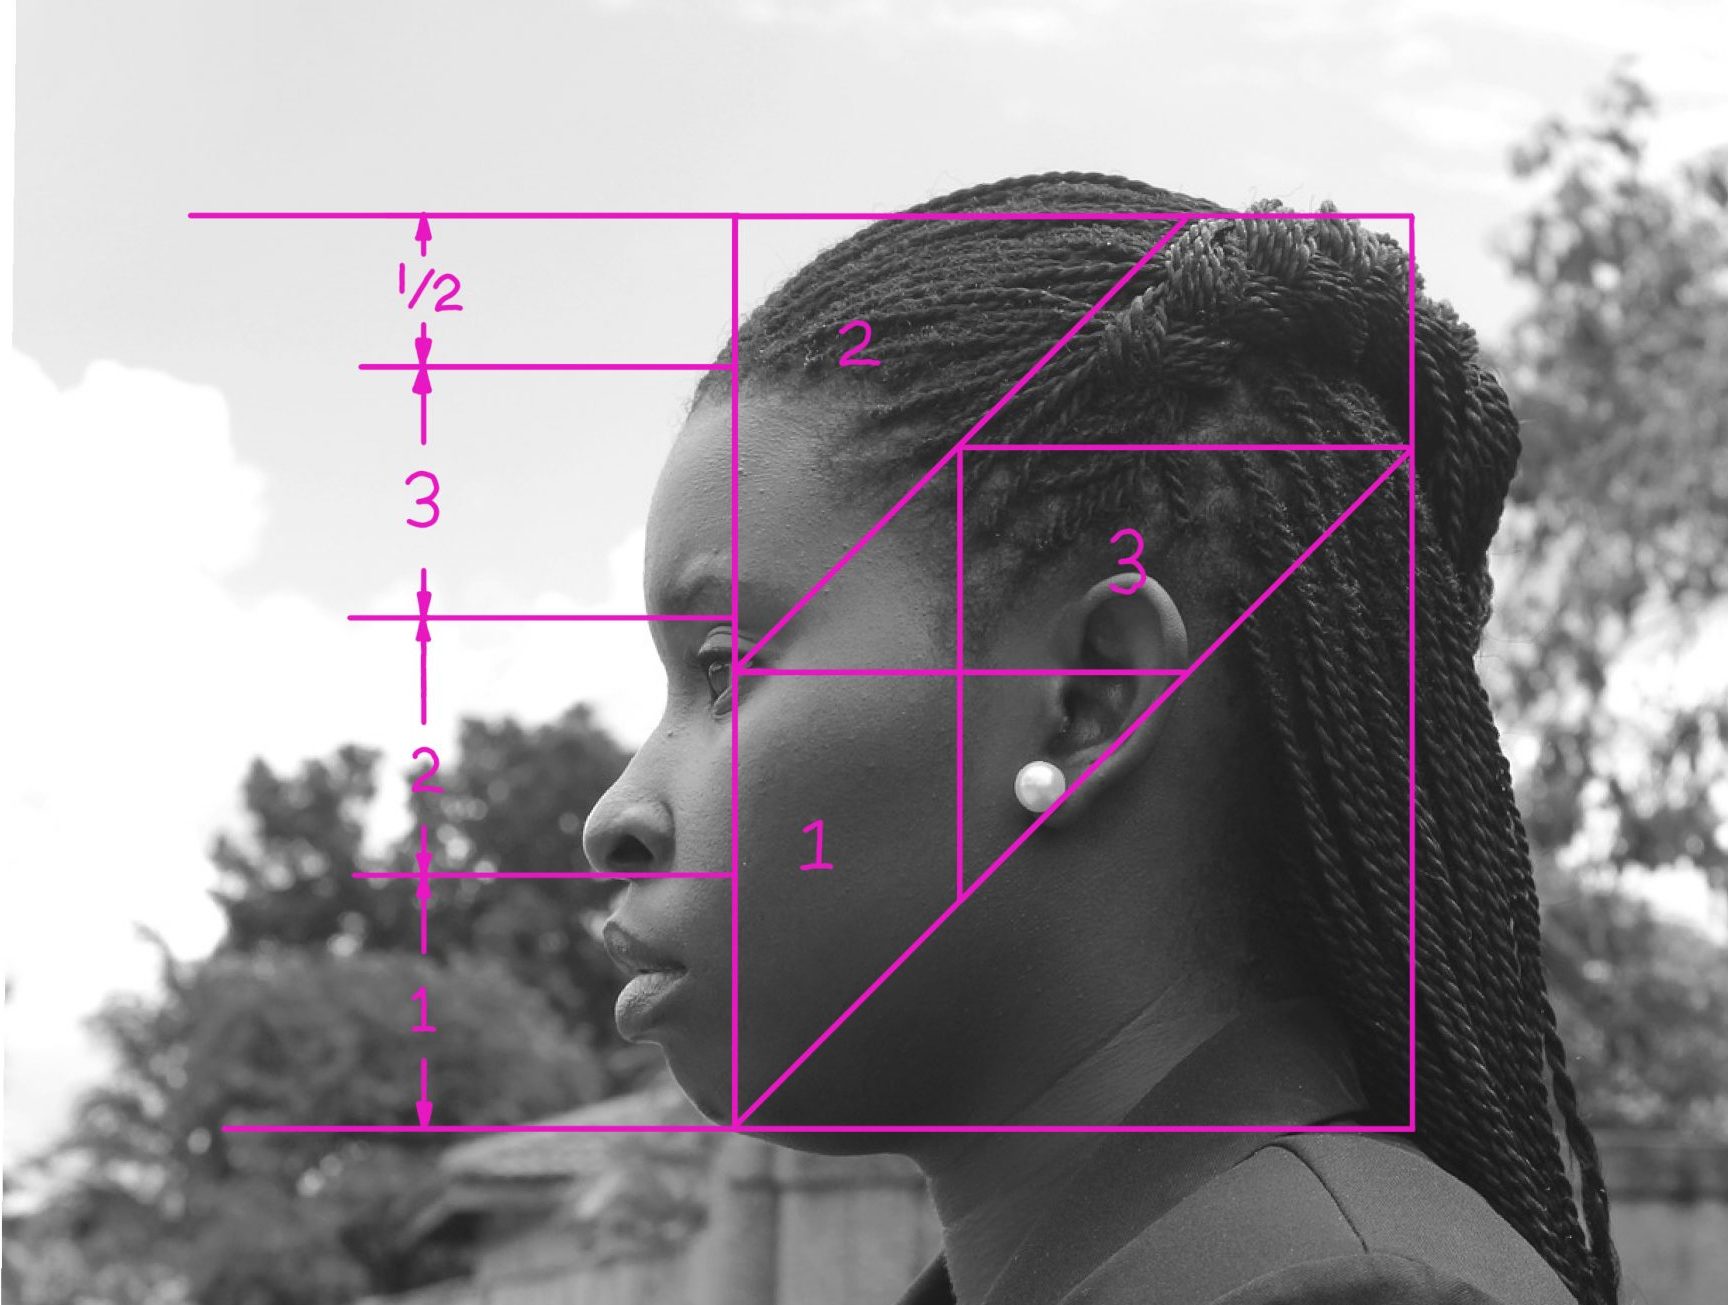
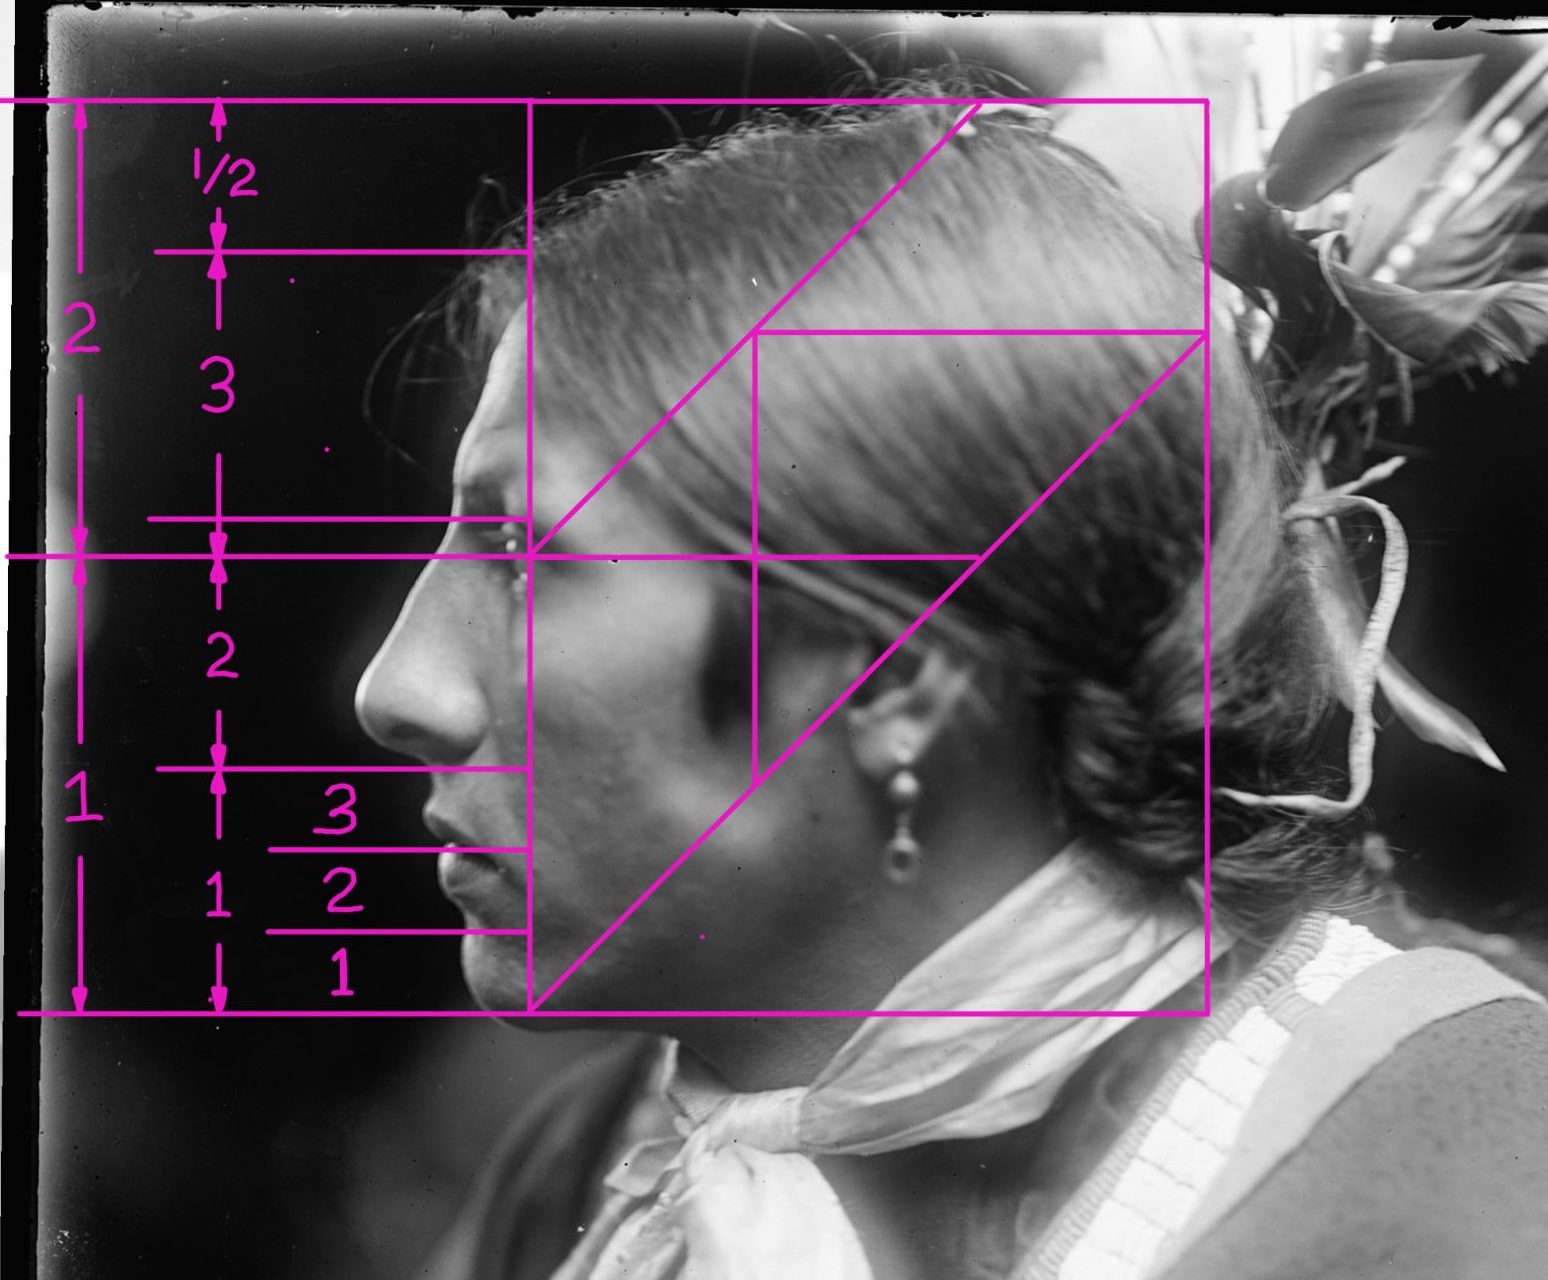
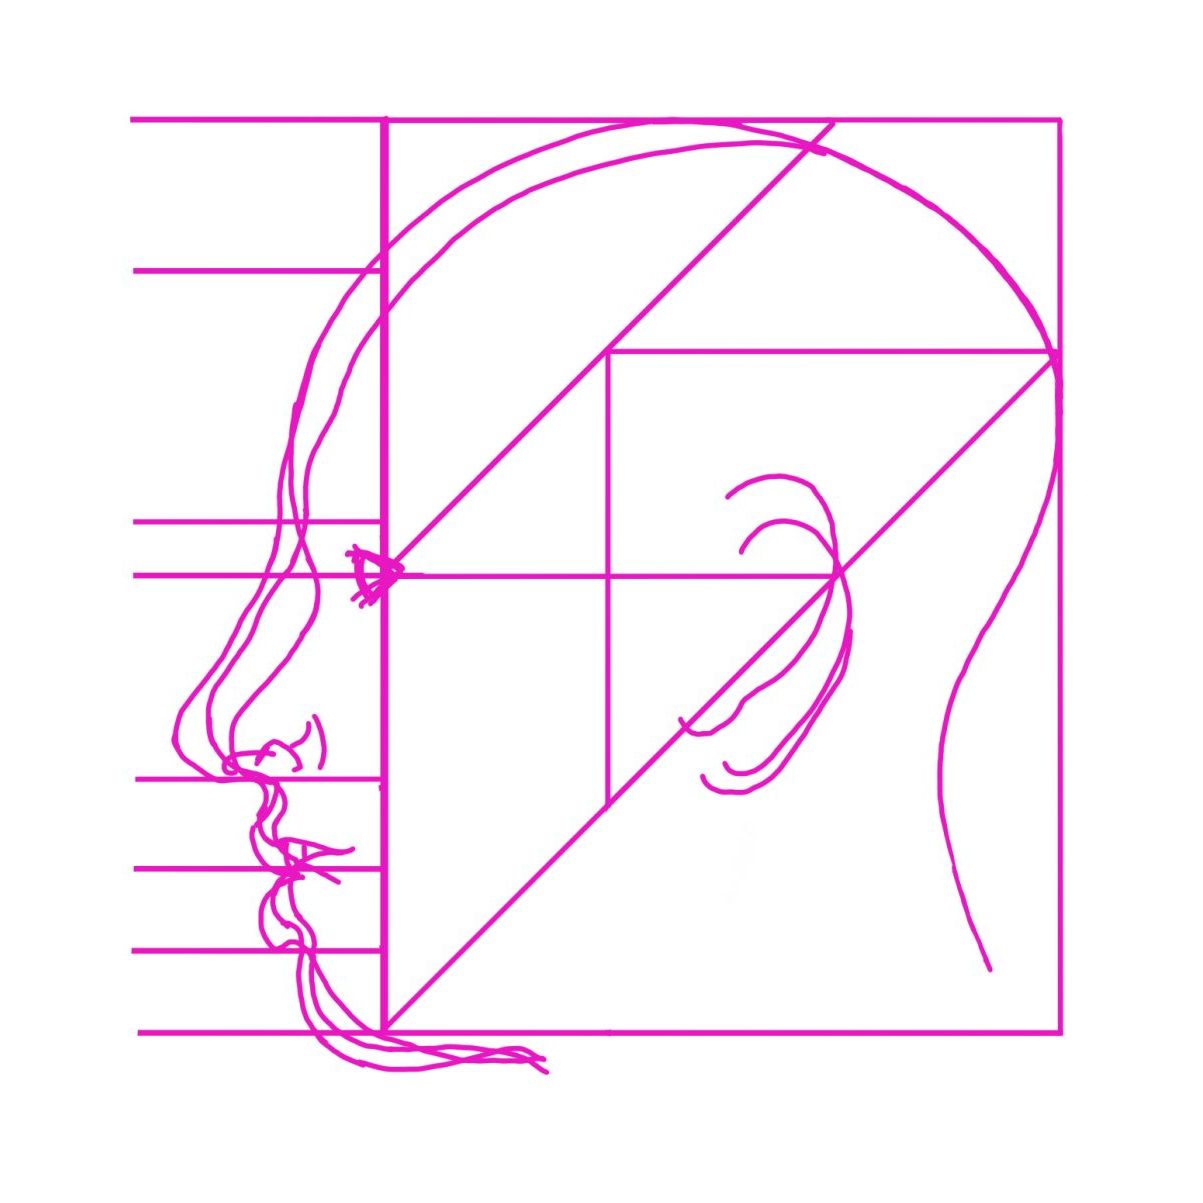
We will use the image to the left to construct the template in a manner that is easy to understand. Note how we see the person’s profile directly from the side. The person’s head and eyes are looking straight ahead. If the person’s head was tilted up or down, the template would also need to tilt accordingly.
Step One
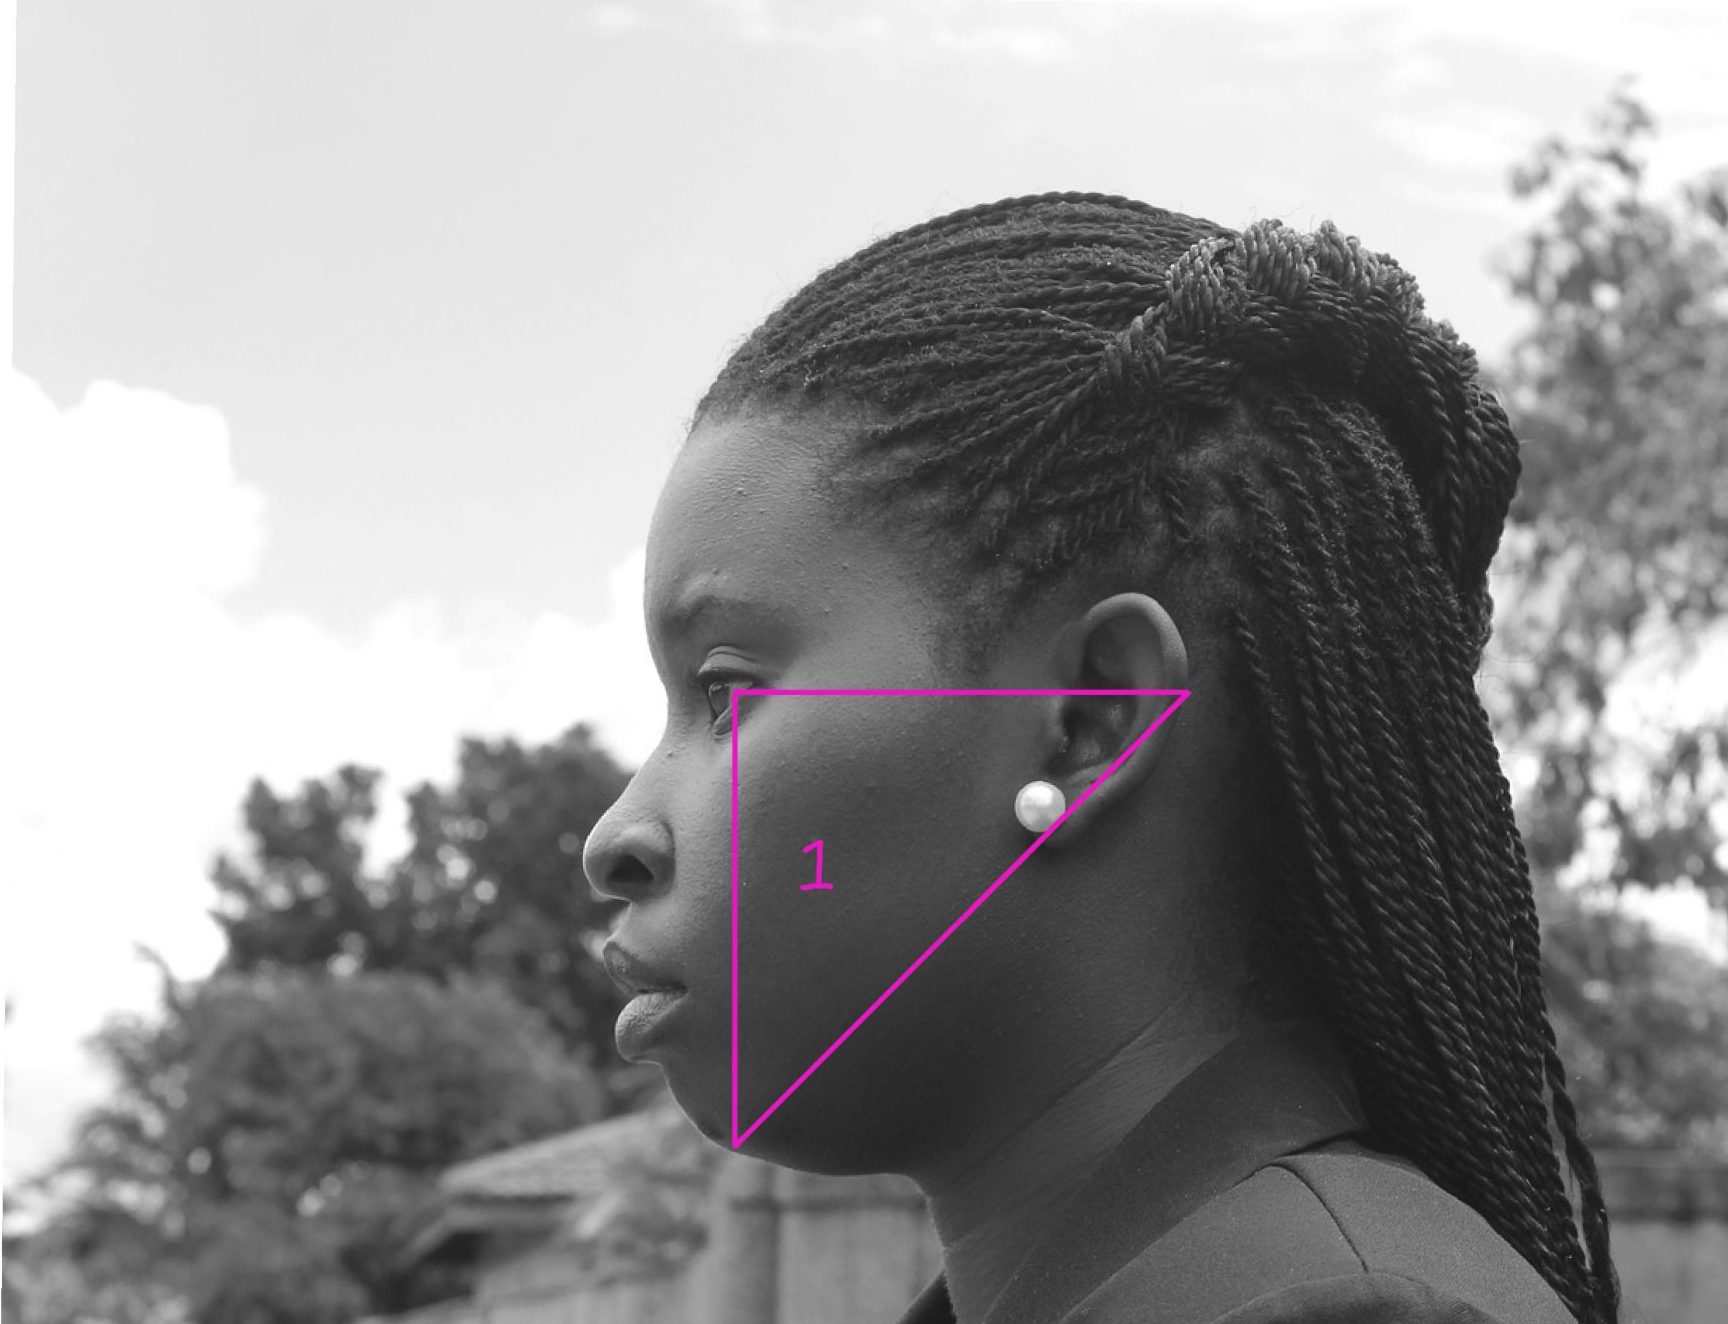
The first step is to create a right triangle. You will start with two lines, one horizontal and the other vertical, projected off the center of the eye at a ninety degree angle. The two lines need to be the same length. The horizontal line should end at the back of the earlobe. The vertical line should end at the bottom of the chin. It is important these measurements be the same length and ninety degrees from each other. A line connecting the two lines can be added to form a triangle. If the person is looking up or down, the triangle may have to rotate with the head.
Step Two
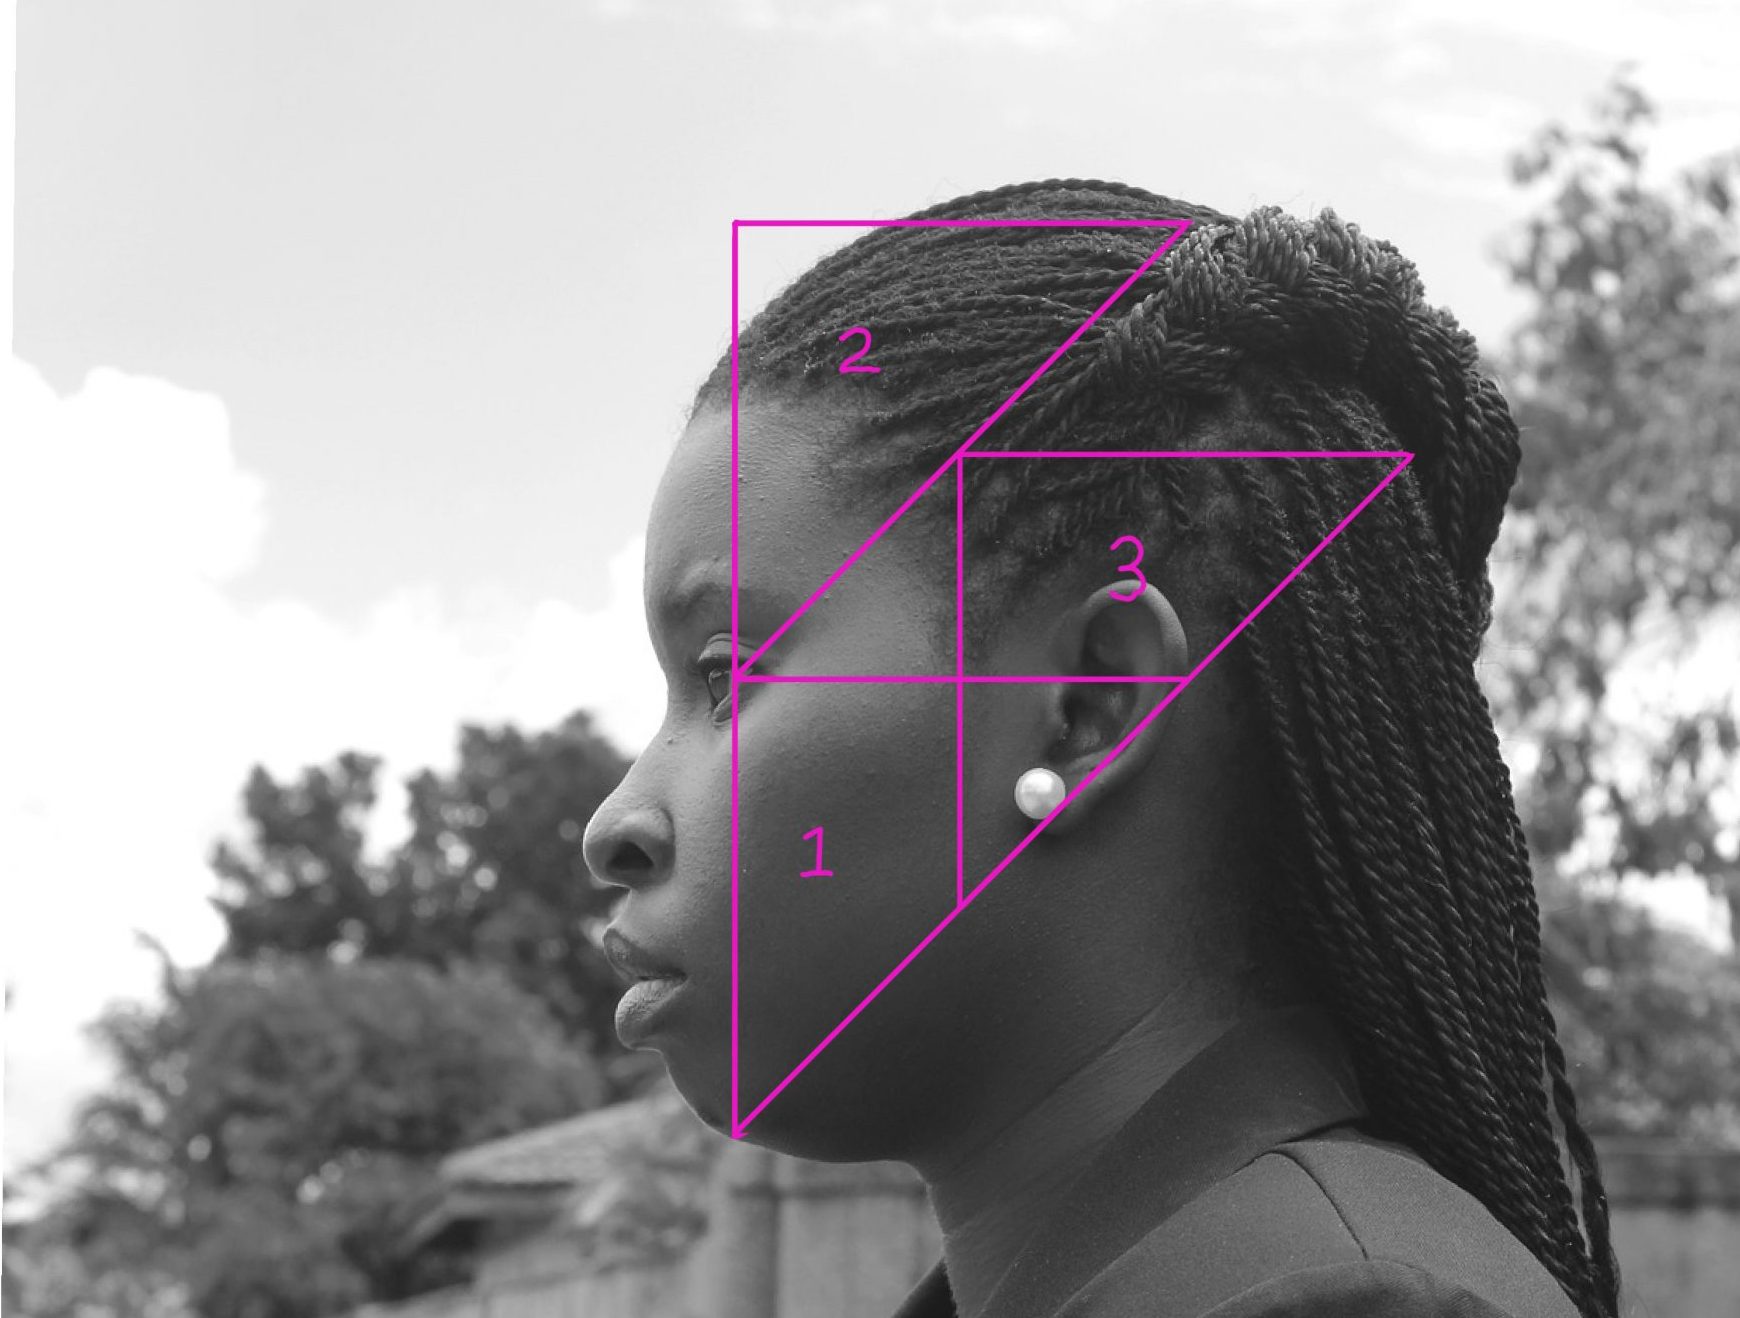
You will now add the same triangle you just created on top of the last. You have triangle one with triangle two on top. You will now add a third triangle halfway up and halfway back from the fist triangle. Notice how the ninety degree corner of triangle three just touches the middle of the hypotenuse side of triangle two and slides up at a 45 degree angle from the first triangle. The overall dimensions are now two triangles high by one and a half triangles wide.
Step Three
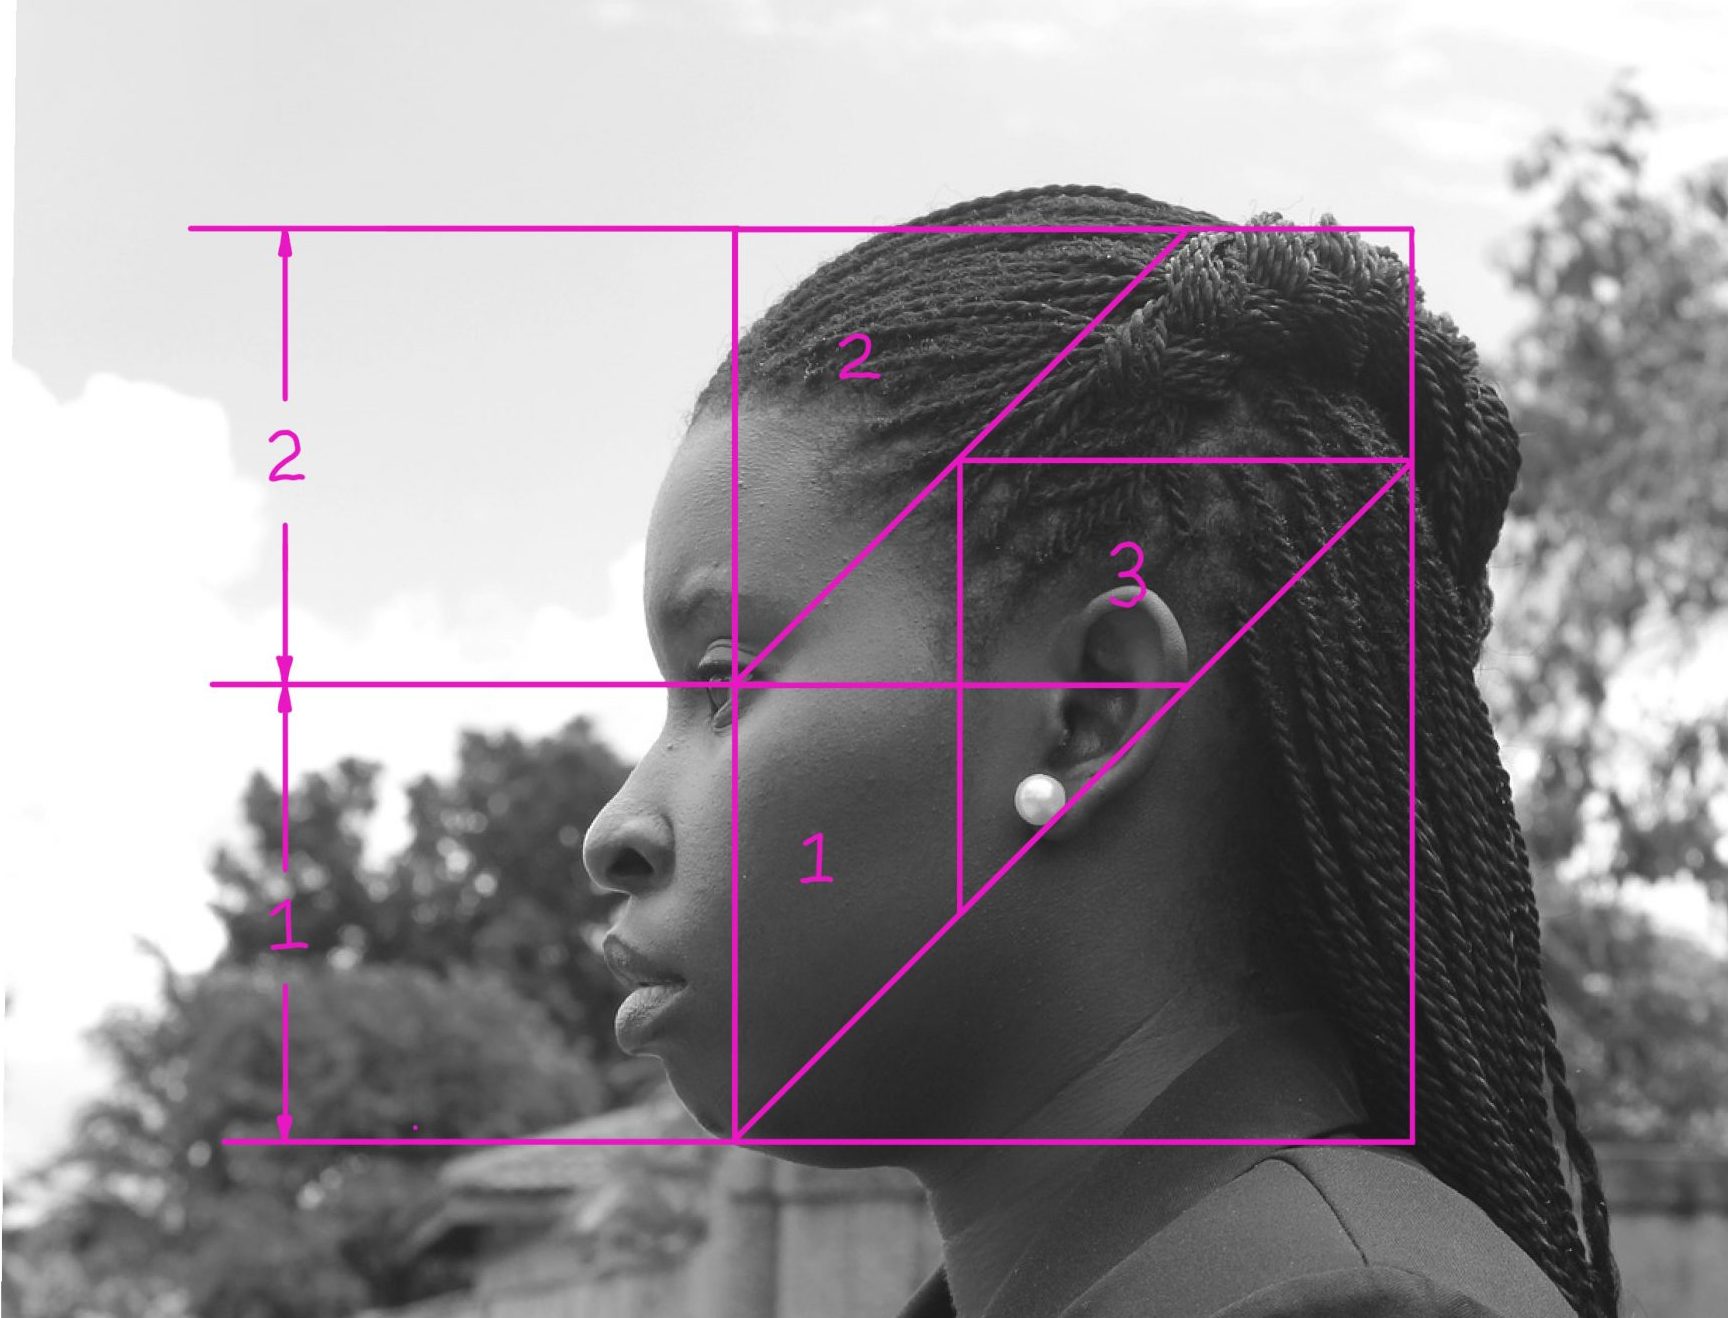
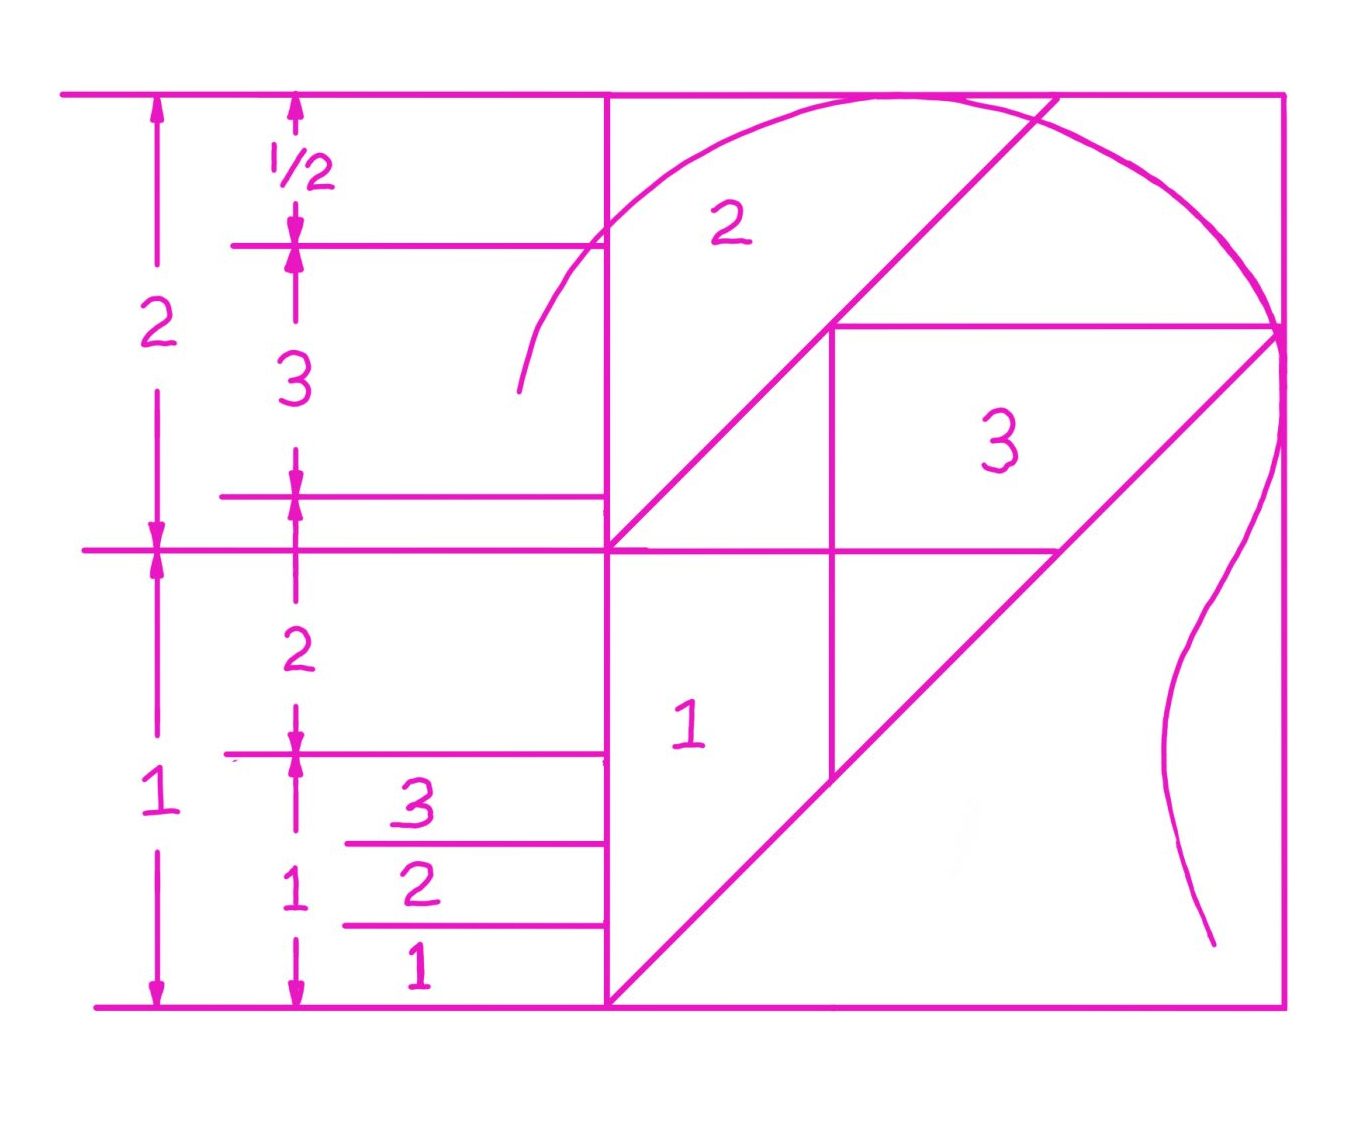
You now have an easy way to measure the basic size of the head. The first triangle (1) height is the distance from the bottom of the chin to the center of the eye and the second triangle’s (2) height is the distance from the center of the eye to the top of the head. The first triangle also helps with the placement of the back portion of the earlobe. The third triangle (3) will help establish the location of the back of the head. A rectangle was created to frame the head a little better and may help to establish the placement of the shoulders. Notice the eyes are half way between the chin and top of head. This measurement is also used for the portrait.
Step four
The last two measurements, from the chin to the center of the eye and then to the top of head, are not needed because the triangles help show this equal division. Now you need to divide the total height of the head from the chin to the top of the head by three and a half. All measurements need to be equal in length except for the top measurement, which is half of the other three. This may be tricky to do and may take a few attempts, but try to be accurate. What you will find is the first measurement (1) will give you the distance from the chin to the bottom of the nose. The second (2) distance is from the bottom of the nose to the eyebrows, and the third (3) distance is from the eyebrows to the hairline. Finally, the highest half measurement will measure from the hairline to the top of the head. Use your pencil to create three and a half basic units from the chin to top of the head.
Step Five
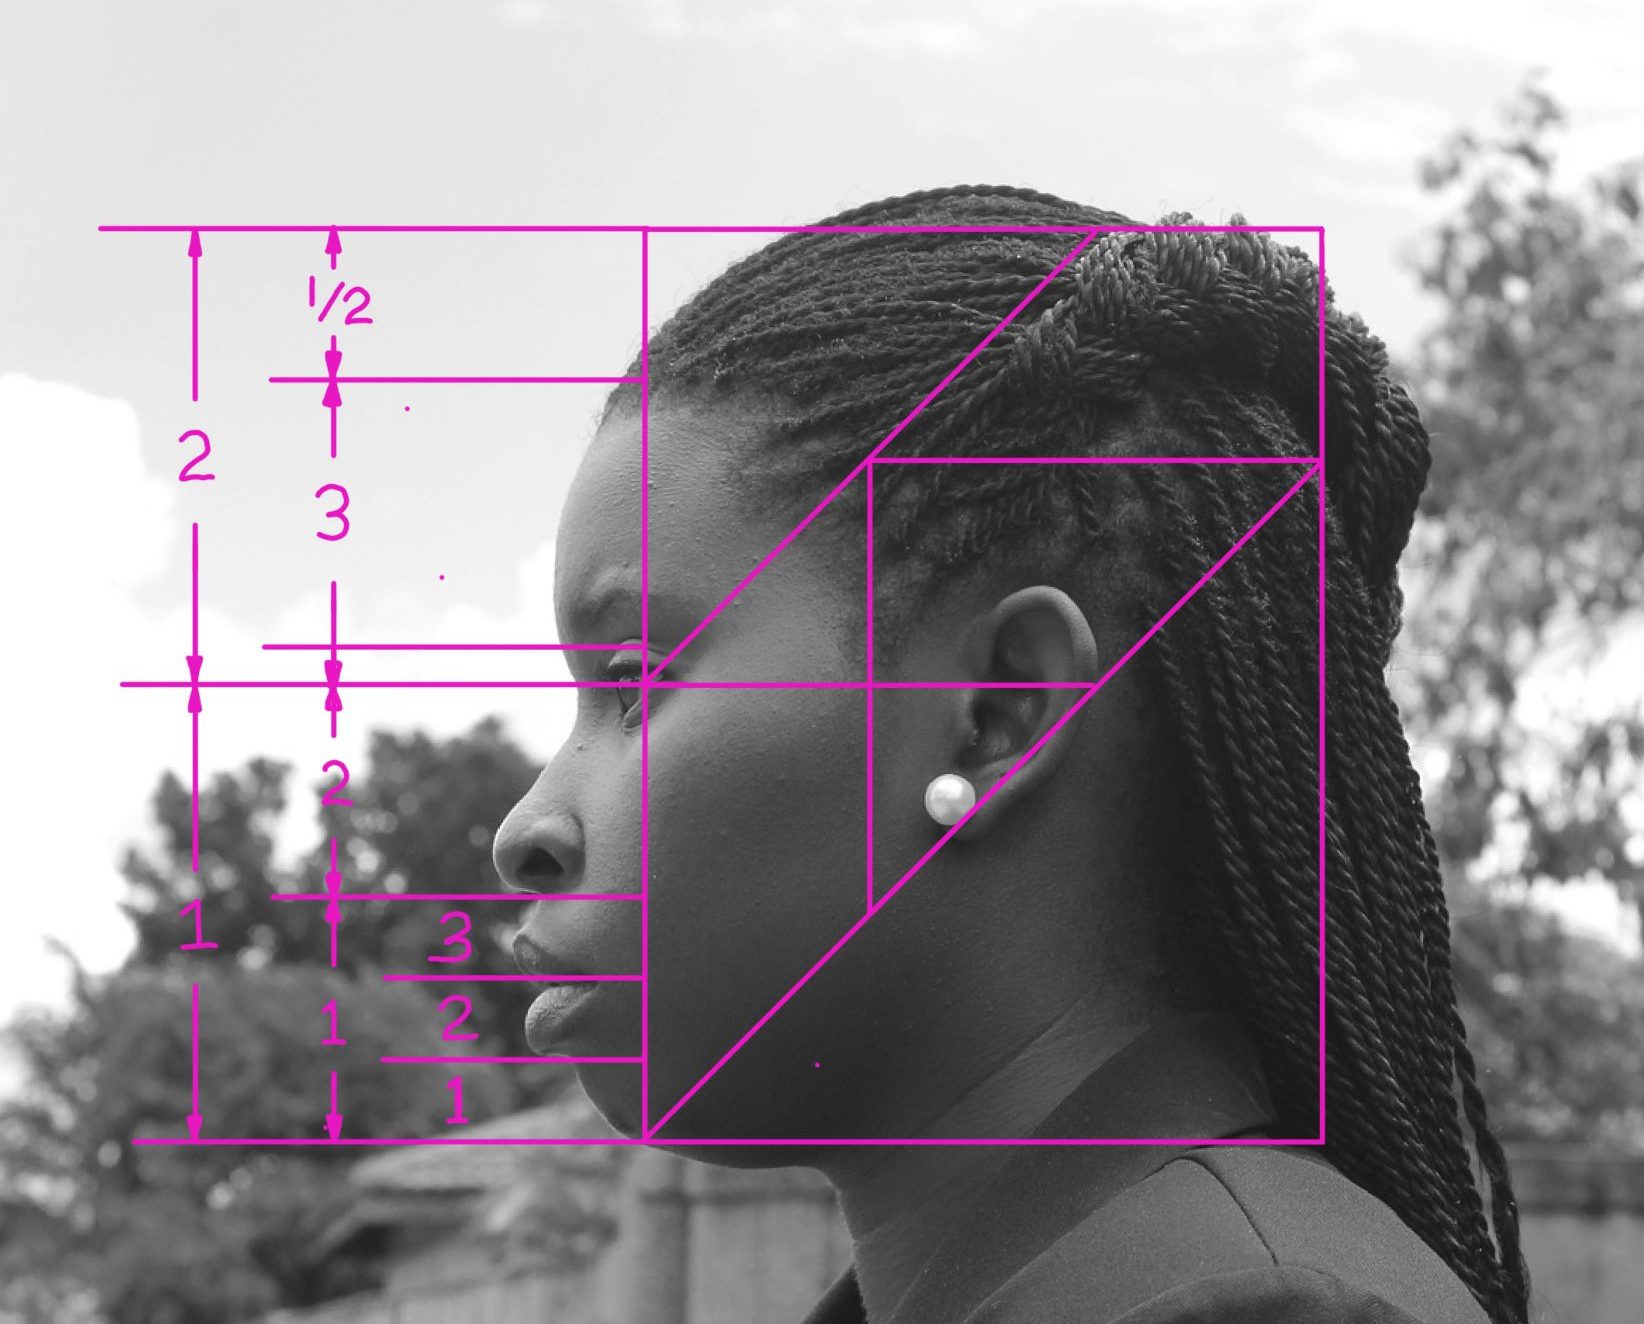
Only two more lines are needed for the dimensions of the face. The distance from the chin line to the line under the nose will need to be divided up into three equal parts, creating two equally spaced lines. Of these two lines, the top one (the closest one to the nose) is the center of where your lips meet. It is not the top or bottom of the lips. The other line of these two is not used for any feature.
Step six
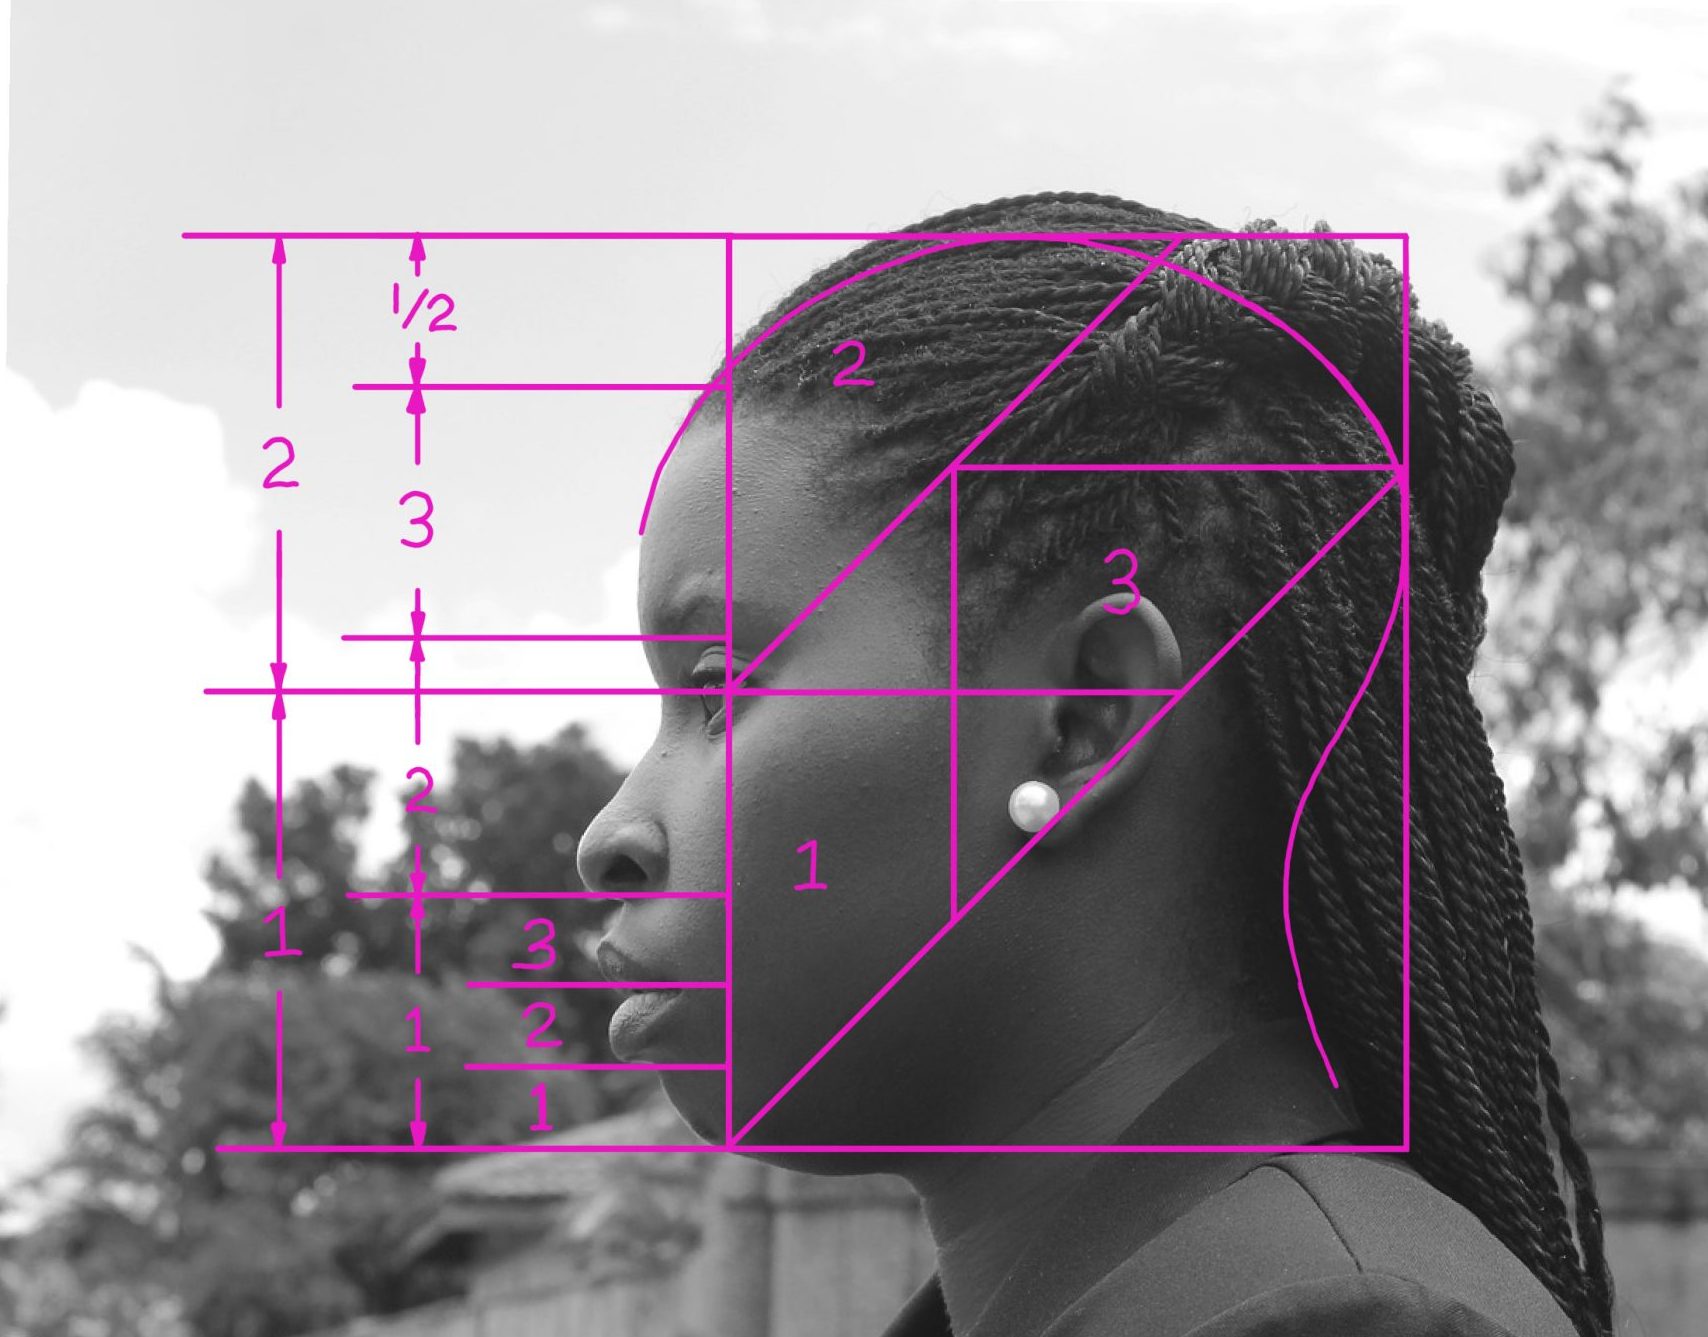
You can now add a basic profile of the top and back of the head and the neck. The heights of the facial features are represented, however, the shape and how far they project outward is dependent on the individual. Pay attention to how far the forehead projects out from the eye location.
If everything was done correctly, then your drawing should look something like the one on the left. Technically, shorter lines coming off the front of the face are all you need to help identify the height of the facial features. Most people fit into these measurements fairly closely. However, the template will only get you close. An individual person person may differ a bit from it.
Below are some more examples of people with the basic template superimposed over the top.
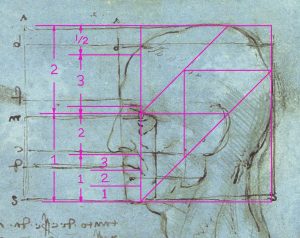 The image on the left is a drawing by Leonardo de Vinci. It shows he used a template that is similar to the one used in this chapter.
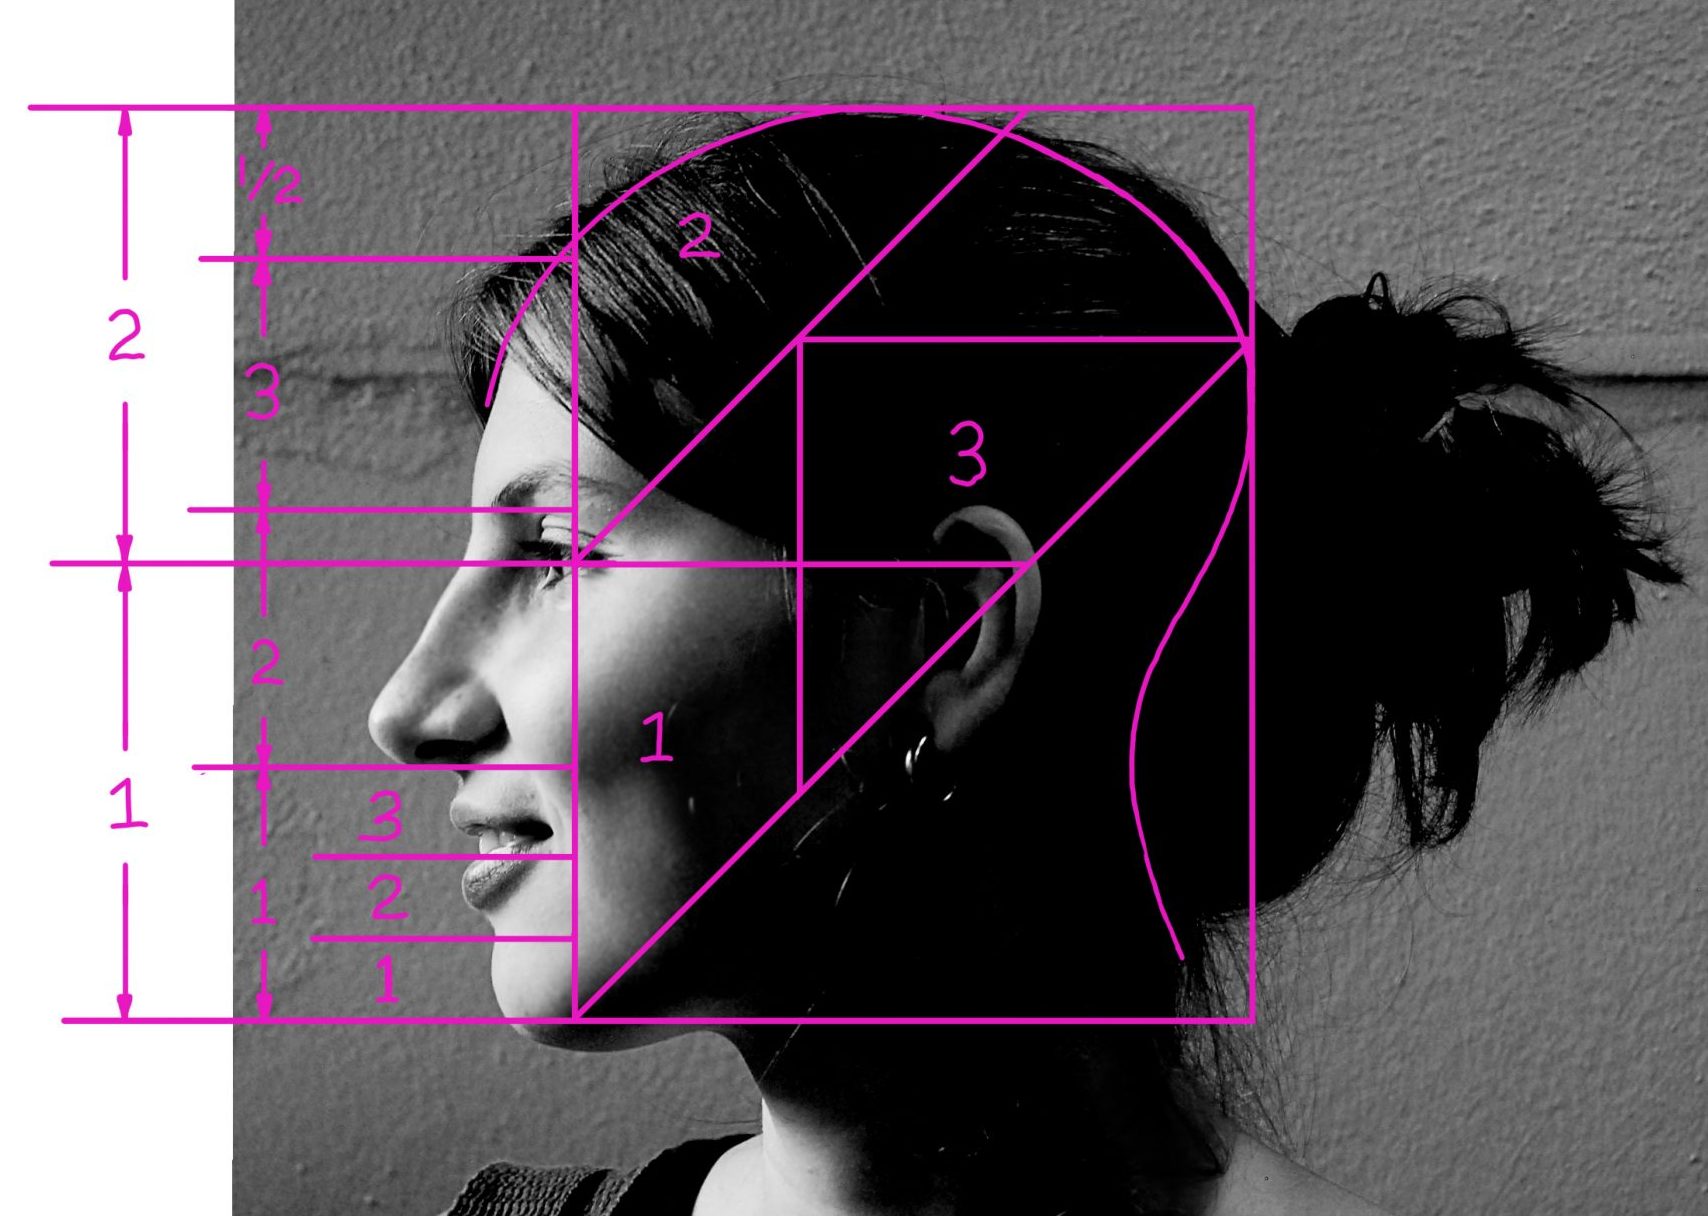
When drawing your subject, note that everyone will vary slightly from the template. The template will help you get close. Even though many features fit within the template, there is still considerable variation in the face. Below are three outline tracings of the three photographed example profiles, along with the template. The facial features are where the main differences will be noticed.
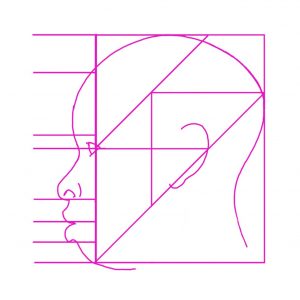
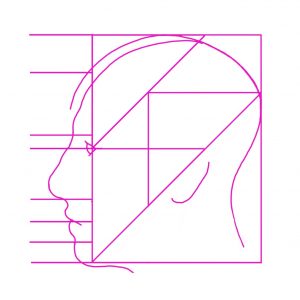

If we take the three images and superimpose them on each other, we will find the variations. Note the subjects in each image might not be similarly lined up with the camera and this may cause some additional variation.
As you can see, the three examples vary mostly in the facial region. This is usually where humans differ the most, and this is where your observational skills will be needed to find these differences.
Some things to look out for:
- The side profile of the eye is much smaller than you may think. Also, the shape is similar to the letter “V” turned on its side and filled with a scoop of ice cream.
- The jaw line will swoop up at and meet at the lowest point of the ear.
- The length of the neck is usually shorter than you may think. The chin is usually not much higher than our shoulders.
human Portrait
Again, you will use a template to help find measurements for the portrait. There may be a few measurements in the template that you may have difficulties believing. It seems like we have a tendency to focus on the facial features, such as the mouth, nose, and eyes, and think they are bigger than they are in relation to the head as a whole. It may be hard to believe that your eyes are located half way between your chin and the top of your head. The only facial features above your eyes are your eyebrows and forehead, and, yes, your forehead is large and takes up much of the area above your eyes to the top of the head. Another area to be careful with is the size of your eyes. They will be much smaller than you may want to believe.
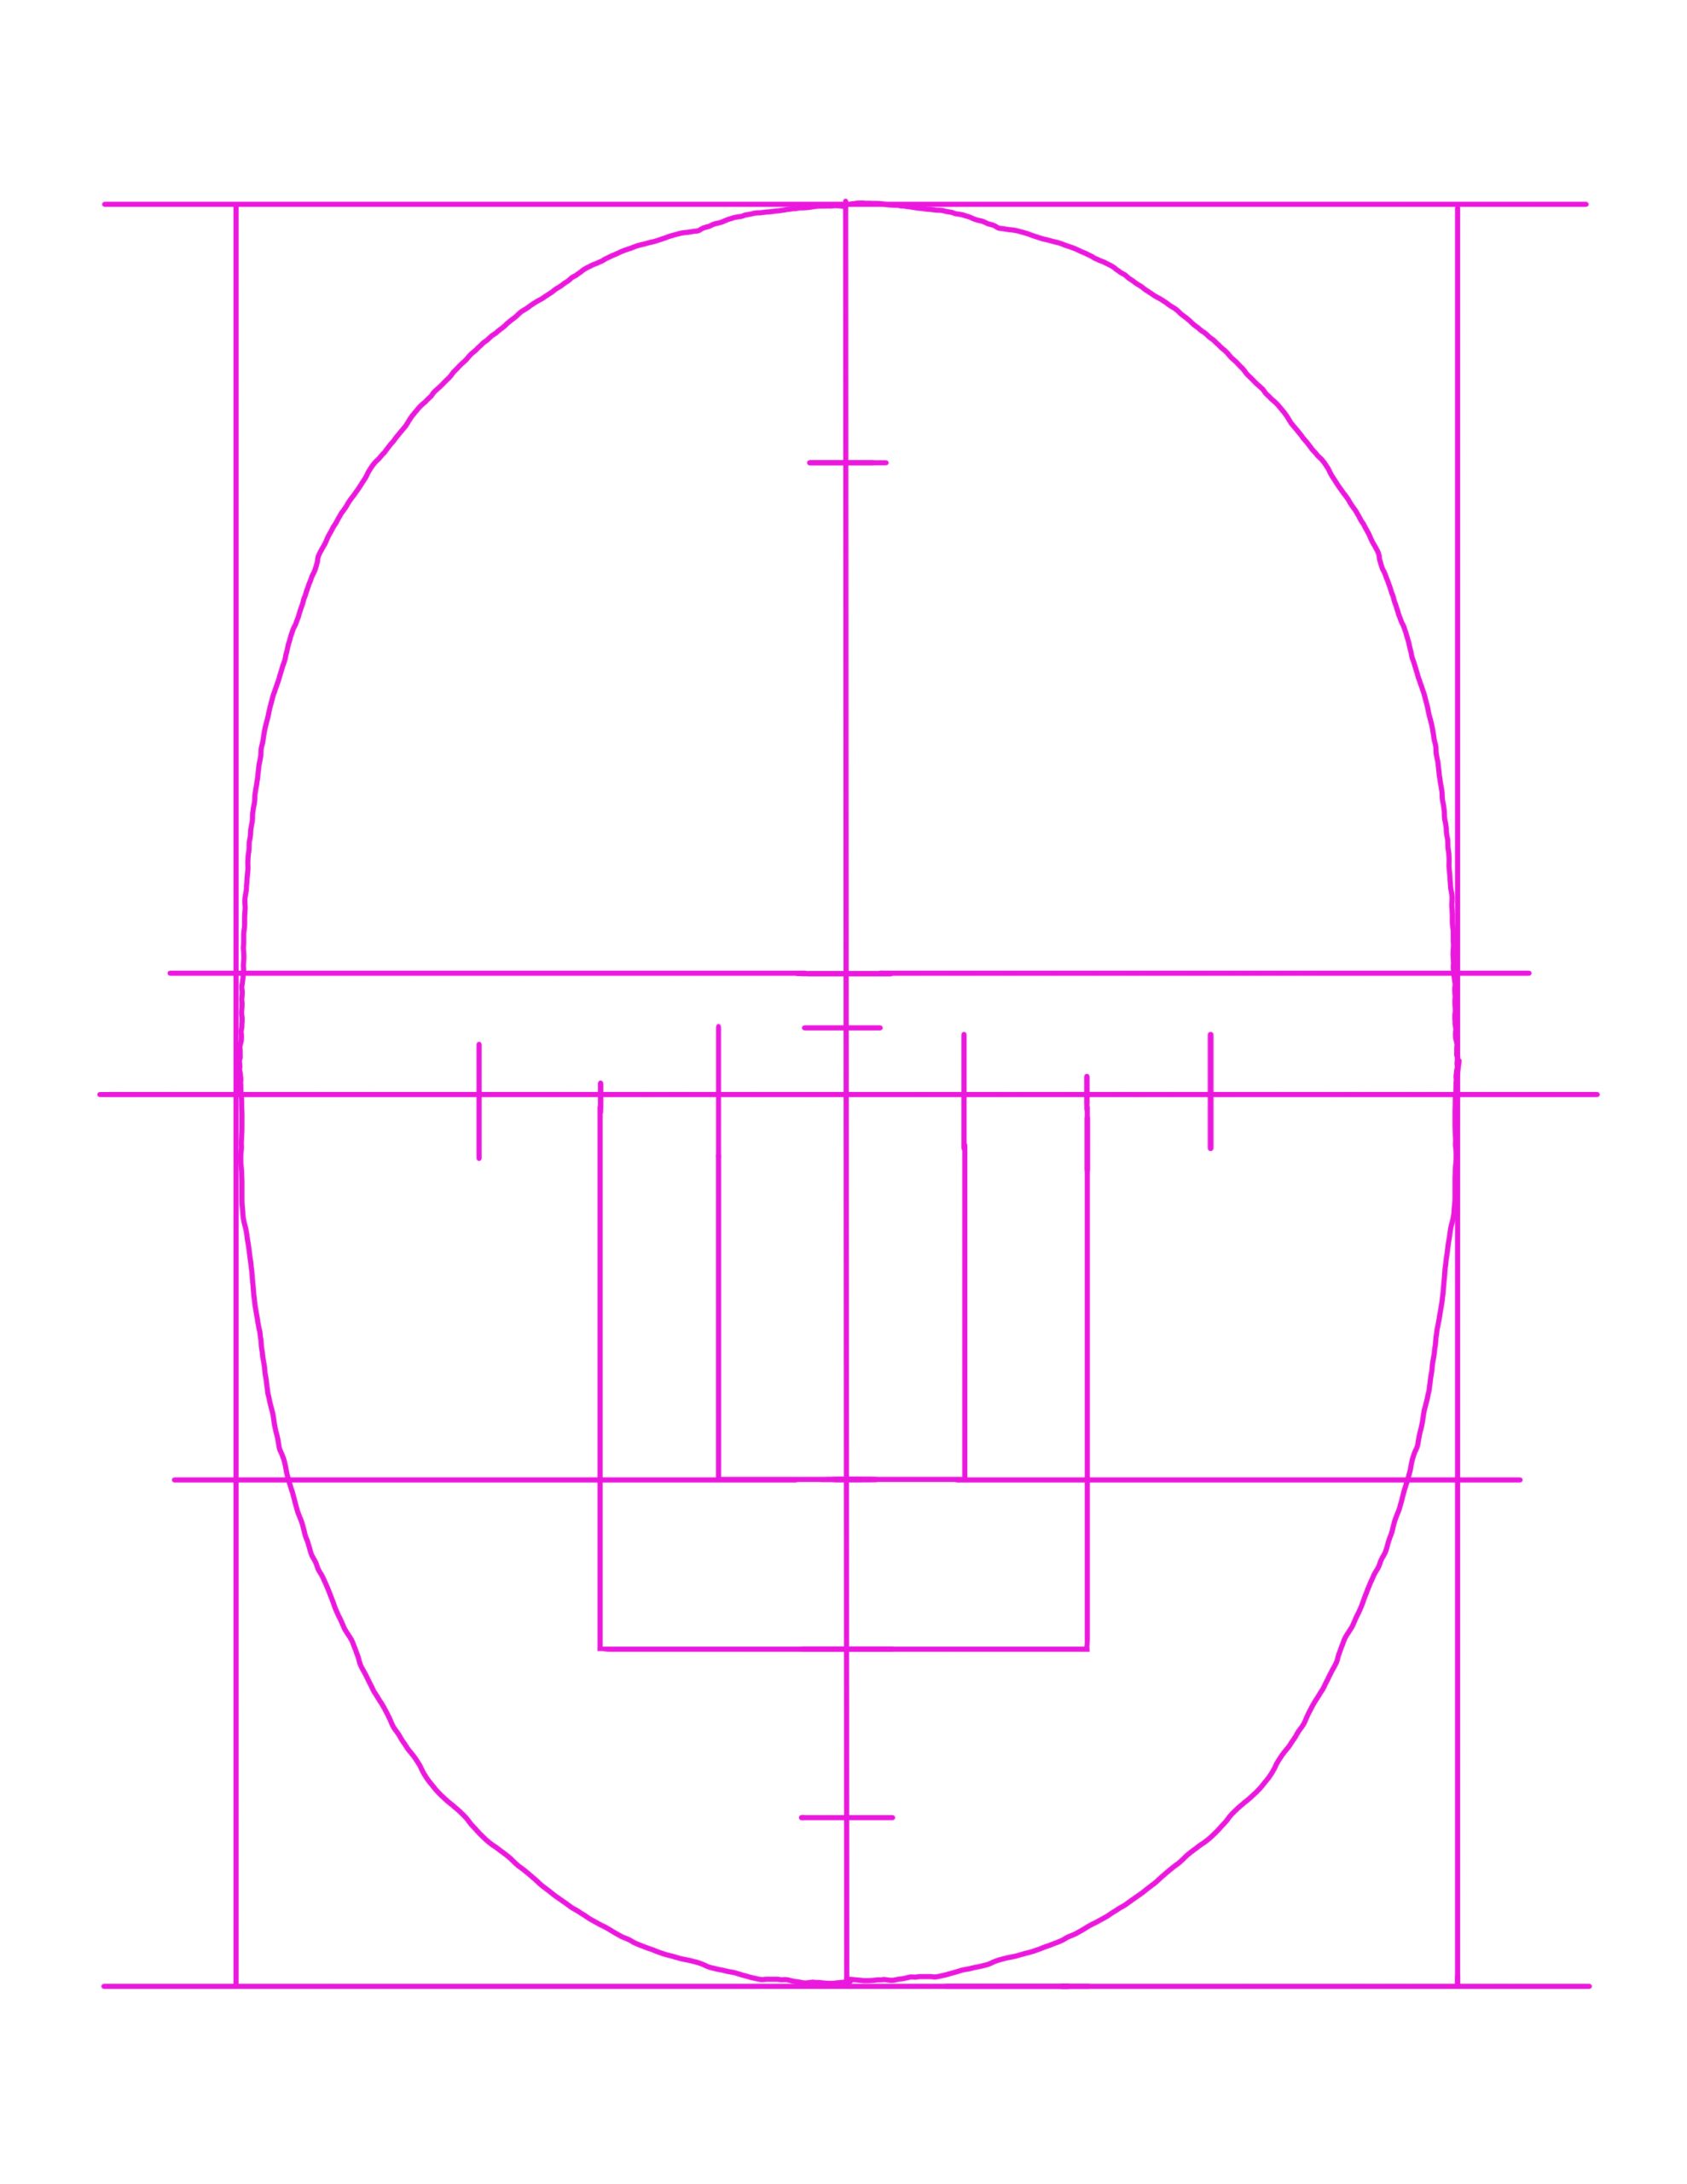
The image on the left is the basic template we will use to help measure the main features on the head. All the height measurements used for the profile template are also used for the portrait. The image has a lot of tick marks, so for the first time using this you may want to add some notes on what the measurements mean.
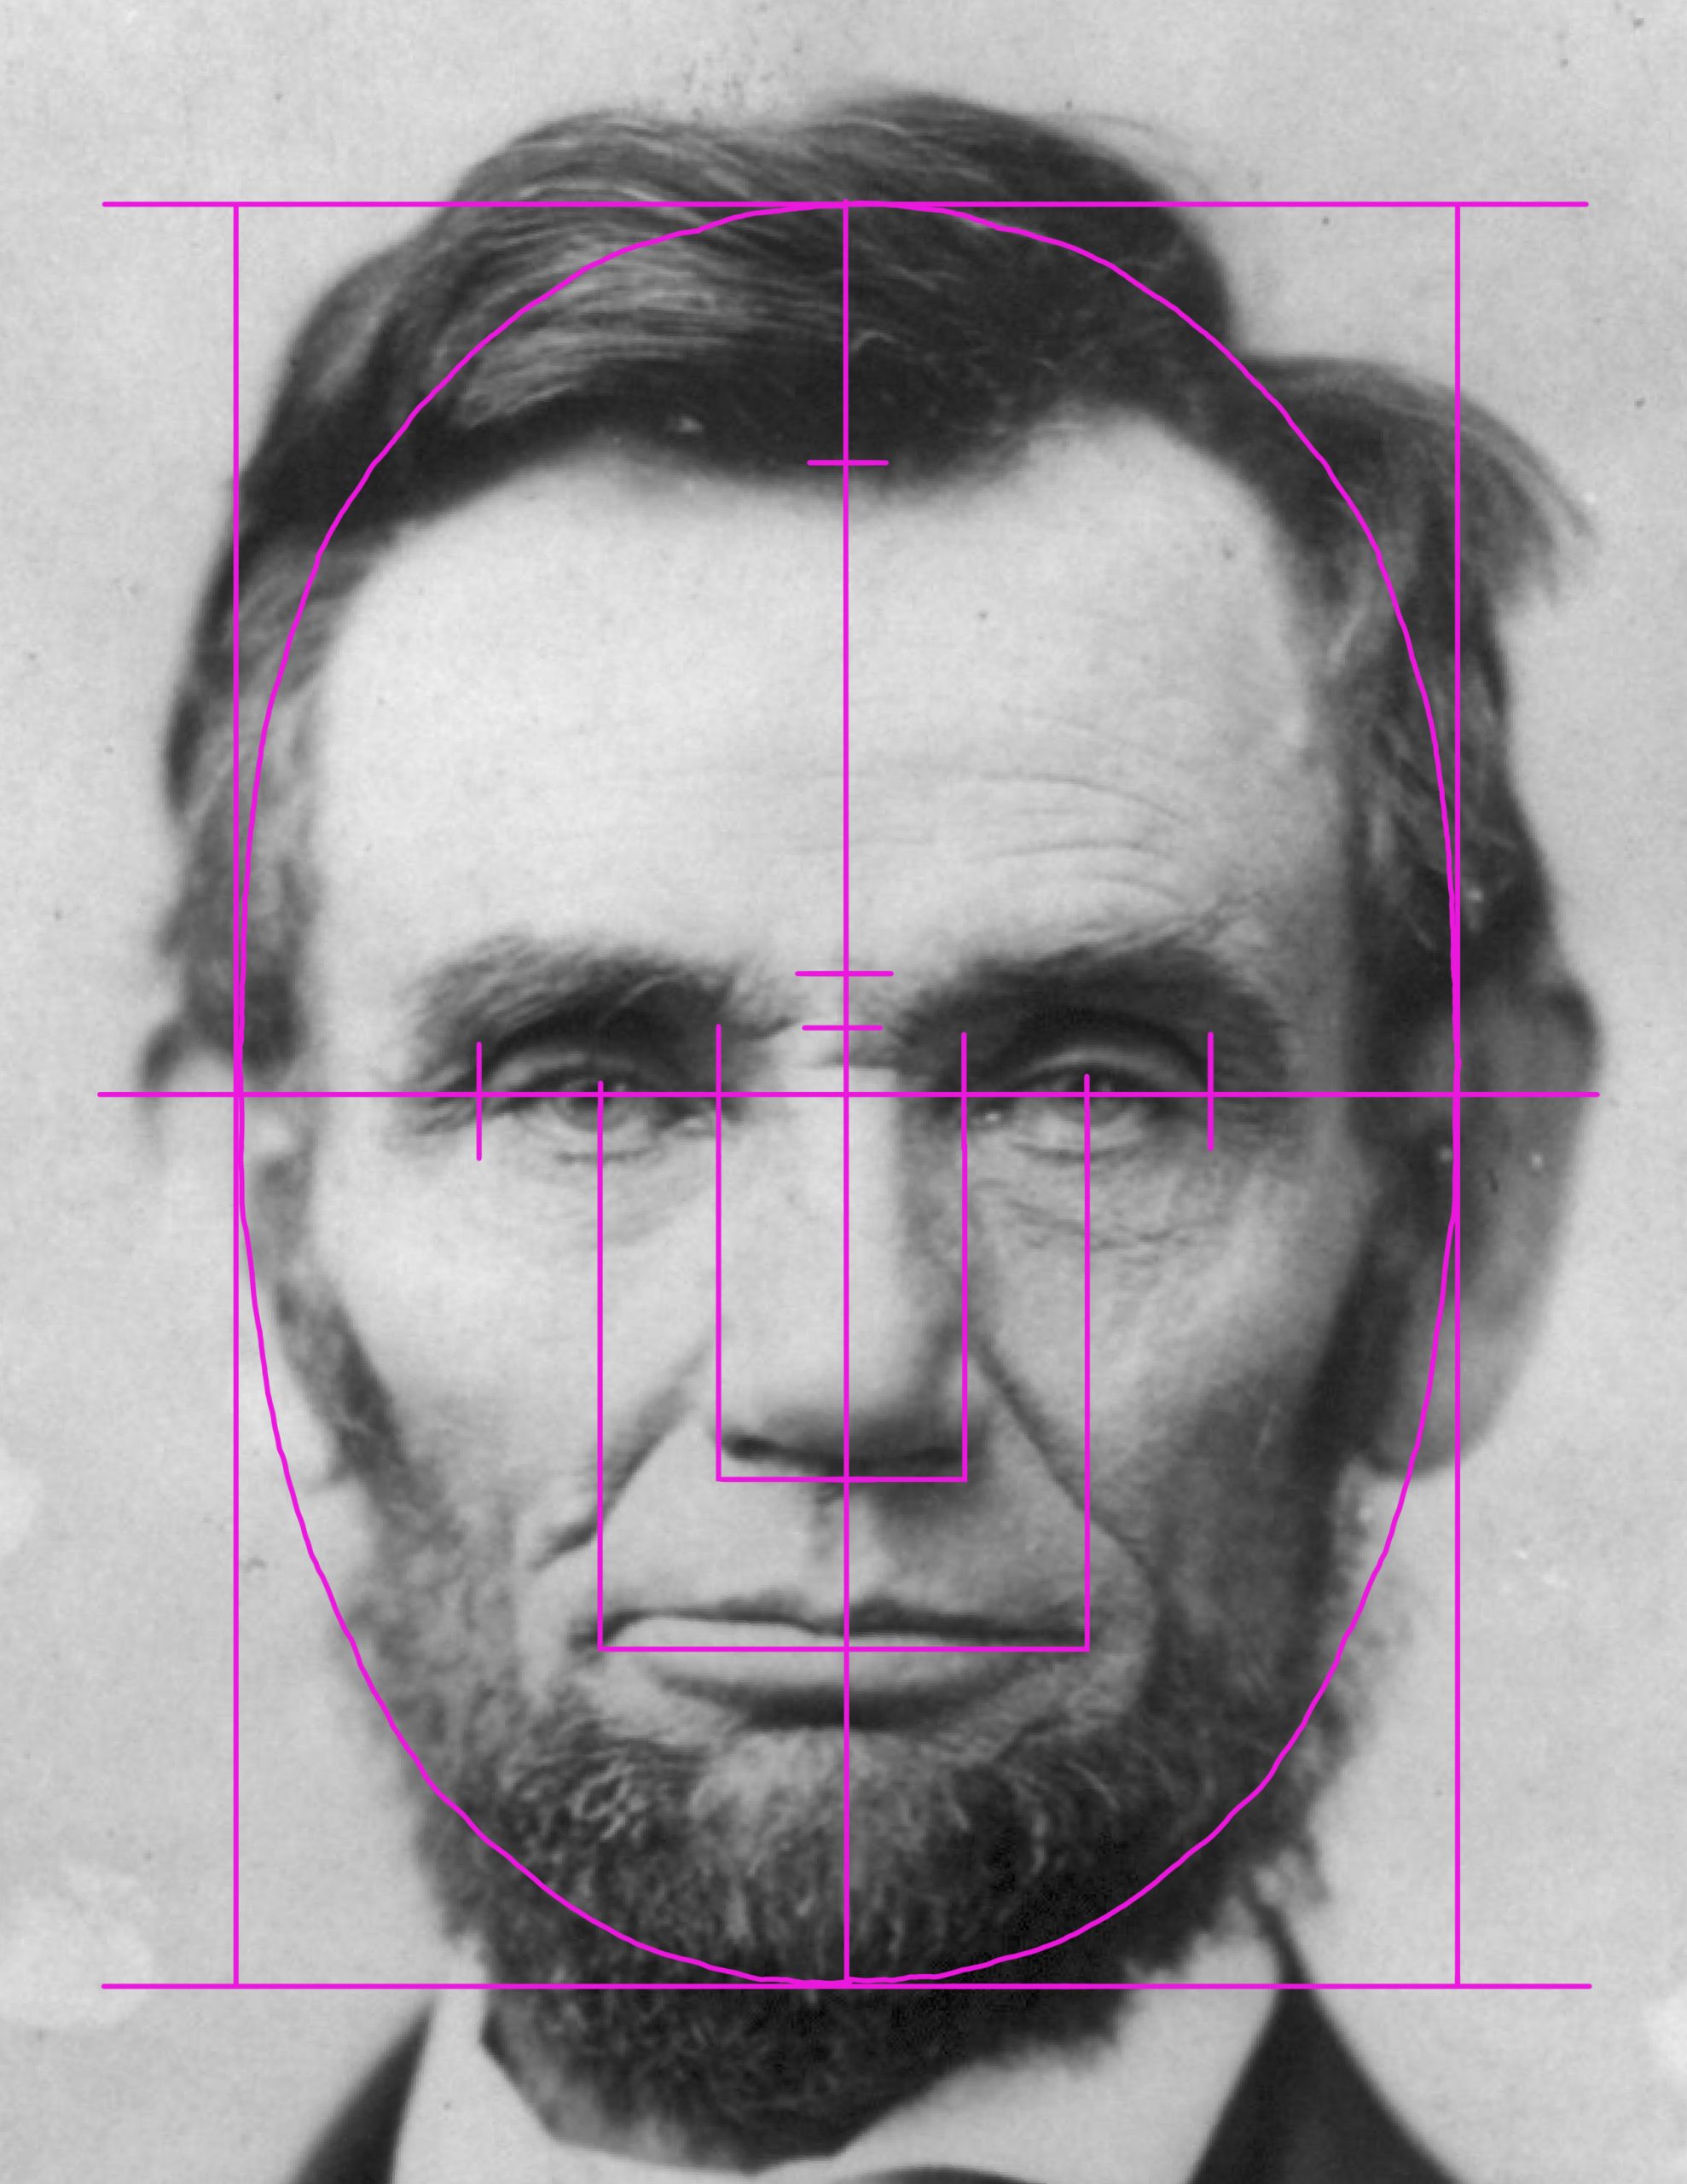
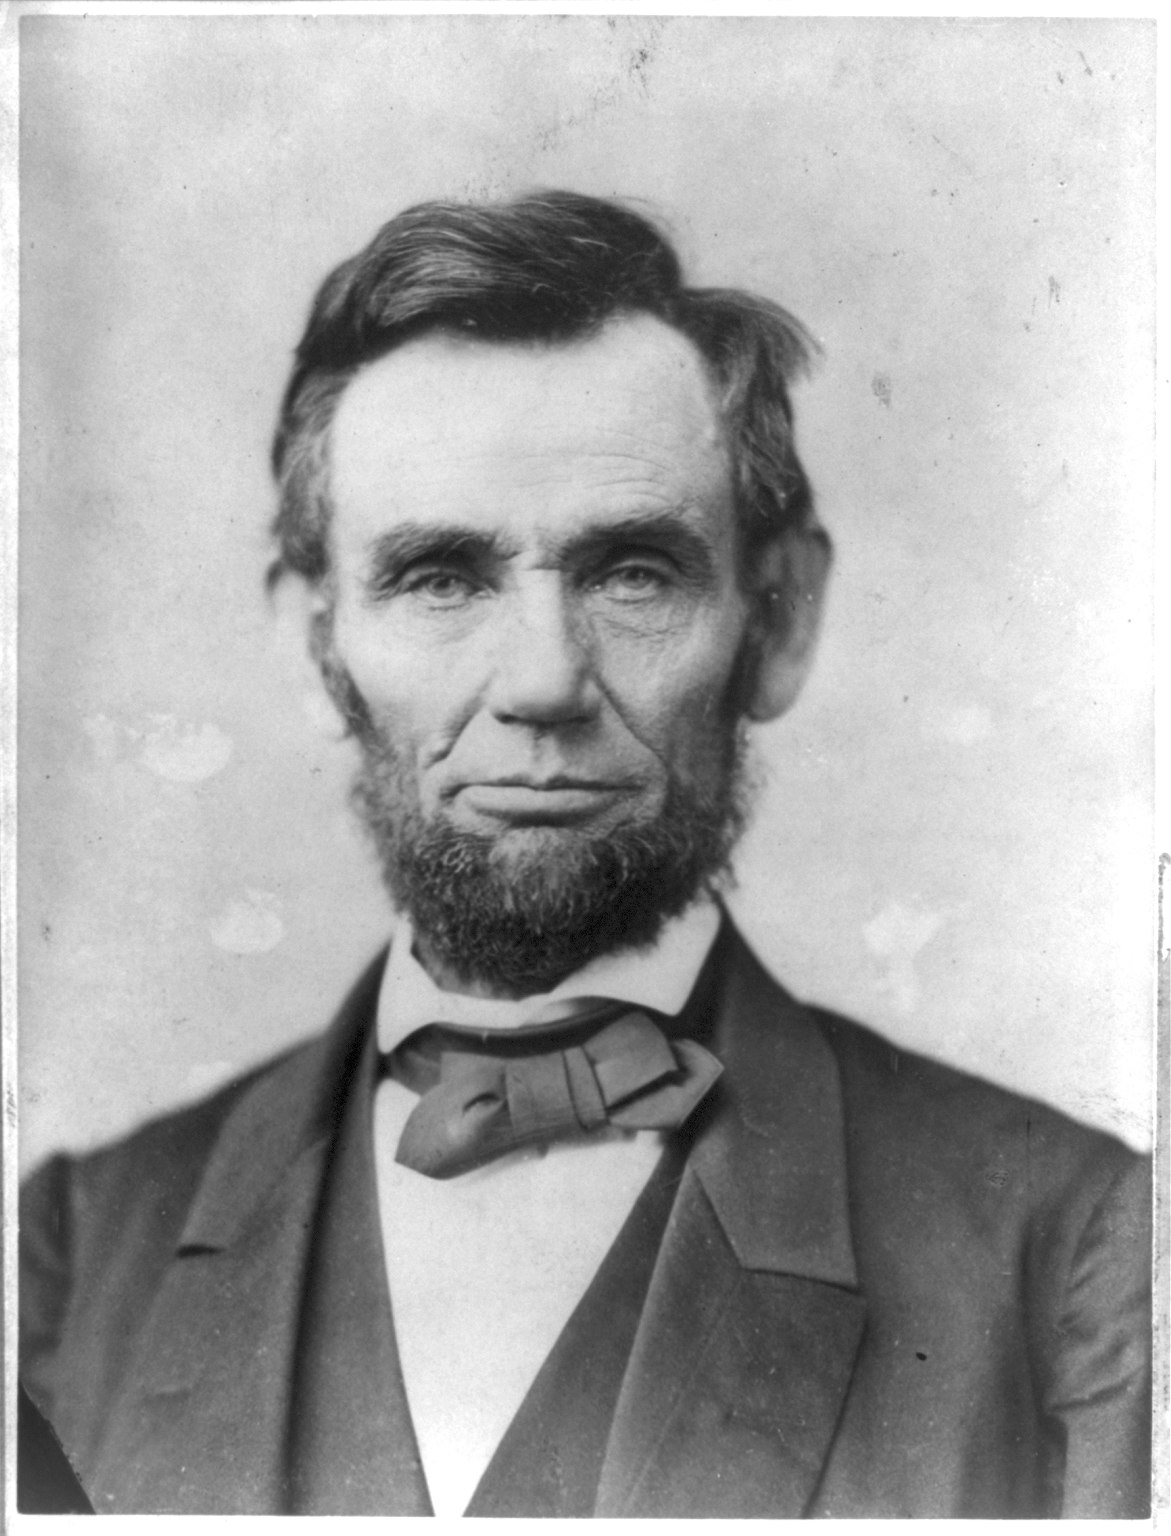 Abraham Lincoln’s image to the left will be used to help show how to build the template. There may seem to be a lot of steps involved, however, after you do this a couple times, the process is really simple and you can easily draw the template in a few minutes.
Step One
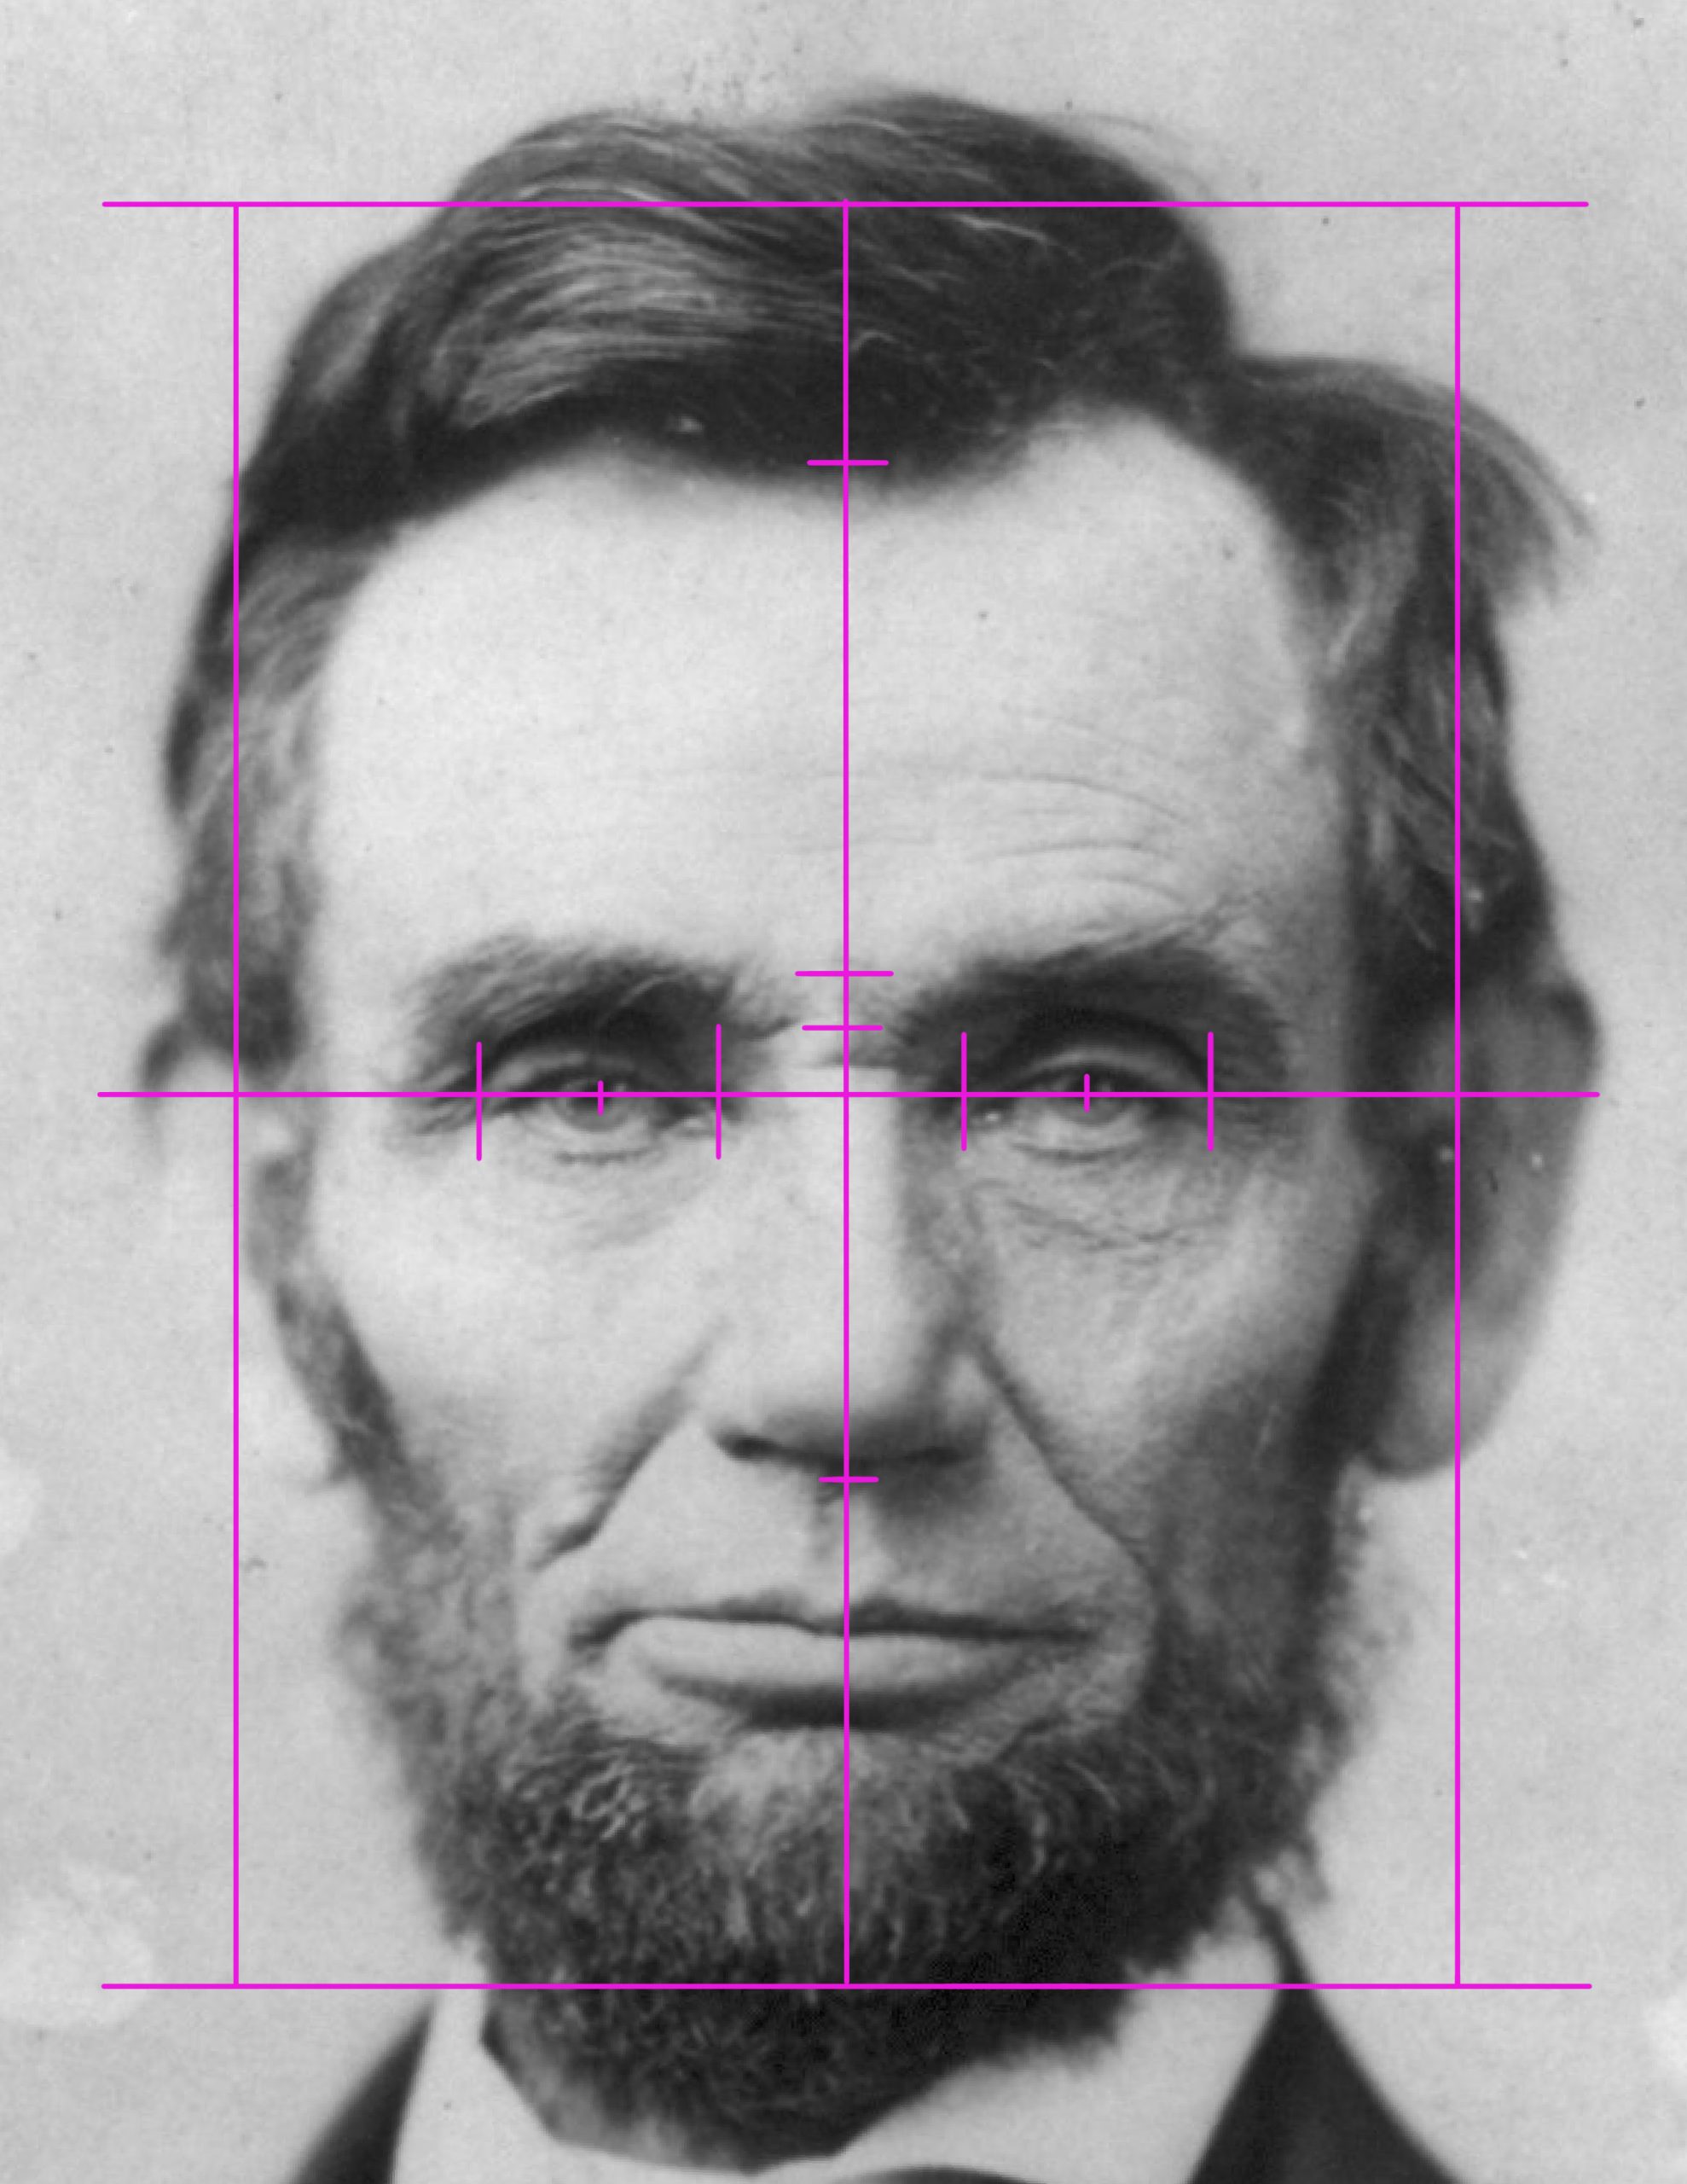
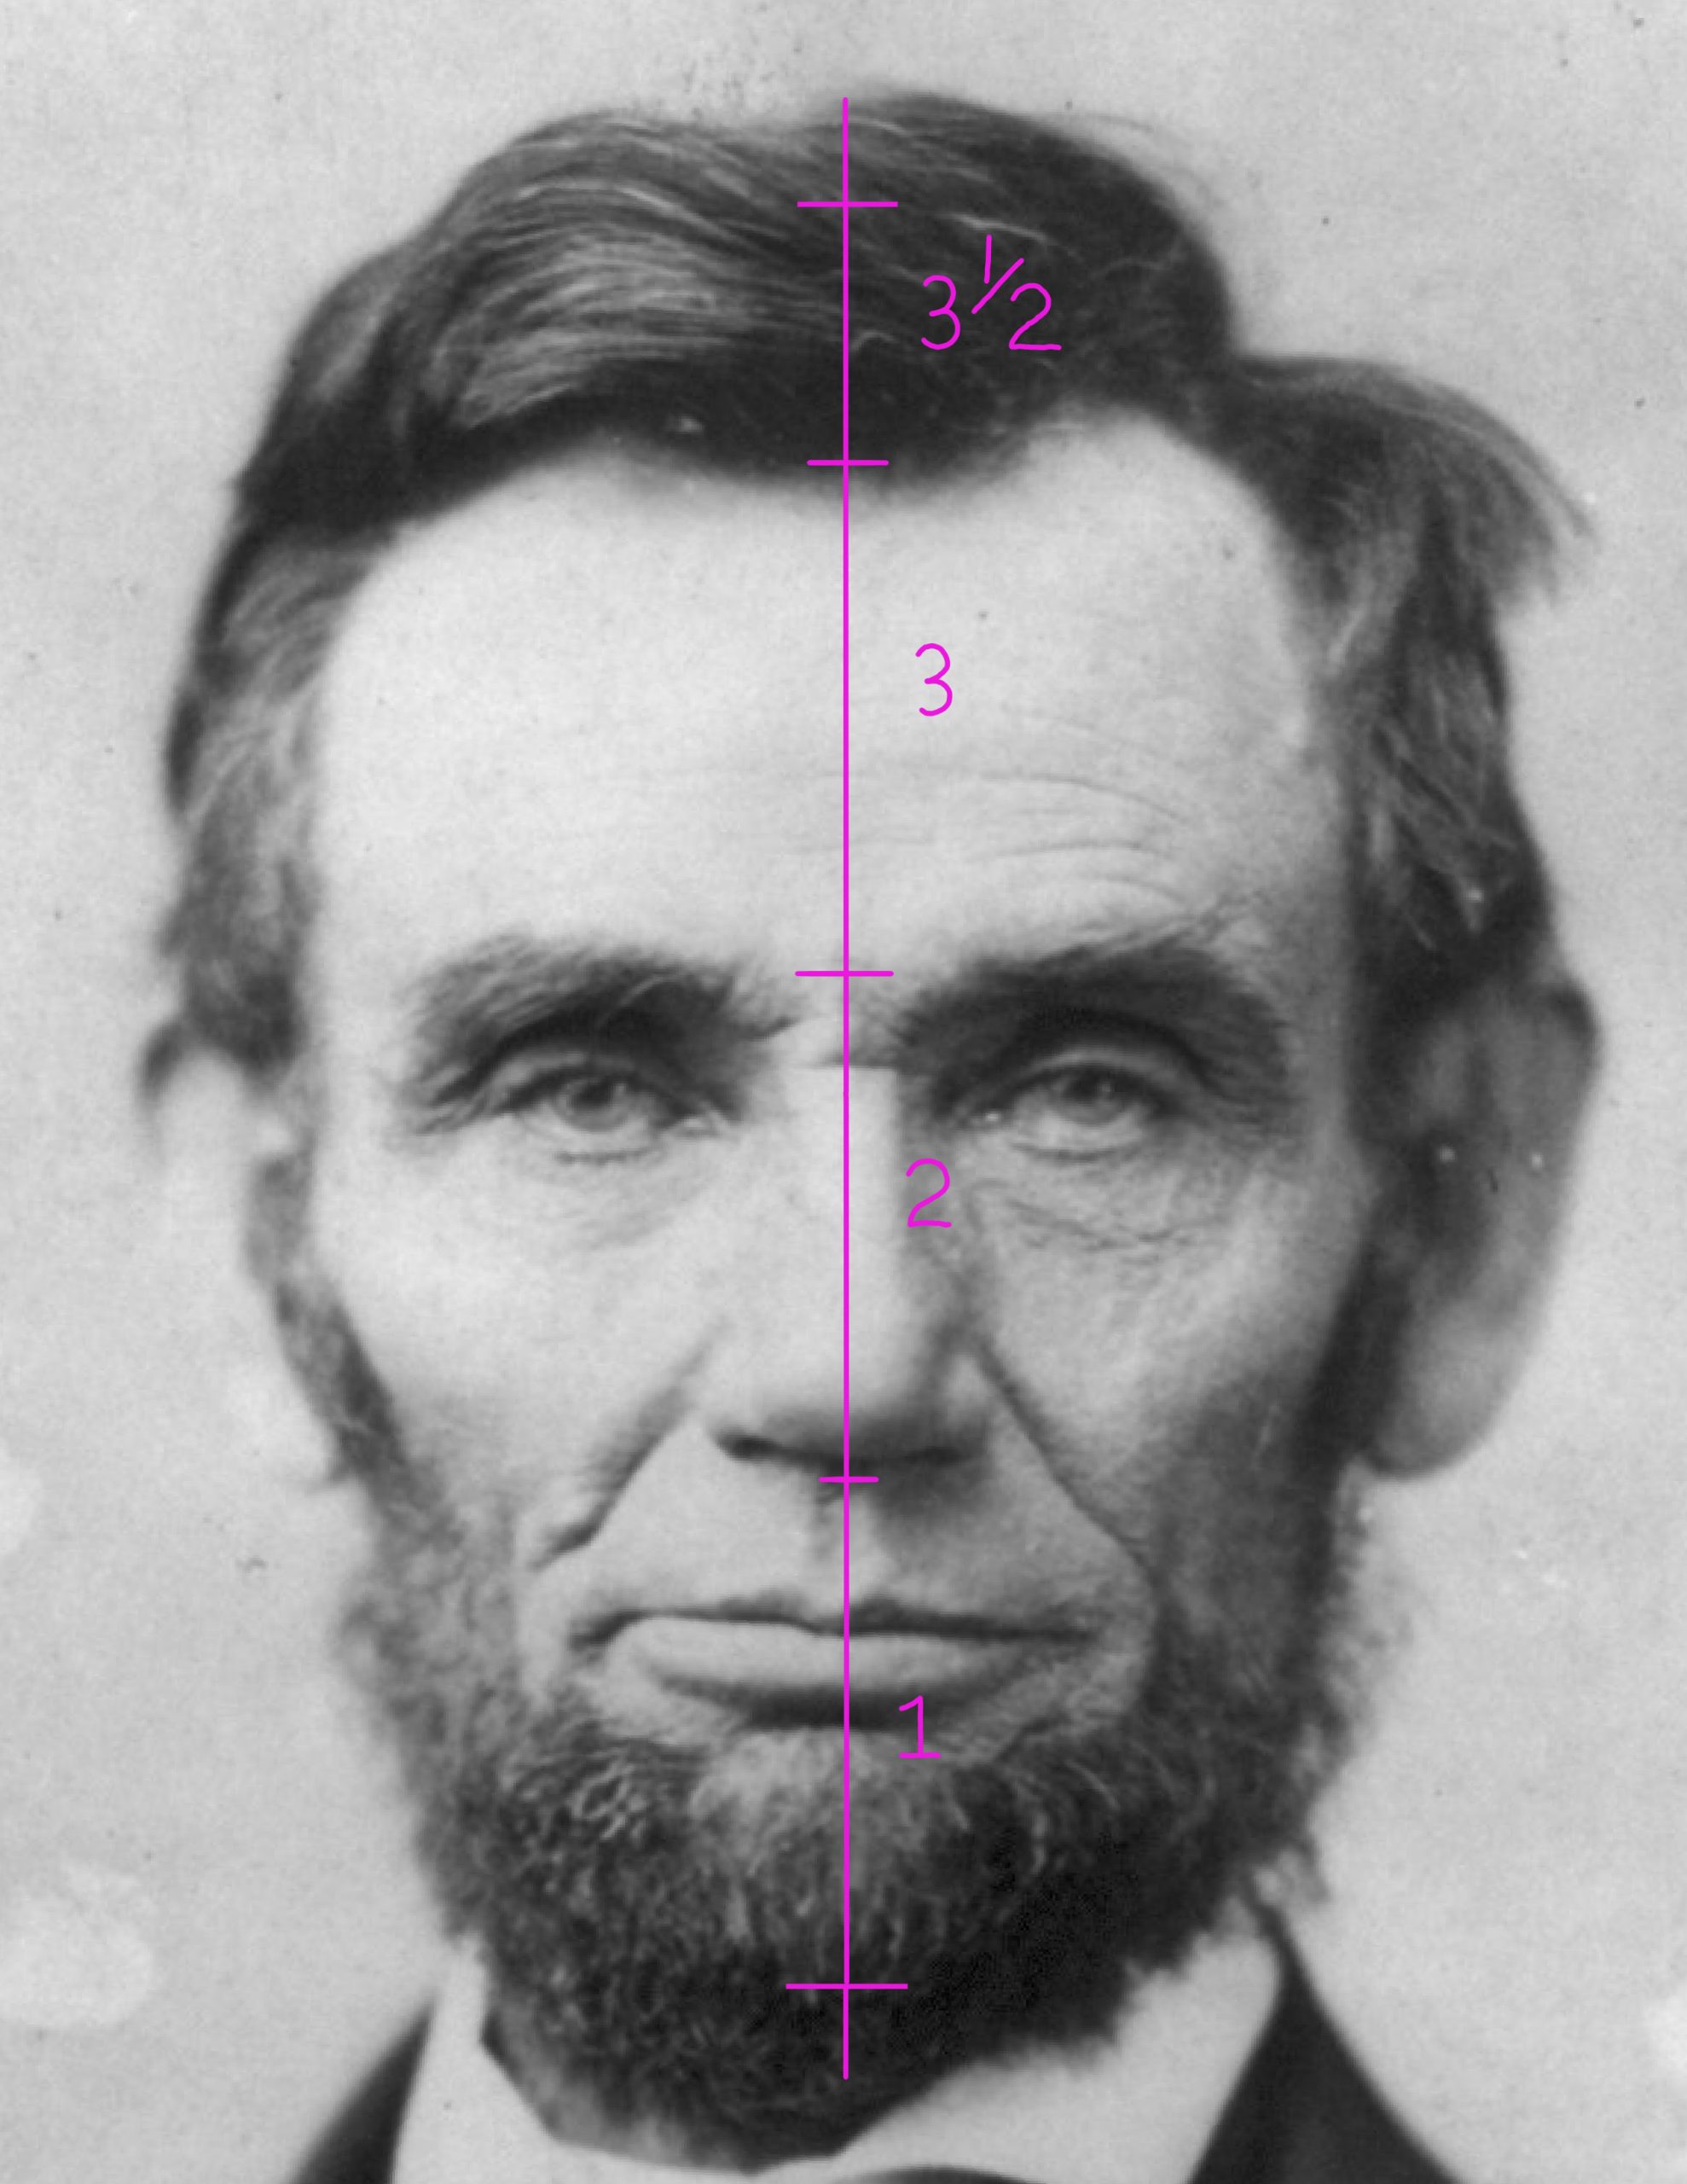 To start, draw a light vertical line down the middle of the drawing area. This line will then need to be divided into three and a half sections with tick marks showing each measurement. The first tick mark, locating the chin, is the best place to start. This should be done in consideration of how much of the page you want left blank under the chin, so you can gauge how much of the neck and shoulders you want to include in your drawing. From the chin tick mark, you will need to three and a half equal units up to the top of the head. Make sure to allow some extra room at the top of the head for hair and a gap between the hair to the edge of the drawing area. This may take some trial and error to come up with the right measurements. Just like the profile template, you will be left with tick marks that represent the bottom of the chin, under the nose, the eyebrows, the hairline, and the top of the head.
Step two
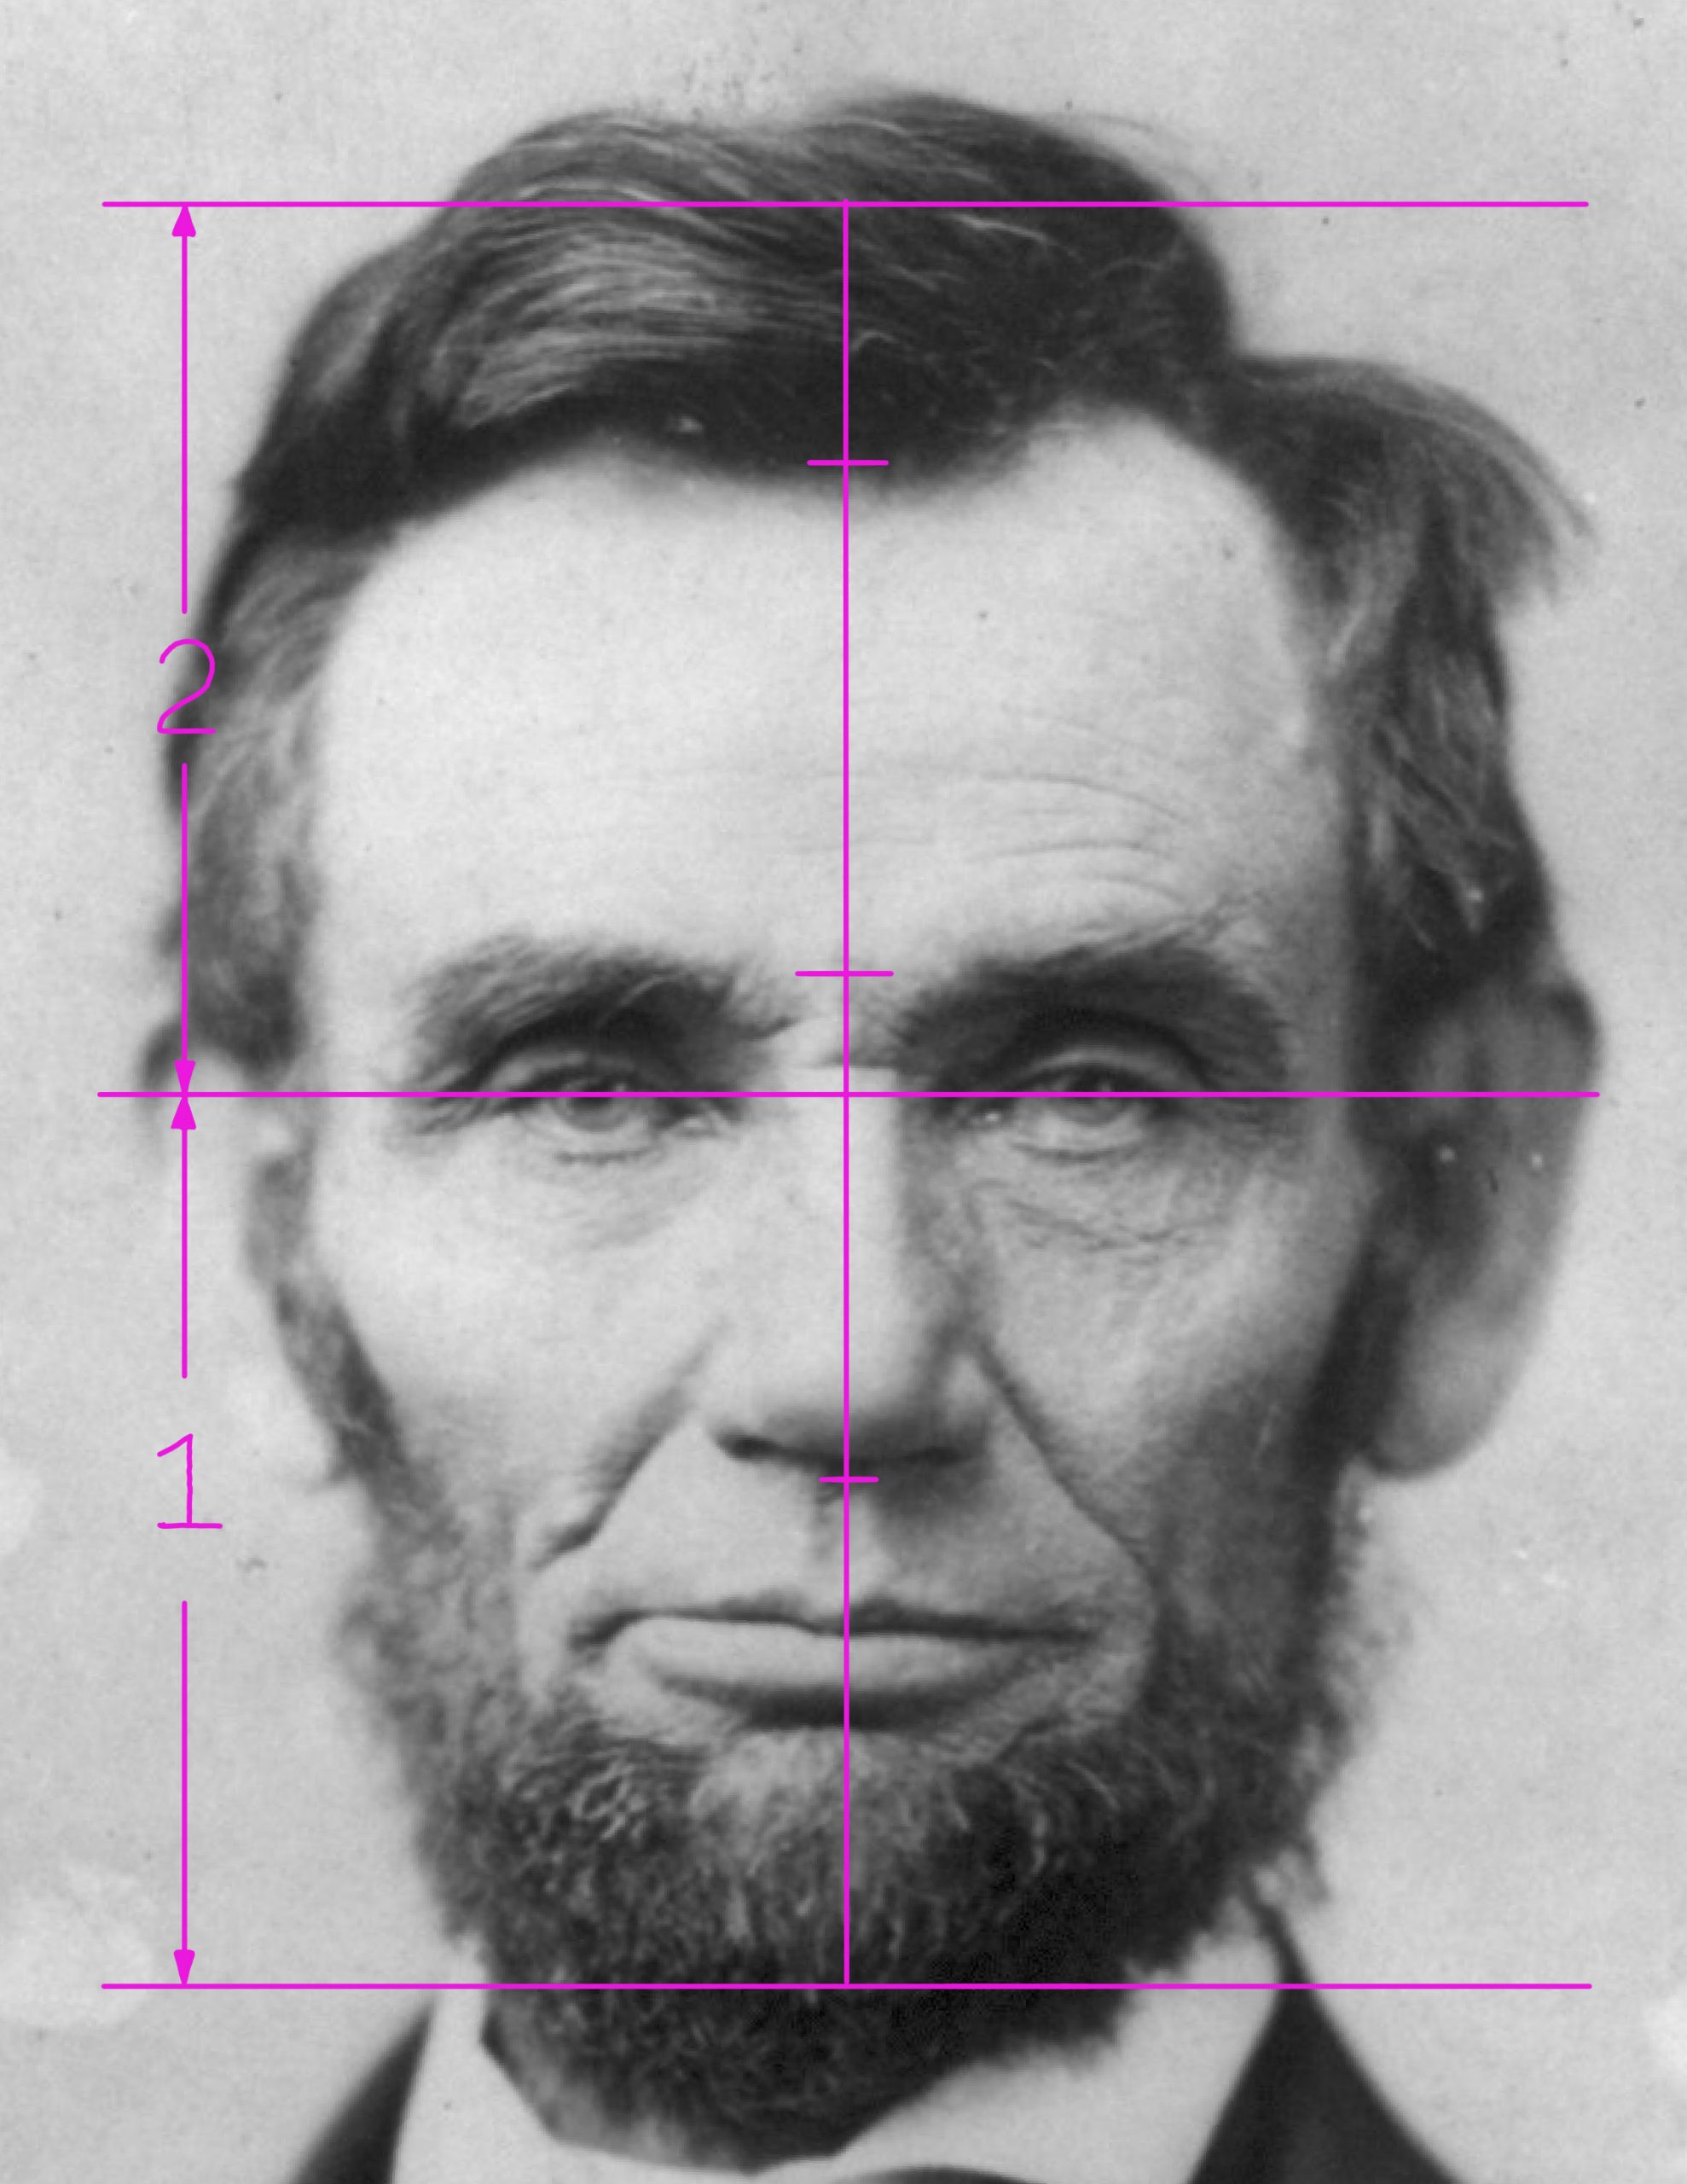 Now that you know the height of the head, you can easily find the vertical placement of the eyes. Just like the profile template, it is halfway between the chin and the top of the head. You could have started with this step, however, if you did, then you would end up having to divide this distance by three and a half, which is harder to do than divide by two. Finding the height of the eyes after step one is much easier.
Step Three
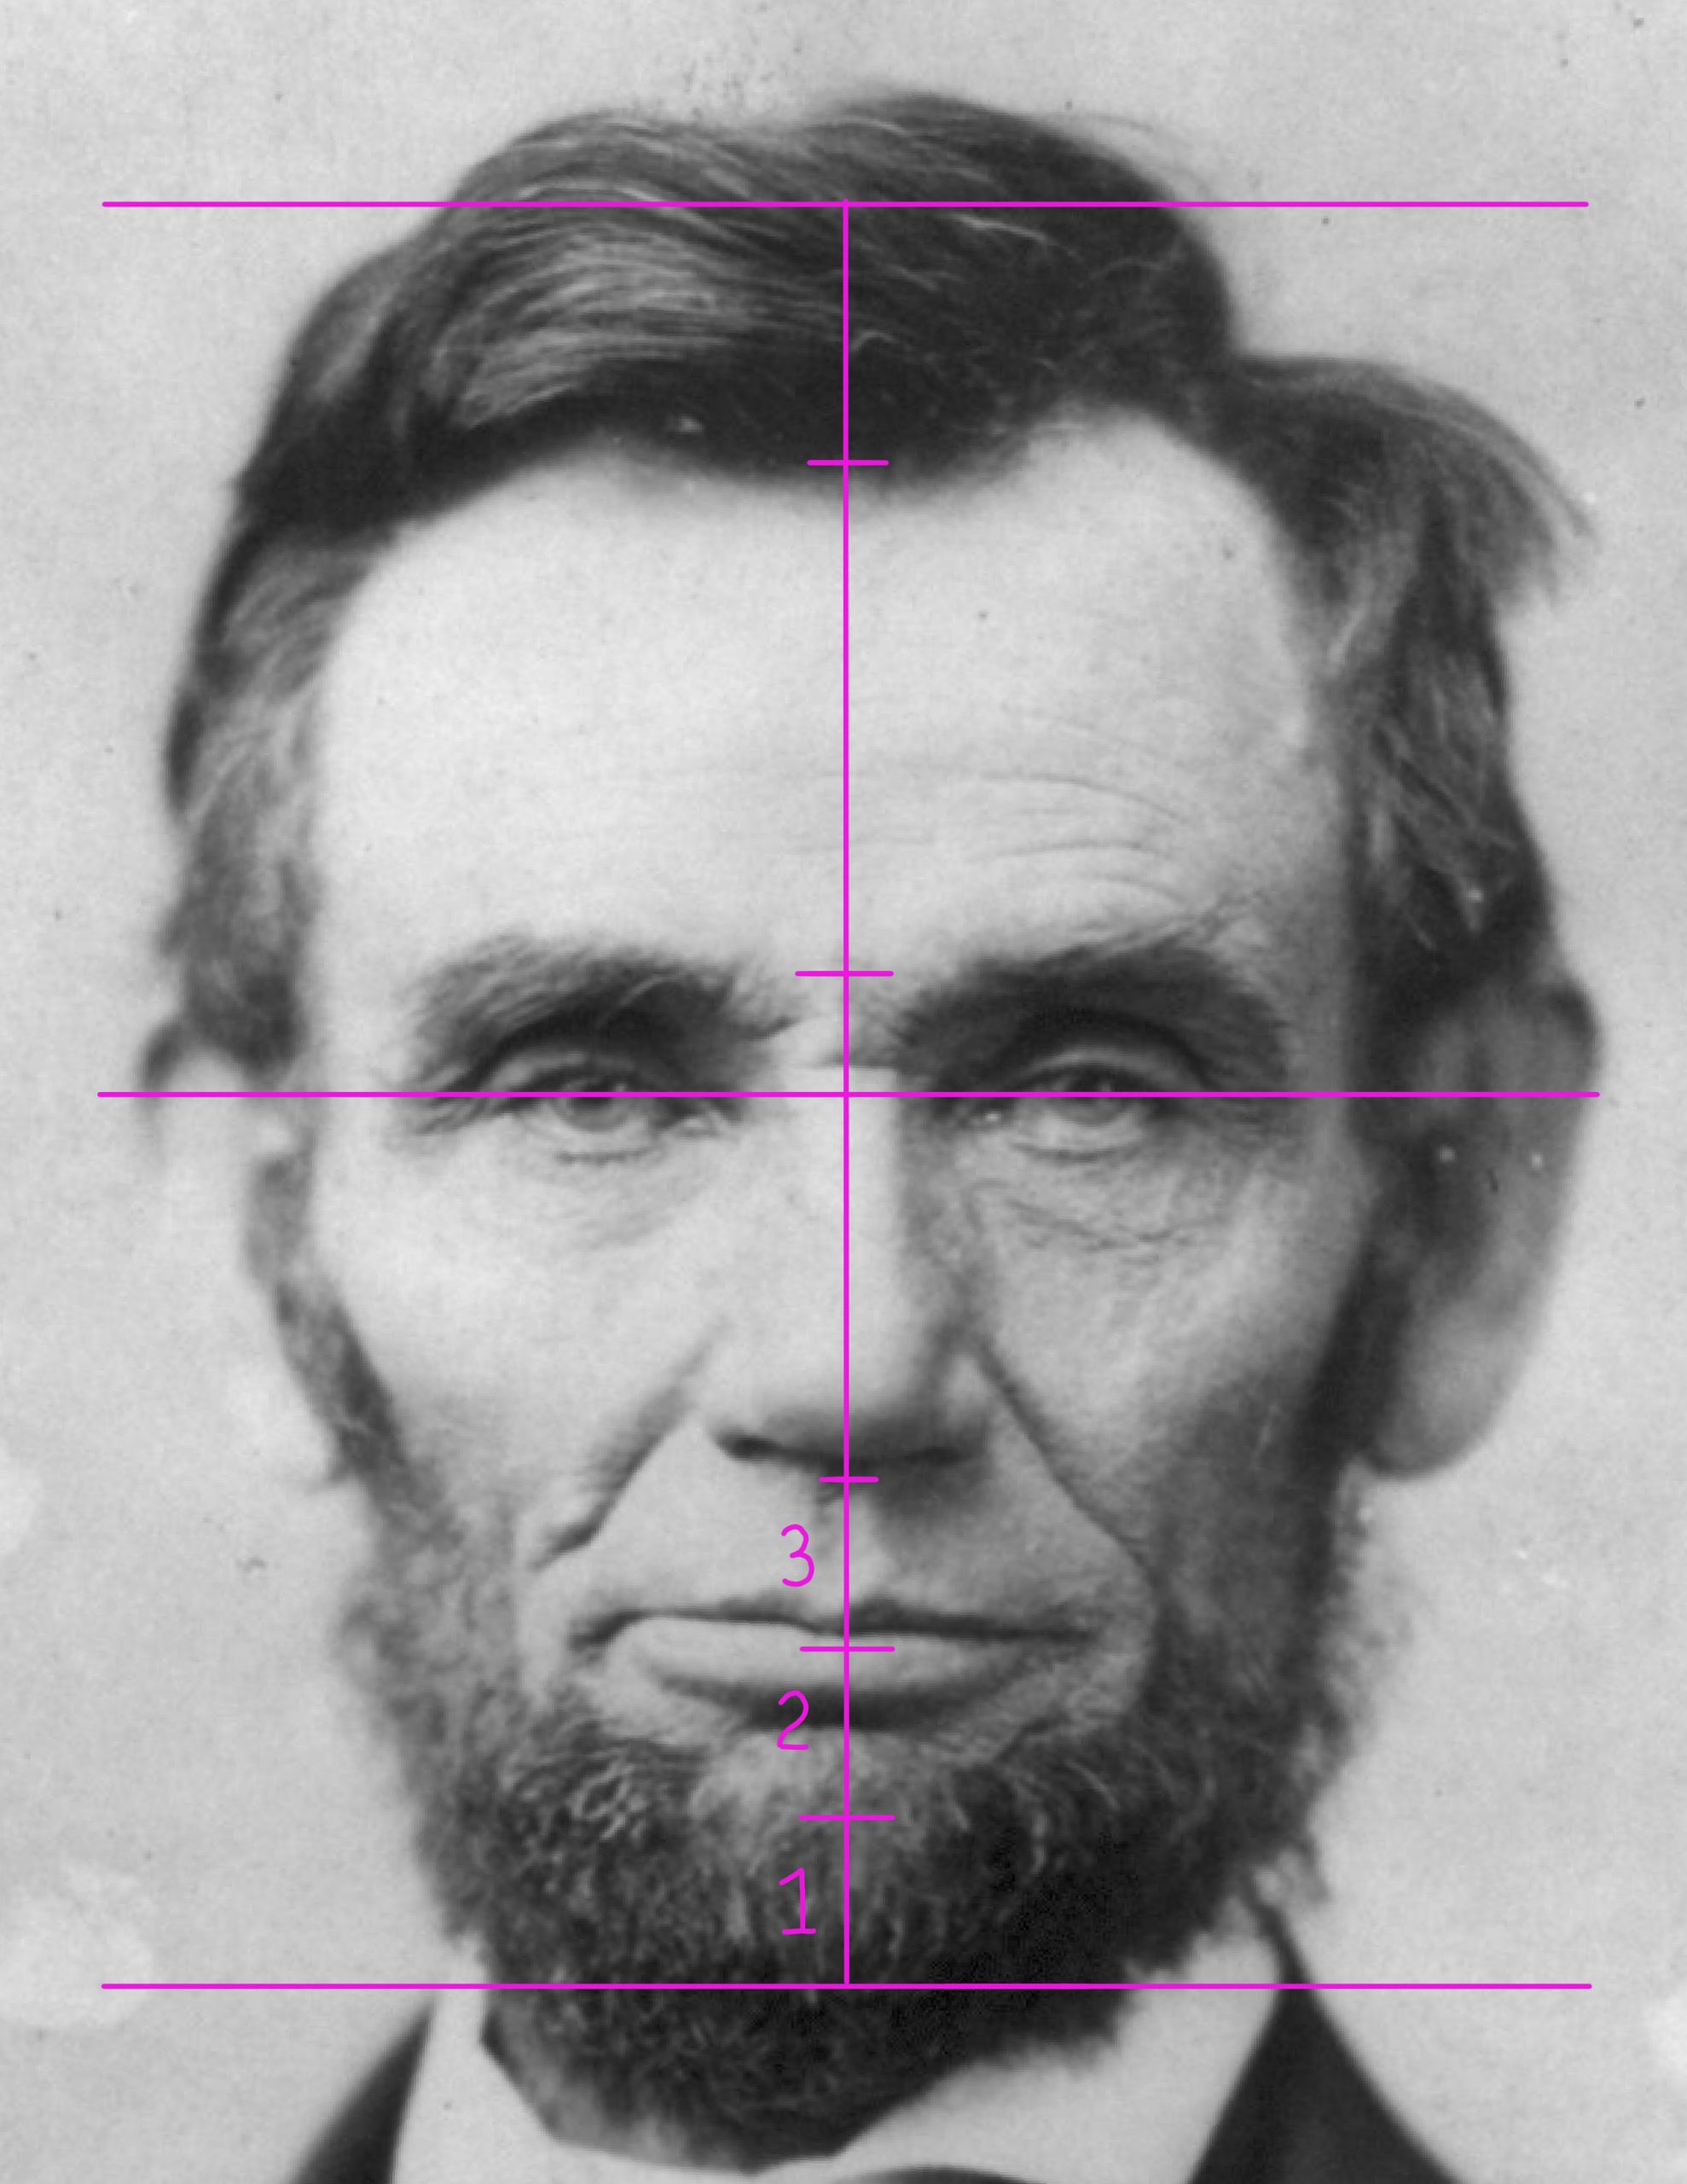 At this point you can add some more of the measurements used in the profile template. As with the profile measurements, the distance from the chin to the bottom of the nose can be divided by three to find the location where the lips meet. Again, you will have to do some experimenting with coming up with a unit that fits three times within this space. You should have two equally spaced lines between the bottom of the chin and bottom of the nose.
Step Four
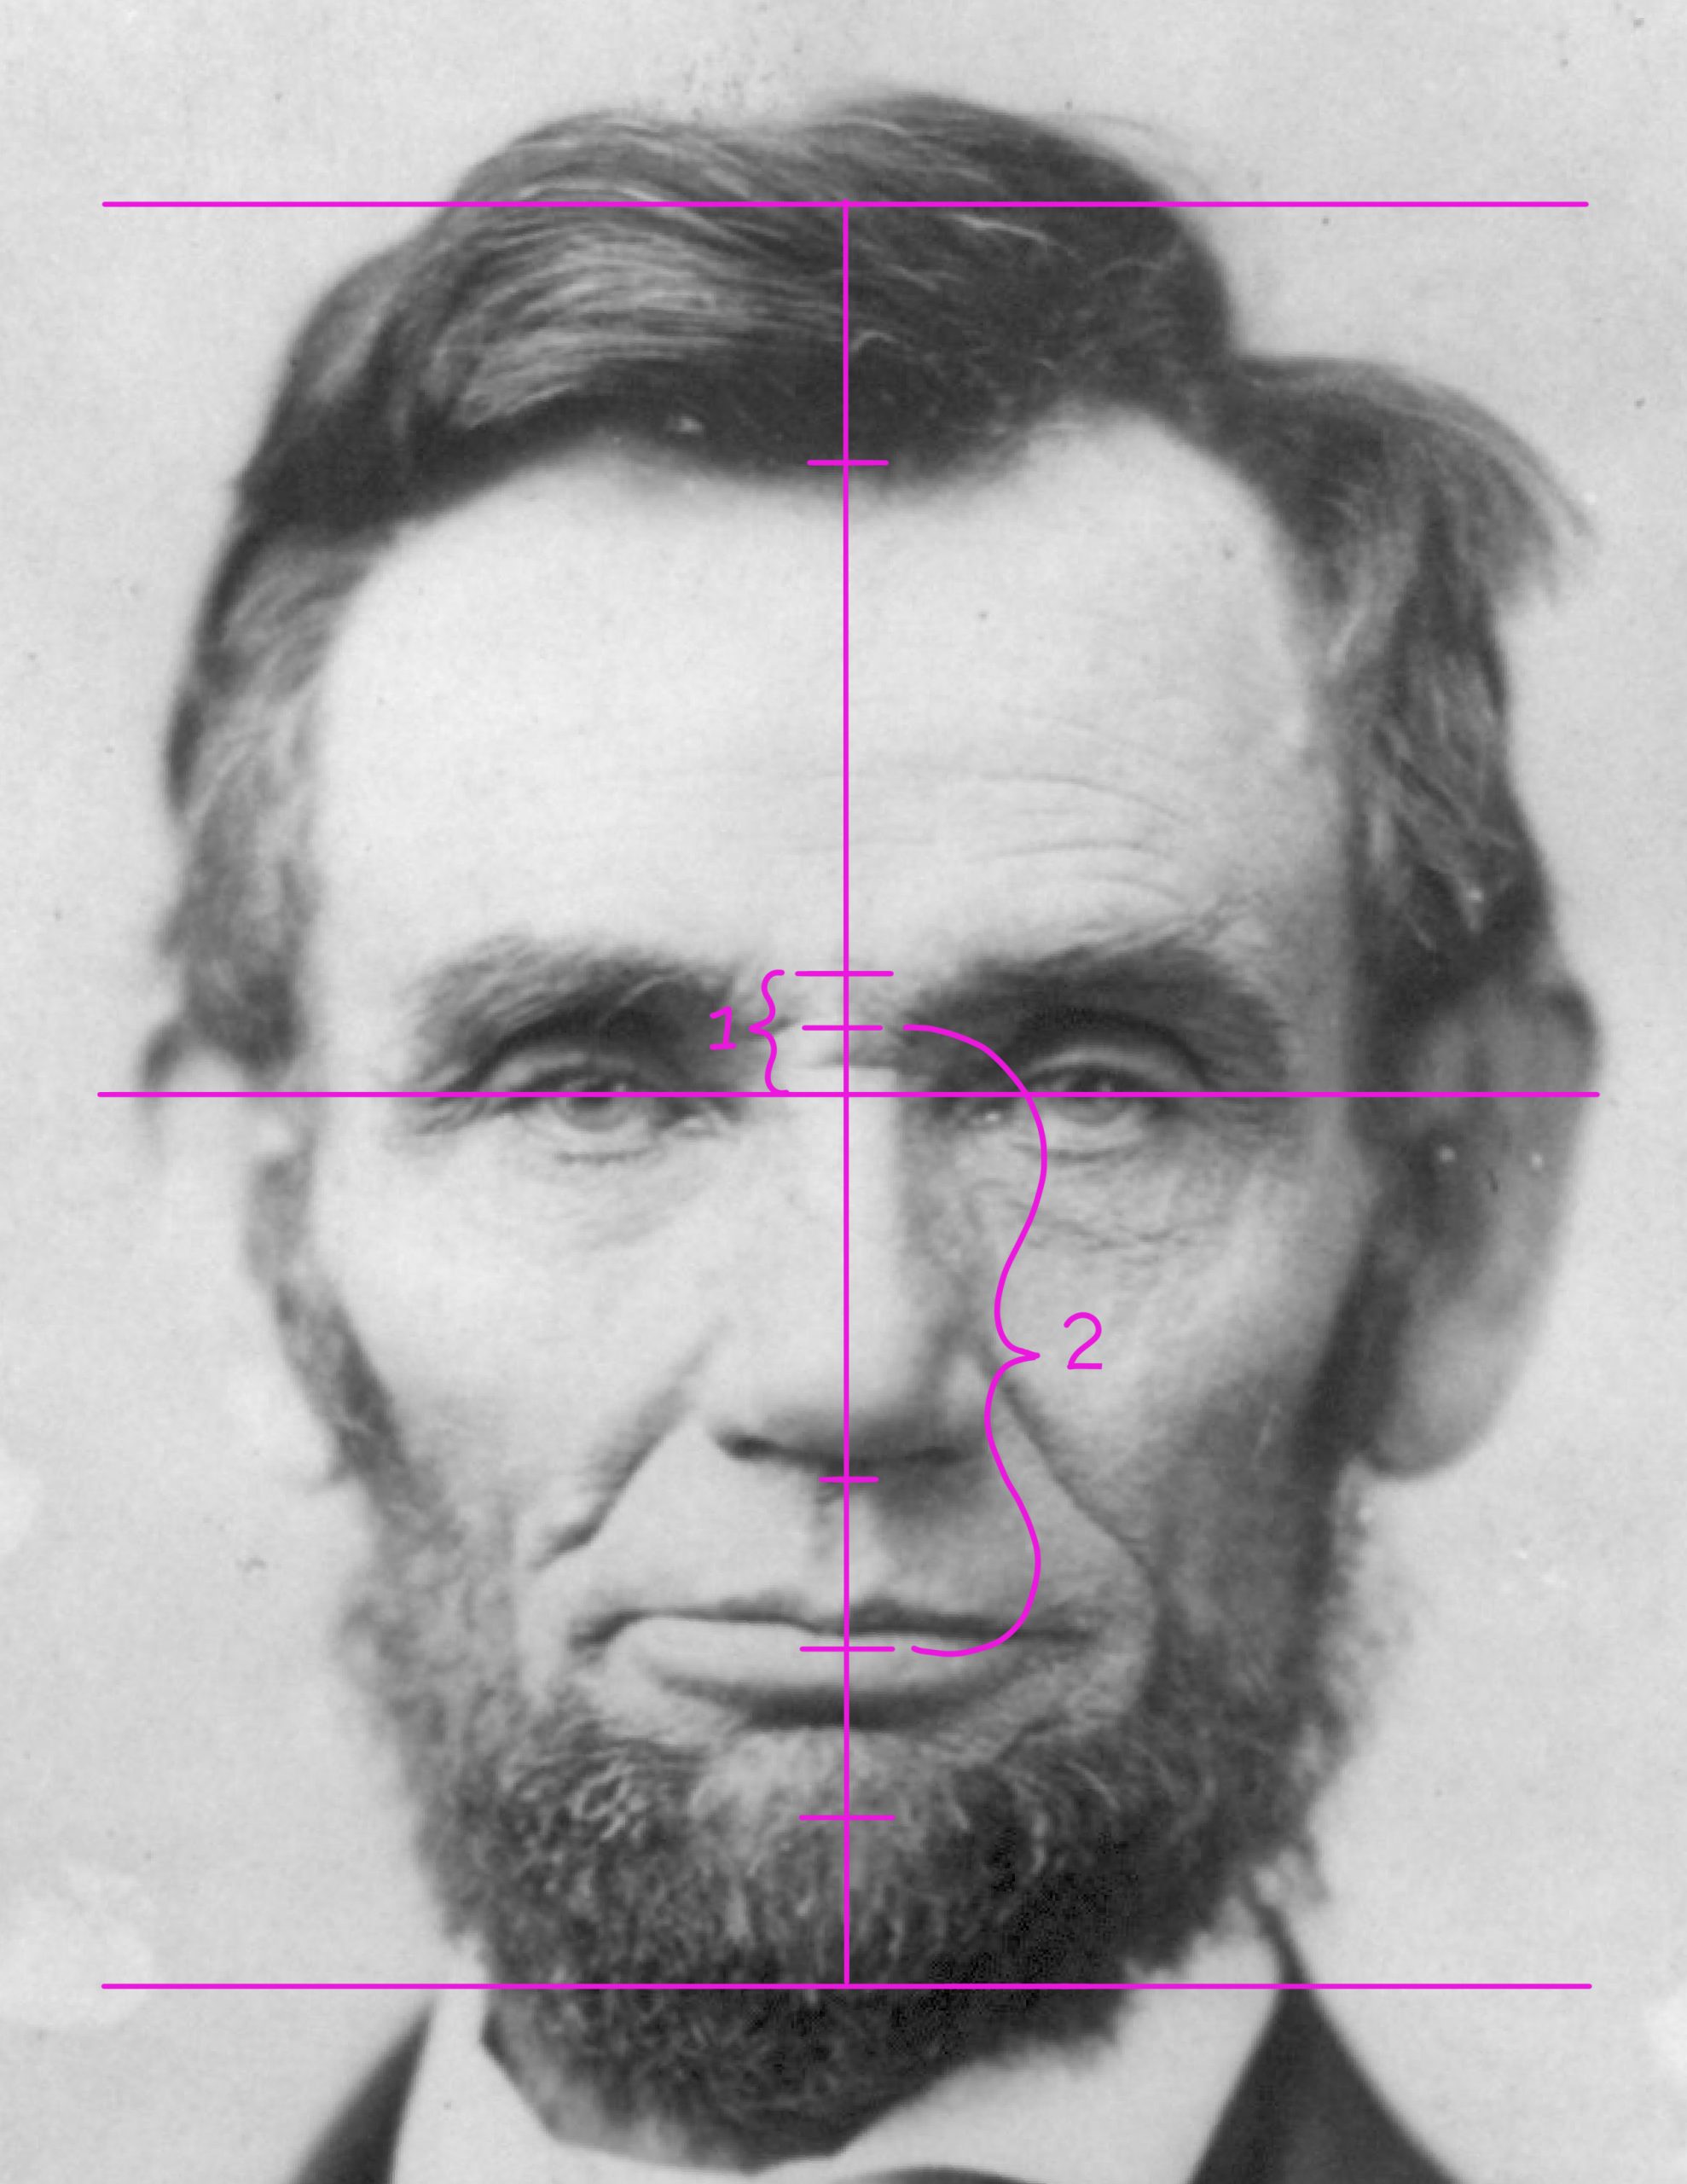 Now that you have all the height measurements, you can work on the width measurements. You will start with finding the width of the head. The measurement you come up with in this step may be a little wider than the actual head, however, it will help when you move to finding the eye width and placement. First, divide the height between the eye height and eyebrow (distance 1) and add another tick mark. Next, measure from that tick mark to the tick mark representing the center of the lips. This distance will be used twice for each half of the head.
Step Five
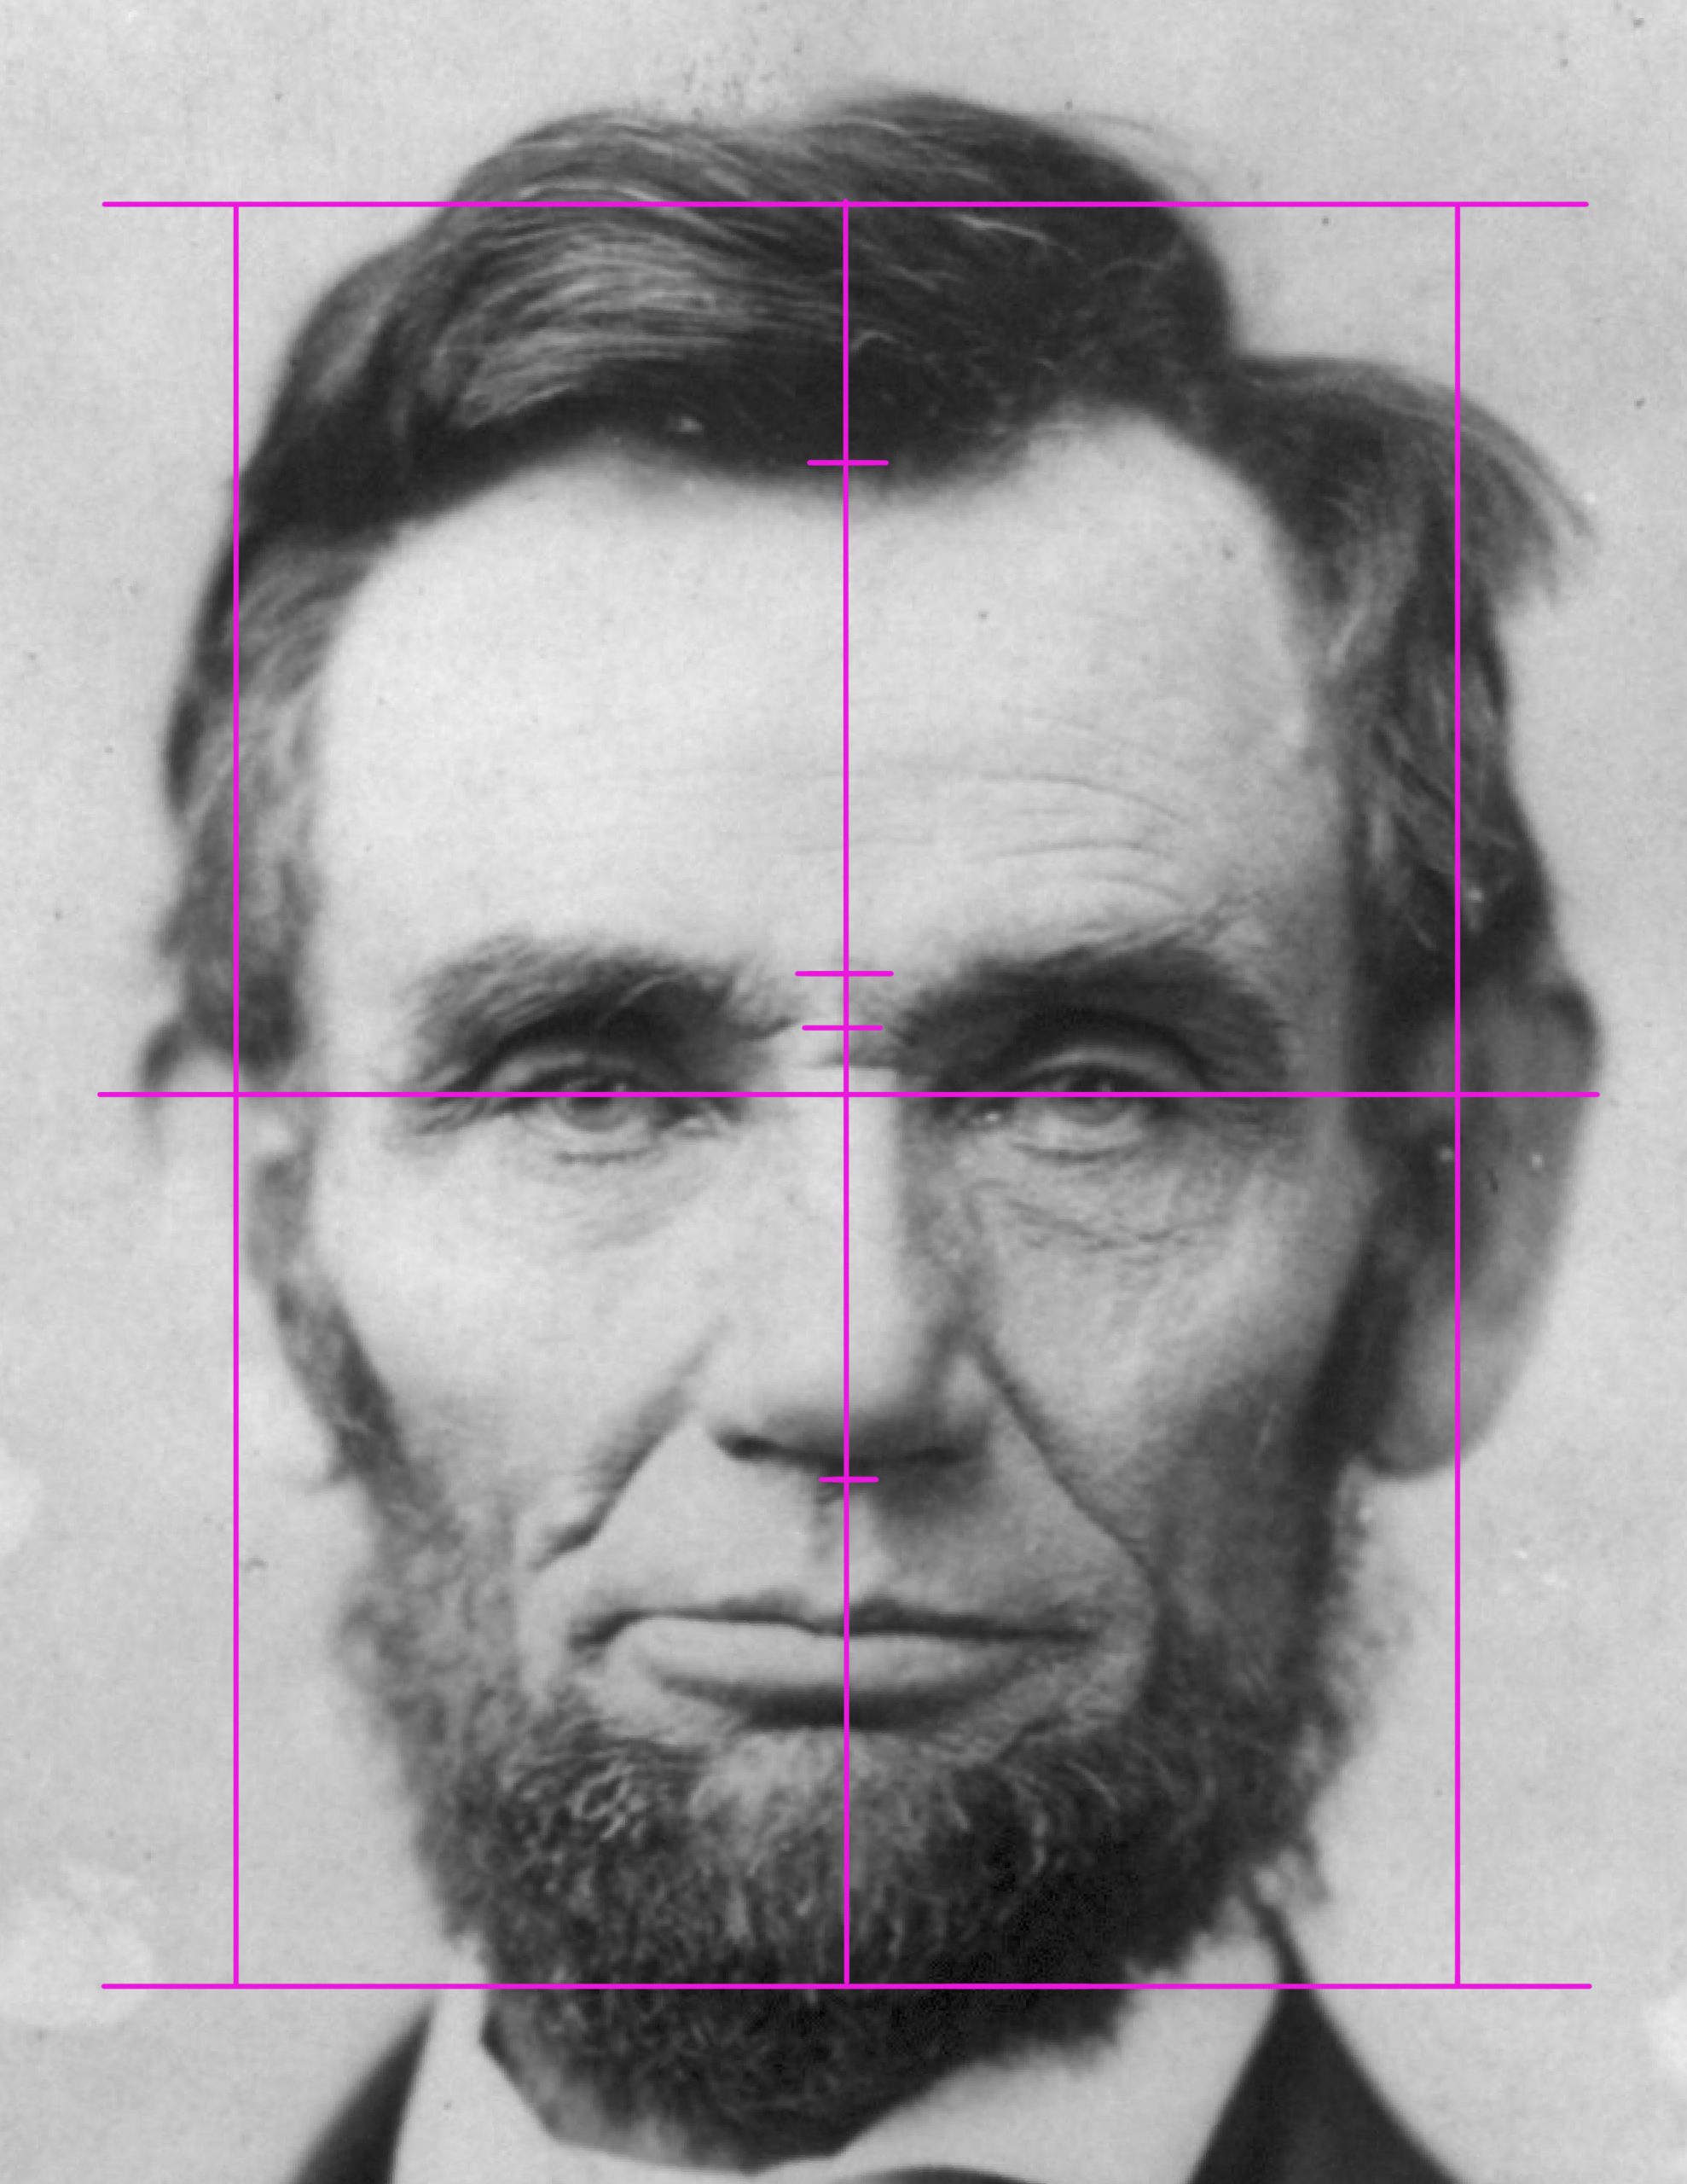
You can now take the measurement from the last step and draw two vertical lines at that distance from the center of the head. You will see this distance is a little wide and, technically, Lincoln’s head is a little narrower than our measurement. This is fine and not everyone fits exactly within the template. For some people, this wider measurement works better. You can make alterations to the head width and shape after the template is complete.
Step Six
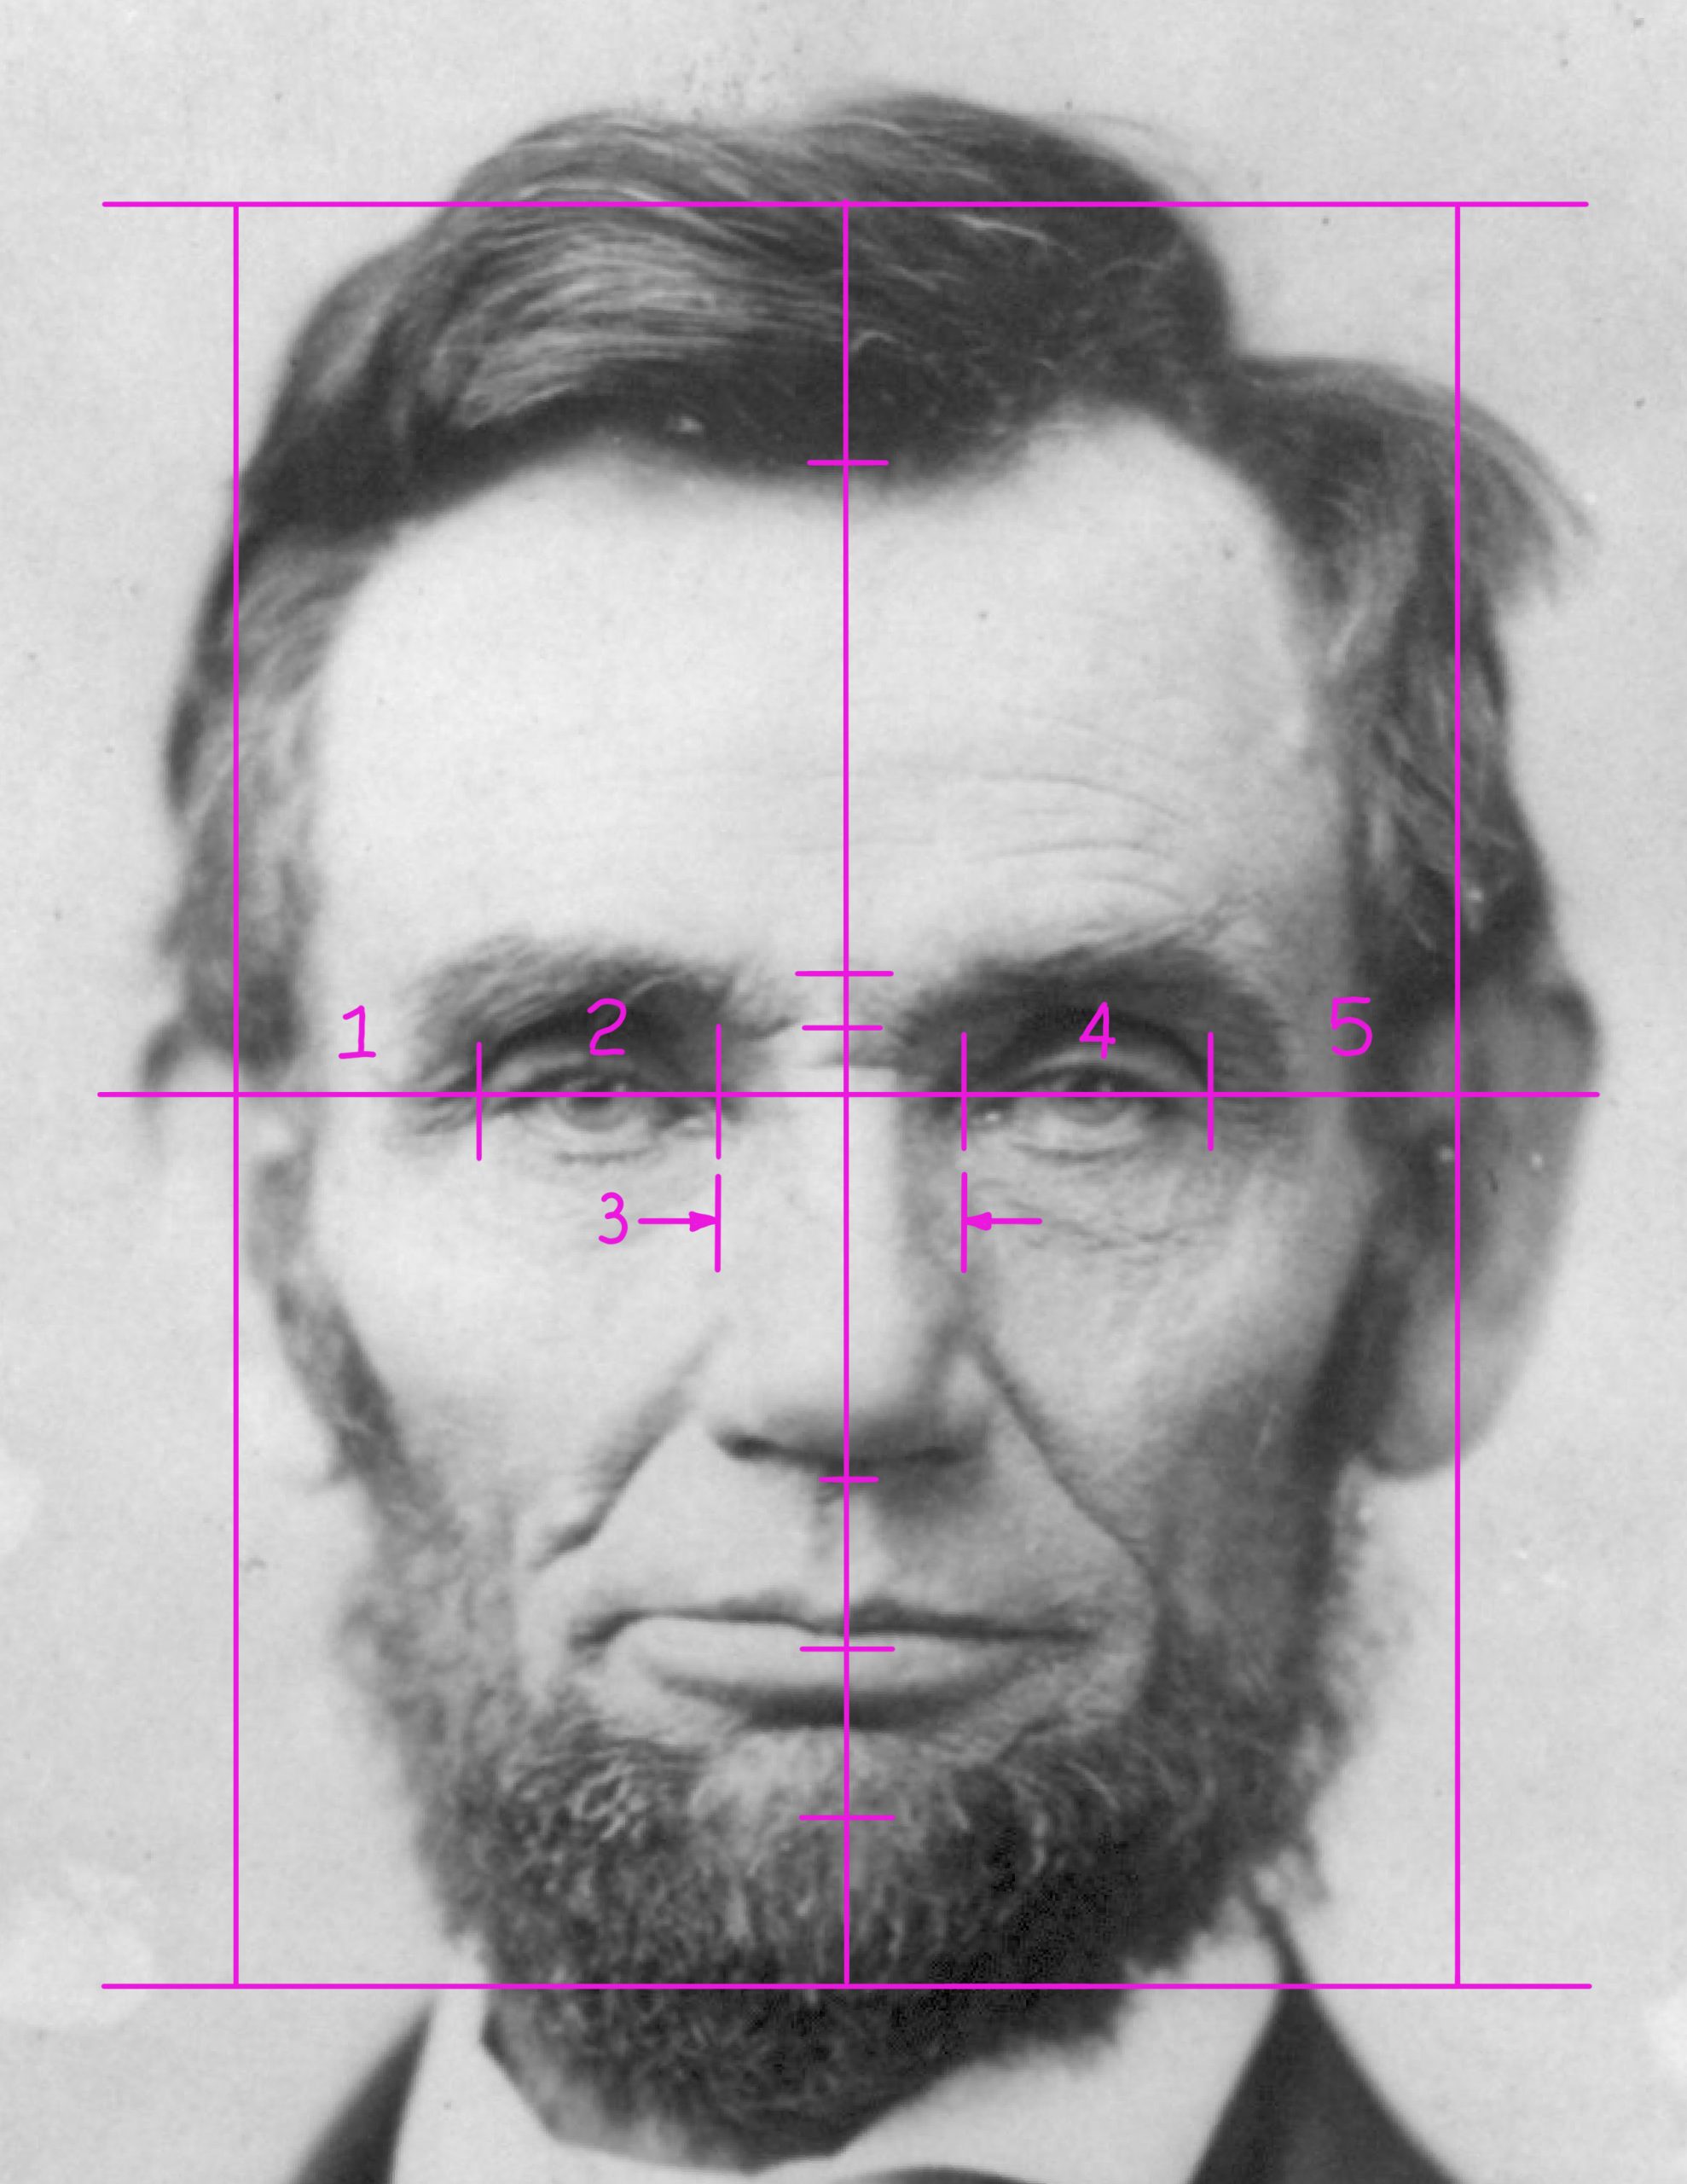
Now you will take the width of the head at the eye height, which is at the half way point, and divide this by five. In doing so you will add four tick marks. You will need to find a basic unit that will allow you to divide the width of the head into five sections. This may take some trial and error to come up with five equal distances. There will be two widths (1 and 5) that are from the outside corner of the eye to the side of the head, another two widths for each eye (2 and 4), and one width (3) for the distance from each inside corner of the eye to the other. Note how the width of the eye is considered at the outer most section of the eyes; tear duct to outer point where the eye lids meet.
Step Seven
You can now divide the width of the eye in half, which will show you the location of the center of the eye, or pupil. Add a tick mark in this location for each eye.
Step eight
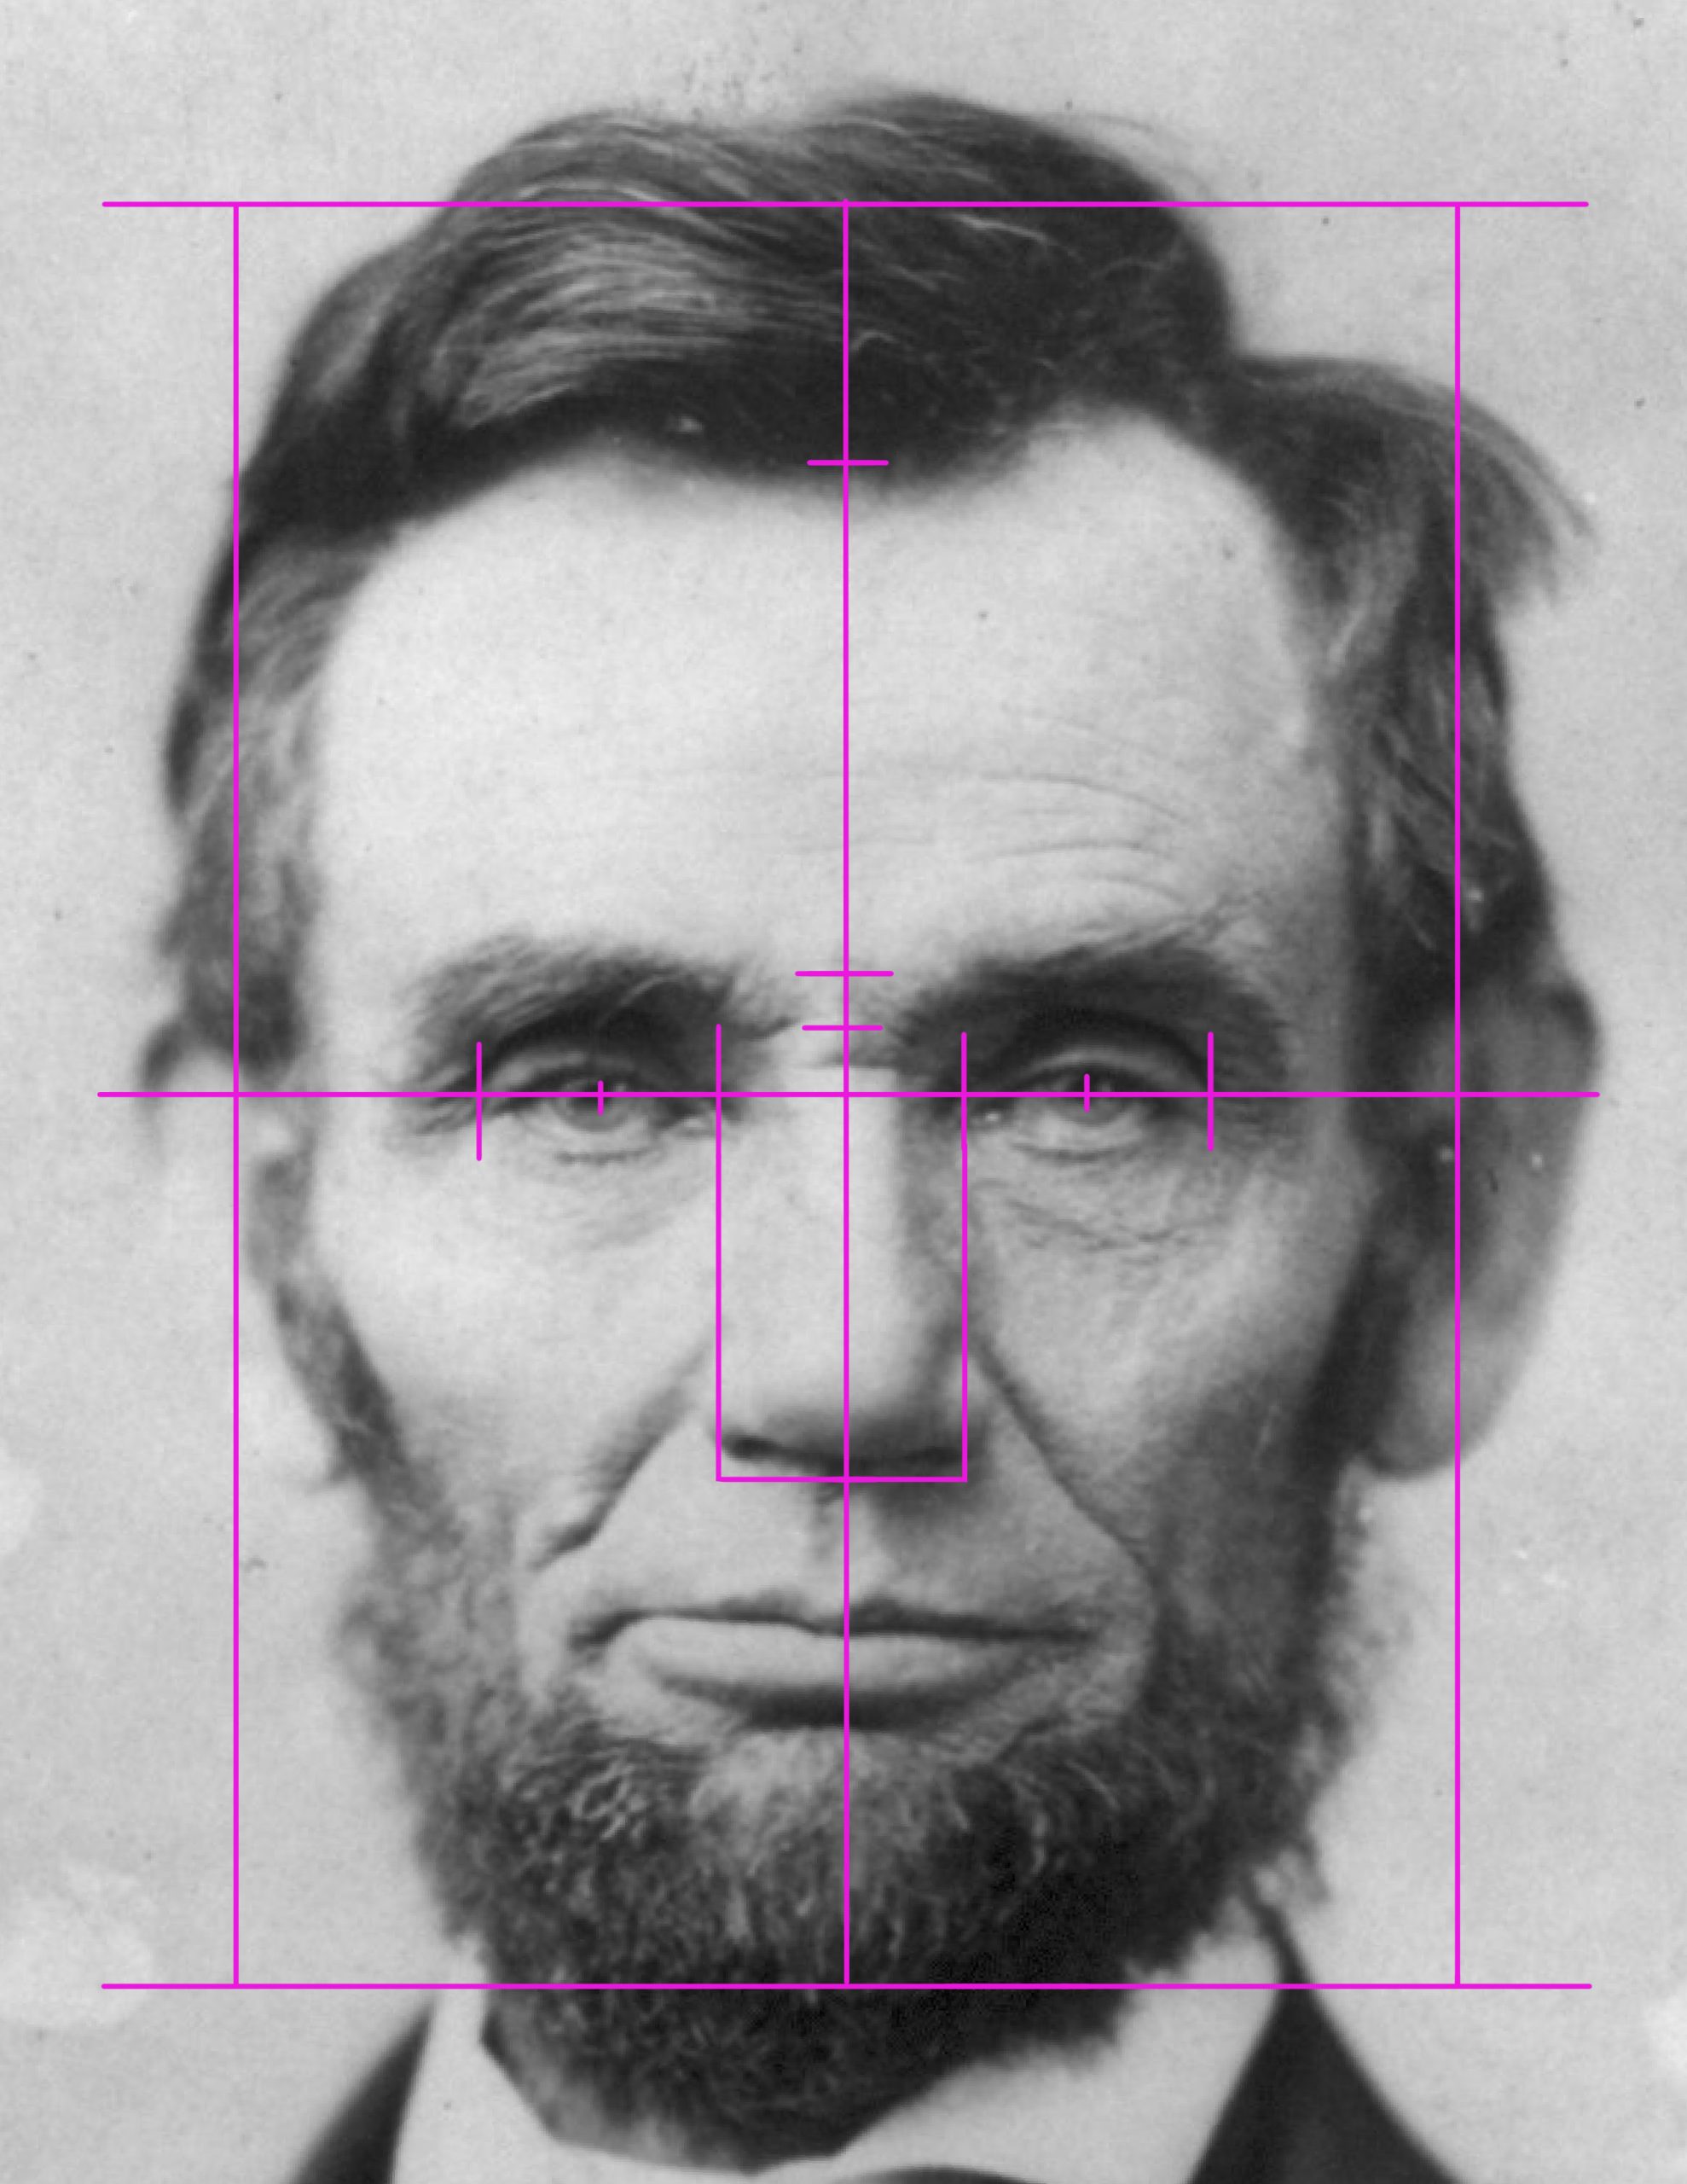
Now you can determine the width of the nose. Draw two vertical lines from the inside corner of the eyes to the tick mark for the height of the nose. You should get a rectangle for the nose to roughly fit into. The two vertical lines will give you a rough idea of the width of the nose. Again, you may need to make some adjustments. Noses can be a little narrower or wider than the distance between the eyes. Take note of this possible variation when you are drawing your portrait.
Step NINE
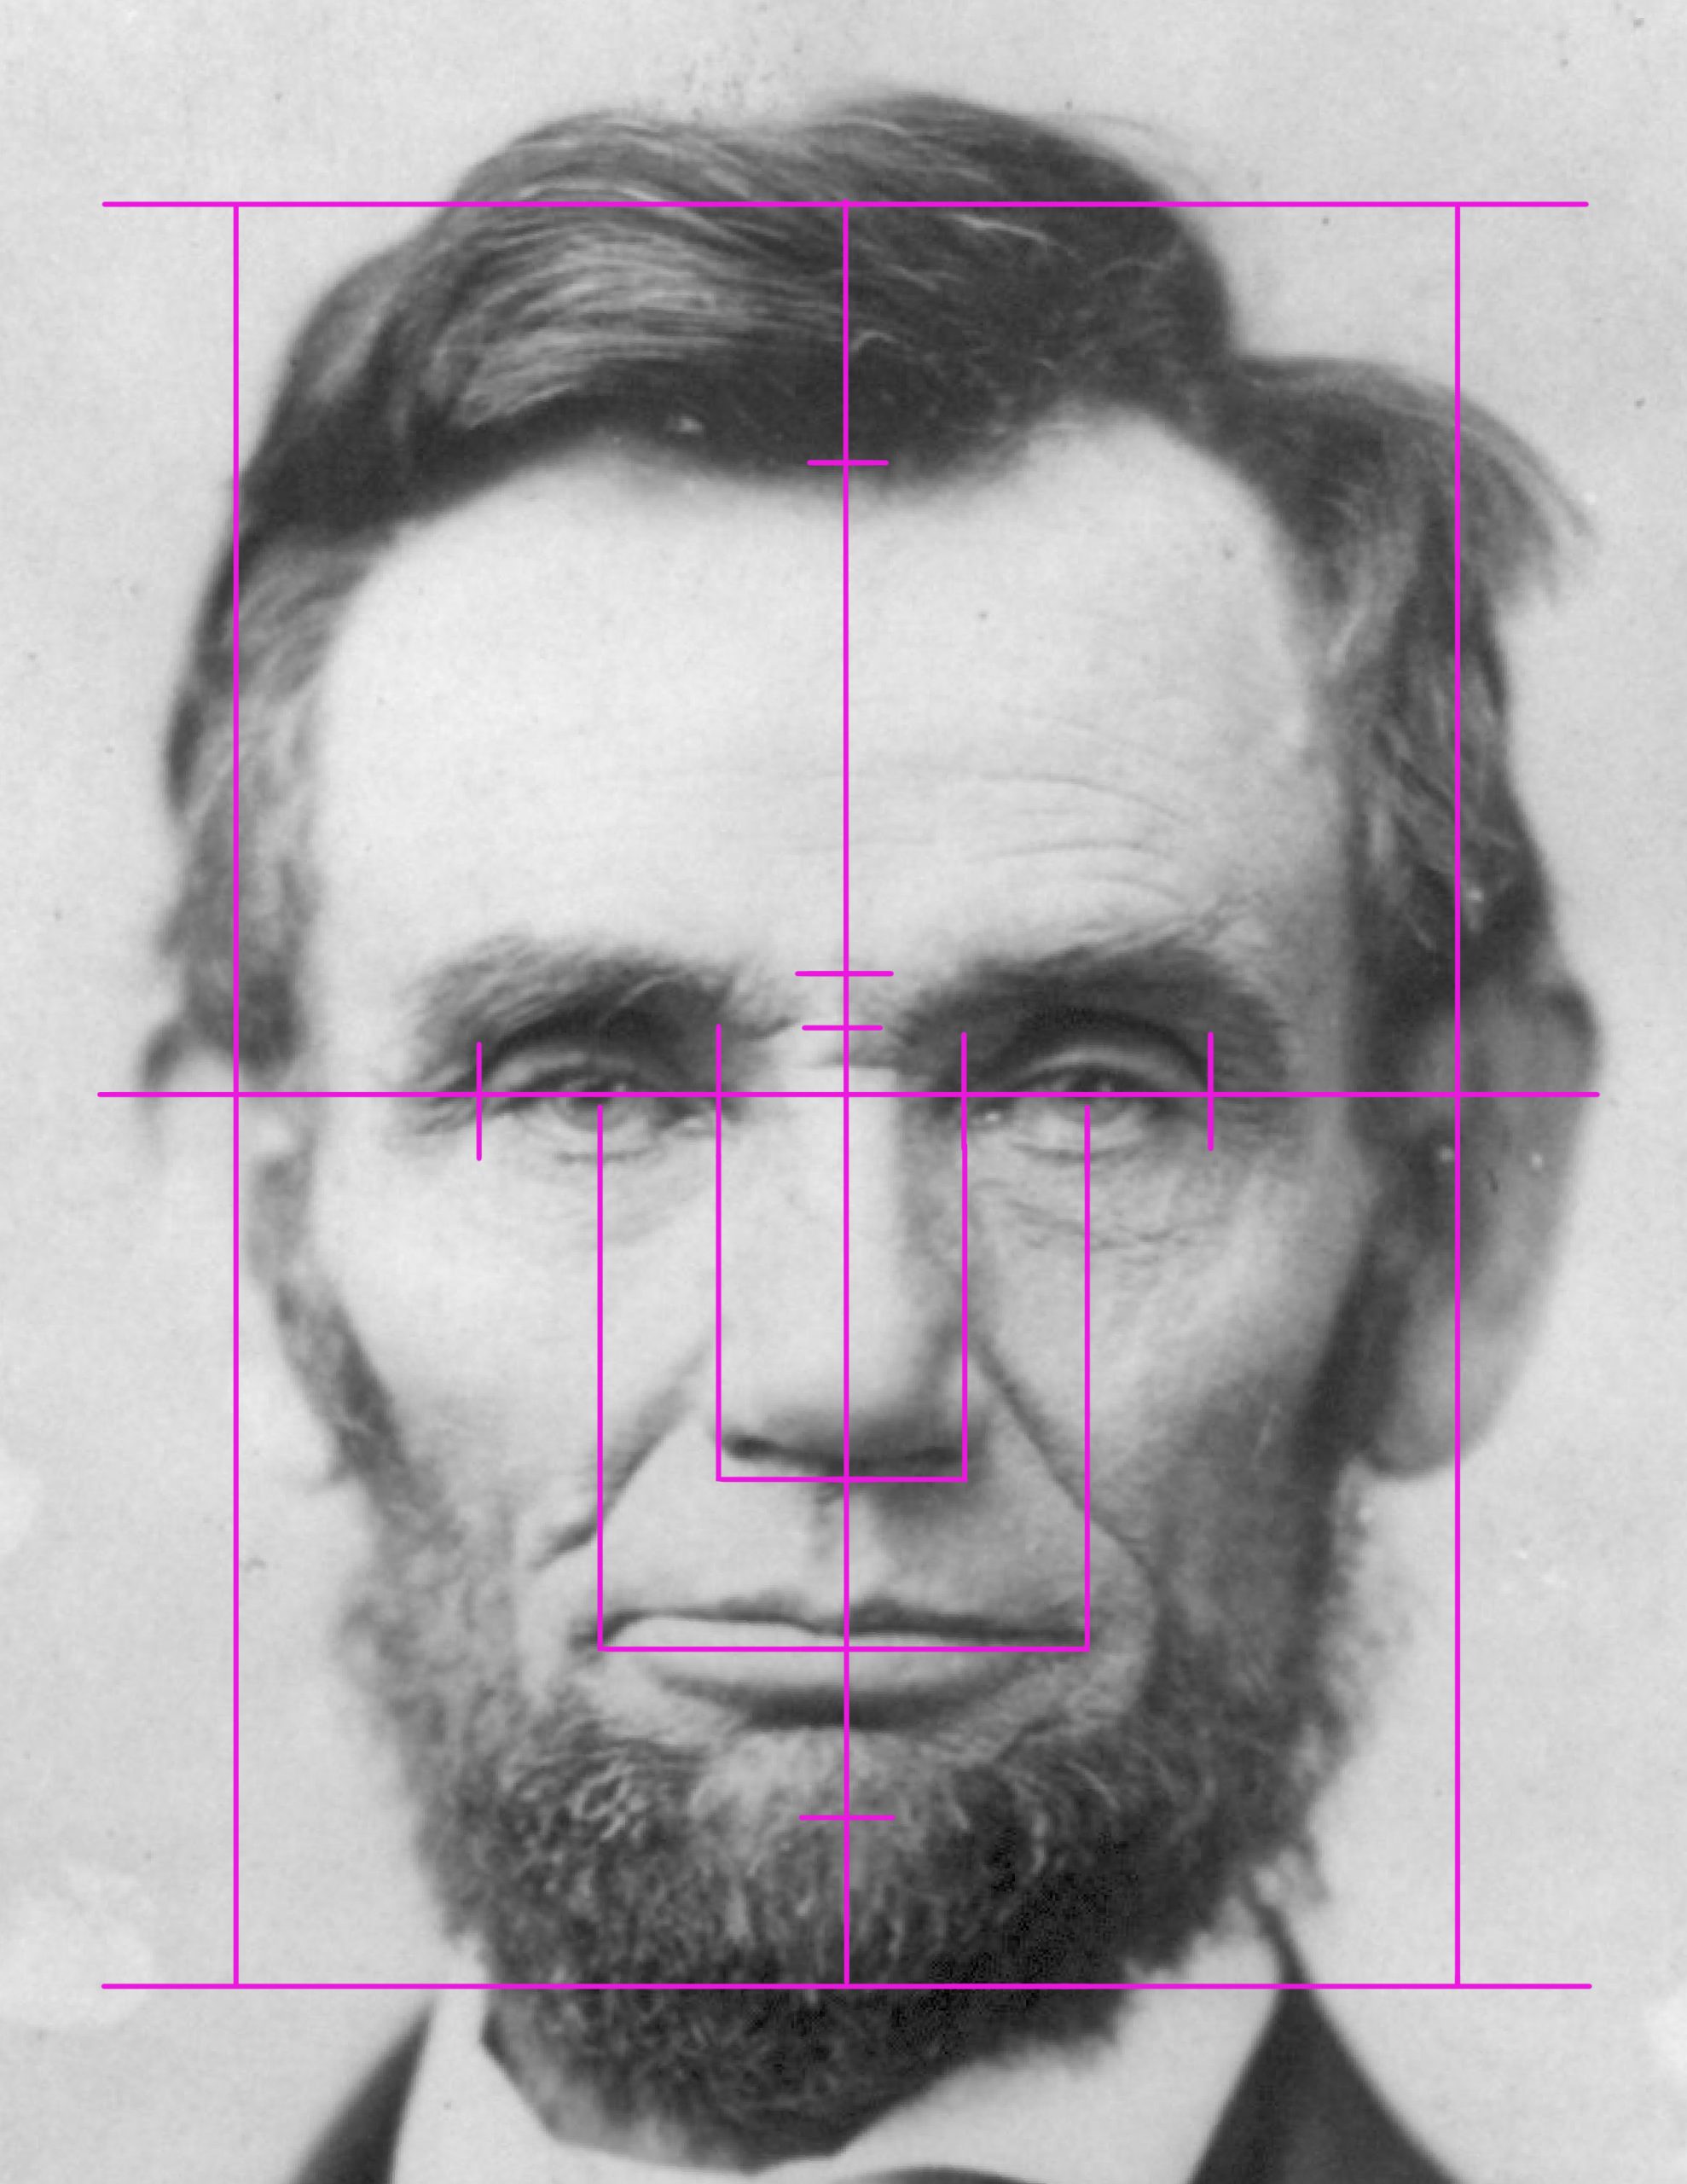 For this step, you will again drop two vertical lines down. However, this time it will be from the center of the eye to the line height where the lips meet. Remember, the distance from the chin to the nose was divided into three. In this process you added two lines and you will use the top line of the two.
Step TEN
You are now on the final step. Add some curves to represent the shape of the head.
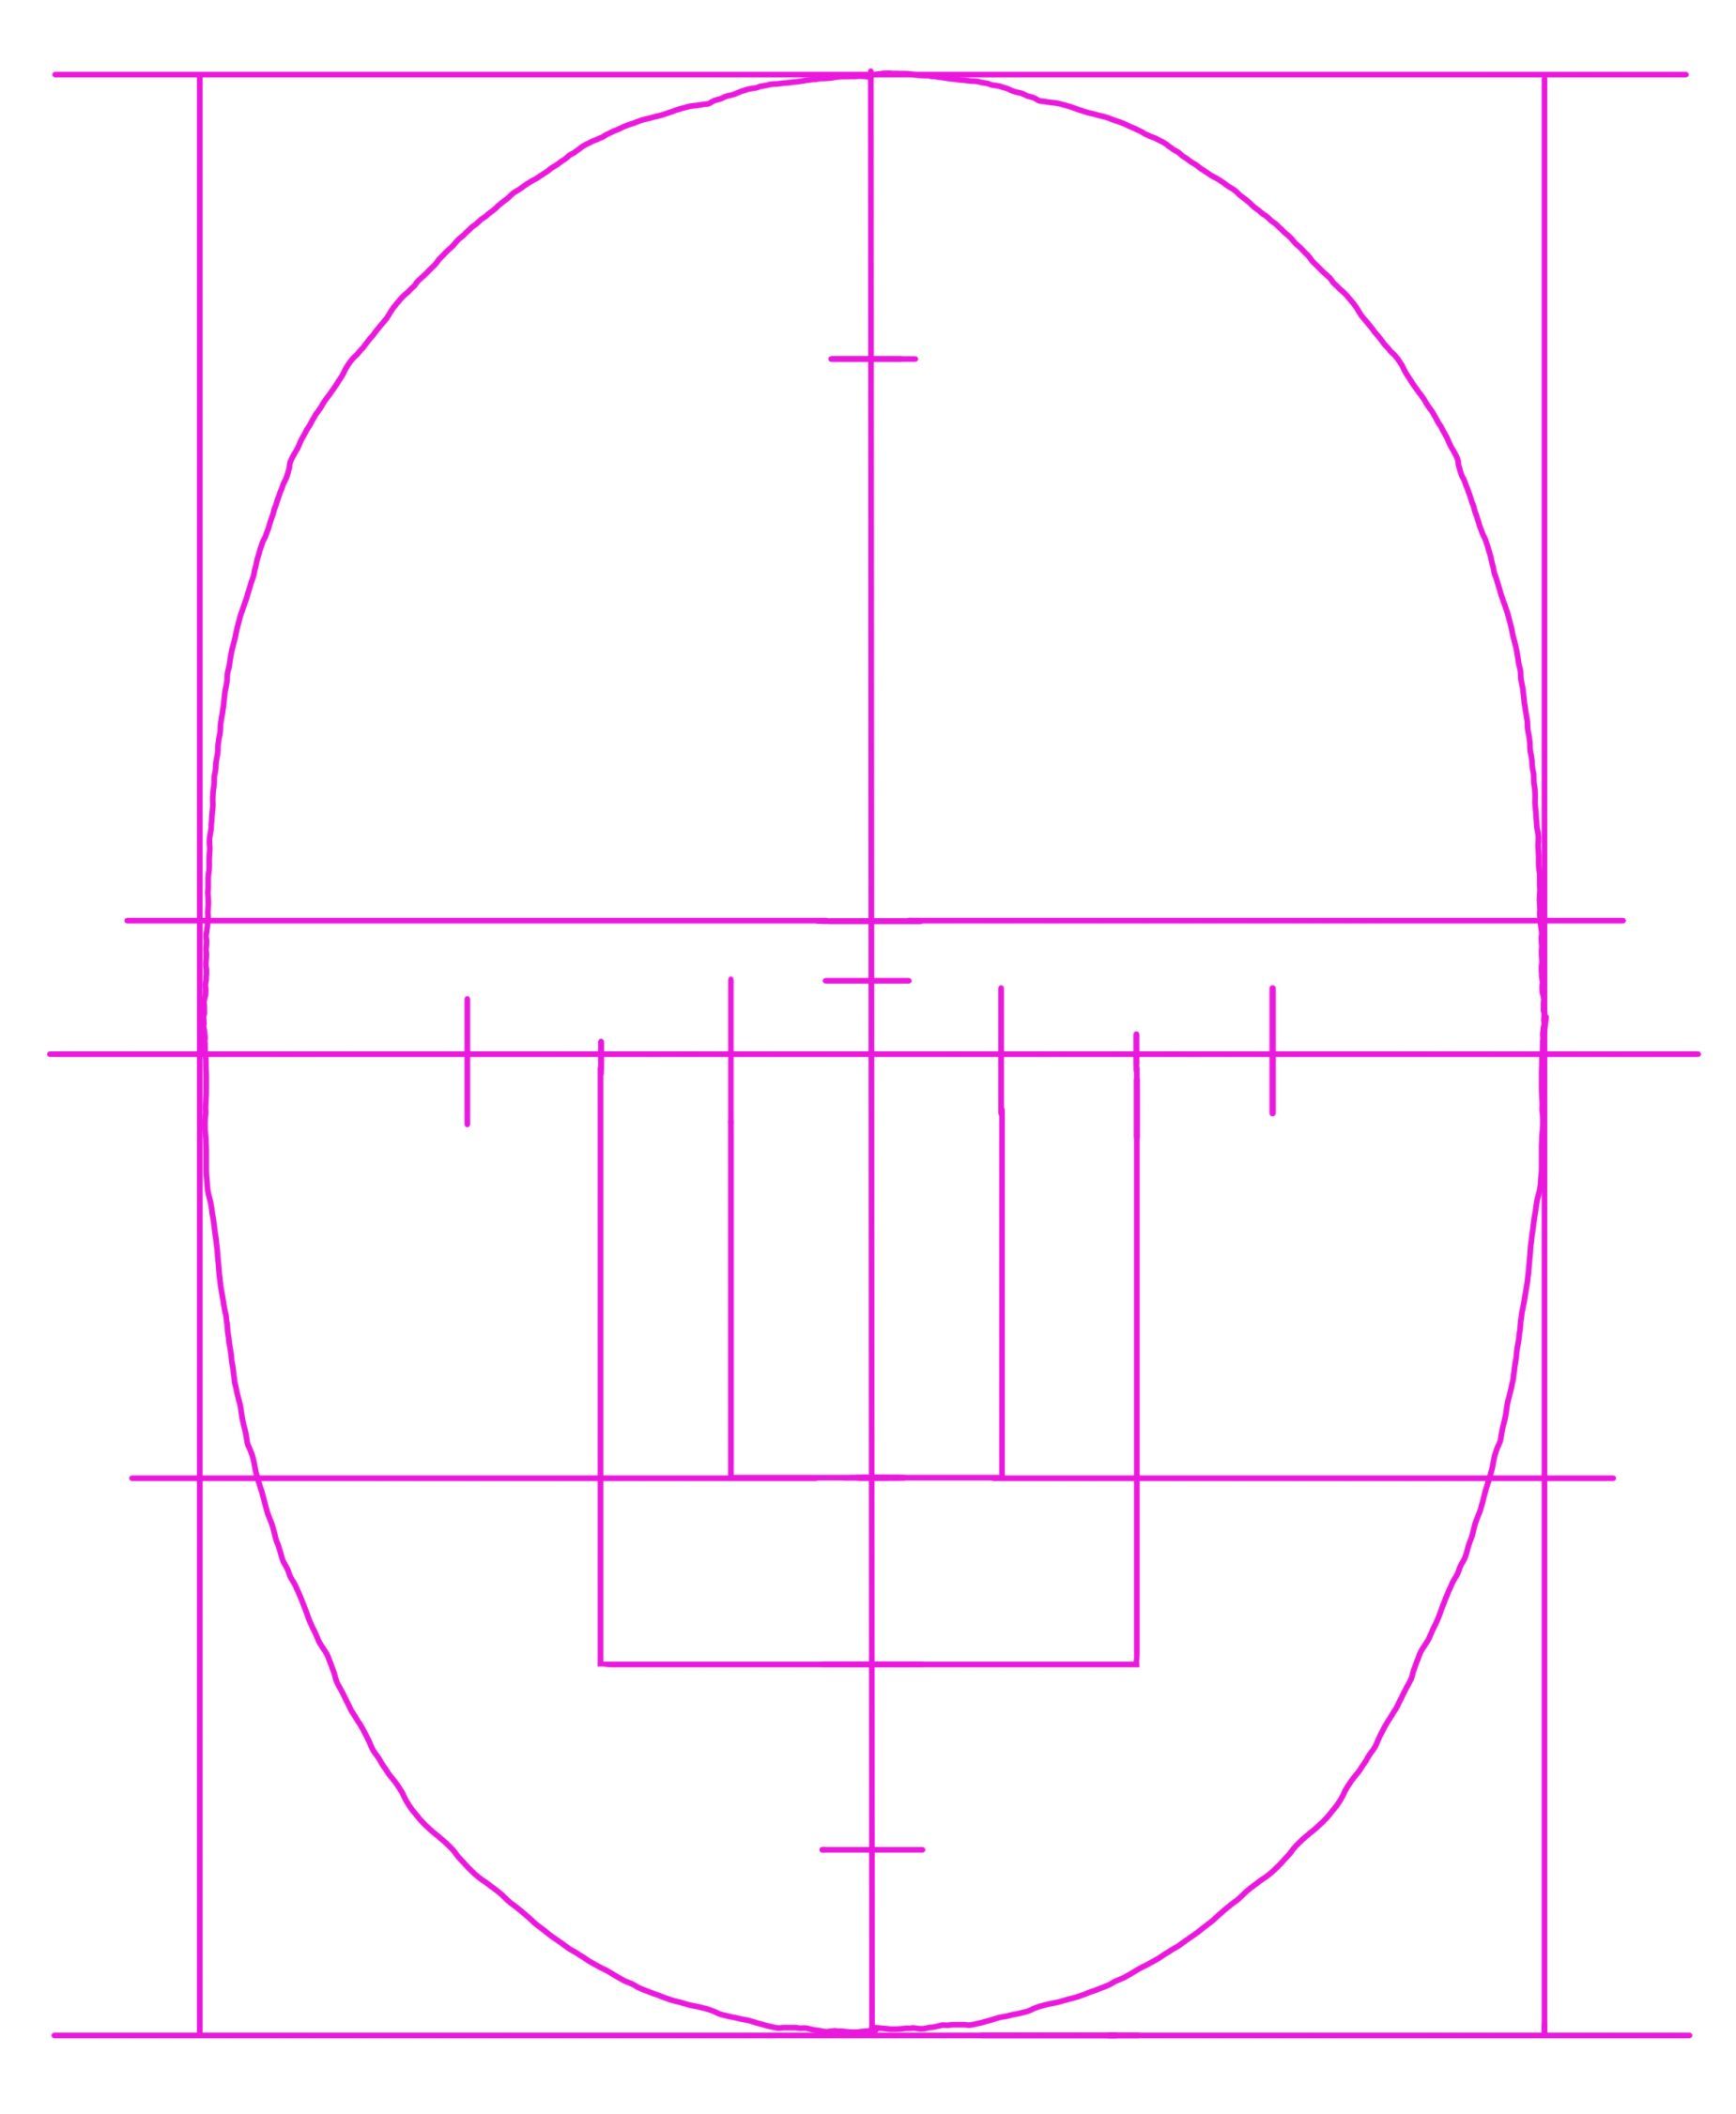 You will now have a template that should look like this. The template will help get you very close to the correct dimensions, however, you will still have to make some alterations because we are not all exactly the same.
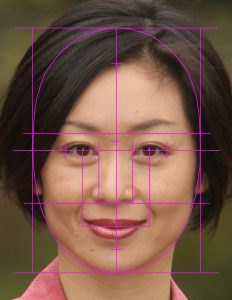
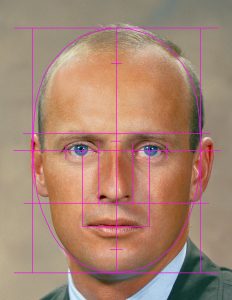
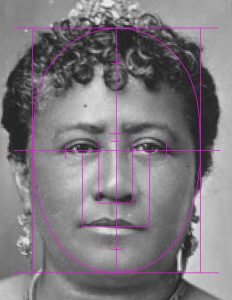
Below are three people with the template superimposed over their portrait to demonstrate how closely people fit and how they may differ. There will be variations that make us unique.
Some things to consider when drawing a portrait:
- Camera distortions – If working off an image, be careful of how the camera translated the image. Both the camera’s software and its lens can alter the way a face may look. Also, the angle at which an image is taken can influence the proportions, so keep it level. If the camera is too high or low relative to the eyes, then either the forehead or chin may appear increased in size. For a portrait, it is always best to either use a mirror or a live model.
- Ears – The ears are usually located between the line created for the bottom of the nose and the eyebrow line. However, if the person is looking down, the ears may look higher. If a person is looking up, then the ears will look lower on the head. This is due to the ears being set back in relation to the face.
- Hair line – Another feature that can appear to move is the hairline. Some people have receding hairlines, so their hairline tick mark may need to move up and their forehead space will increase. Also, if the subject is looking up or down slightly, this can alter the dimension.
- Eye size – Be careful to not increase the size of the eyes past the tick marks. This is a natural tendency you need to be mindful of. The eye tick marks are for the very outside corners of the eye features (skin folds and inner most tear duct), not the outside corner of the white area. The eye height is not in the template, so be careful on the height-to-width ratio. Also, on the size of the iris, you do not see much white above or below it. Be careful to center it within the lids or the person will appear to be looking up or down.
- Nose and mouth width – The width of the nose and mouth can vary greatly, so use the template as a base. A good way to check the widths of these features is to compare their dimensions to the eyes. The drop down vertical lines off the eyes are just a generalization. Your subject’s eyes and nose may be wider or narrower in relation to these lines.
- Neck and shoulder – Another area that can be hard to interpret is the neck and shoulder area. This can vary depending on the subject and their pose. A common mistake is to draw the neck too narrow and straight and the shoulders too low and flat, which creates a bobble head look. In many poses, the neck ends and the shoulders start at around the height of the chin. The neck width is usually a little wider than the width of the outside of the eyes, but narrower than the head. You may notice the three examples above have their heads turned a little, which varies the amount of neck you see from one side to the other.
