
Chapter 7 Perspective
Perspective
Learning Objectives
By the end of this chapter, you should be able to:
Understand how the principles of perspective influences how we observe the world around us.
Define different perspectives including one-point perspective, two-point perspective, vanishing point, and horizon line.
Know how to create a drawing utilizing one or more vanishing points along a horizon line.
The term perspective is used to describe a piece of art that creates the look of three dimensional space on a two dimensional surface.. The main idea to remember when creating a perspective drawing is that an object will appear smaller the farther it is from you. An object will eventually get so small that it will look like a small dot or point. Note in the image below how the people get smaller the farther they are away from the person who took the picture.

This point is known as the vanishing point (V.P.). In the image of the road below, notice how each outside edge of the road and yellow lines eventually meet and converge at one point. If a person was to keep walking down the road in front of the camera they would eventually get so small they would appear to vanish. Also note how the vanishing point intersects with the horizontal line (H.L.).

The horizon line is the height of your eye off the ground. If your eye is five feet off the ground, then your horizon line is technically five feet off the ground. If you are seated and your eye is three feet off the ground, your horizon line is now three feet off the ground. Note that in the image above the mountains off in the distance are not used as the horizon line. If we are looking at an image taken by a camera the camera height is considered the same as the eye height.
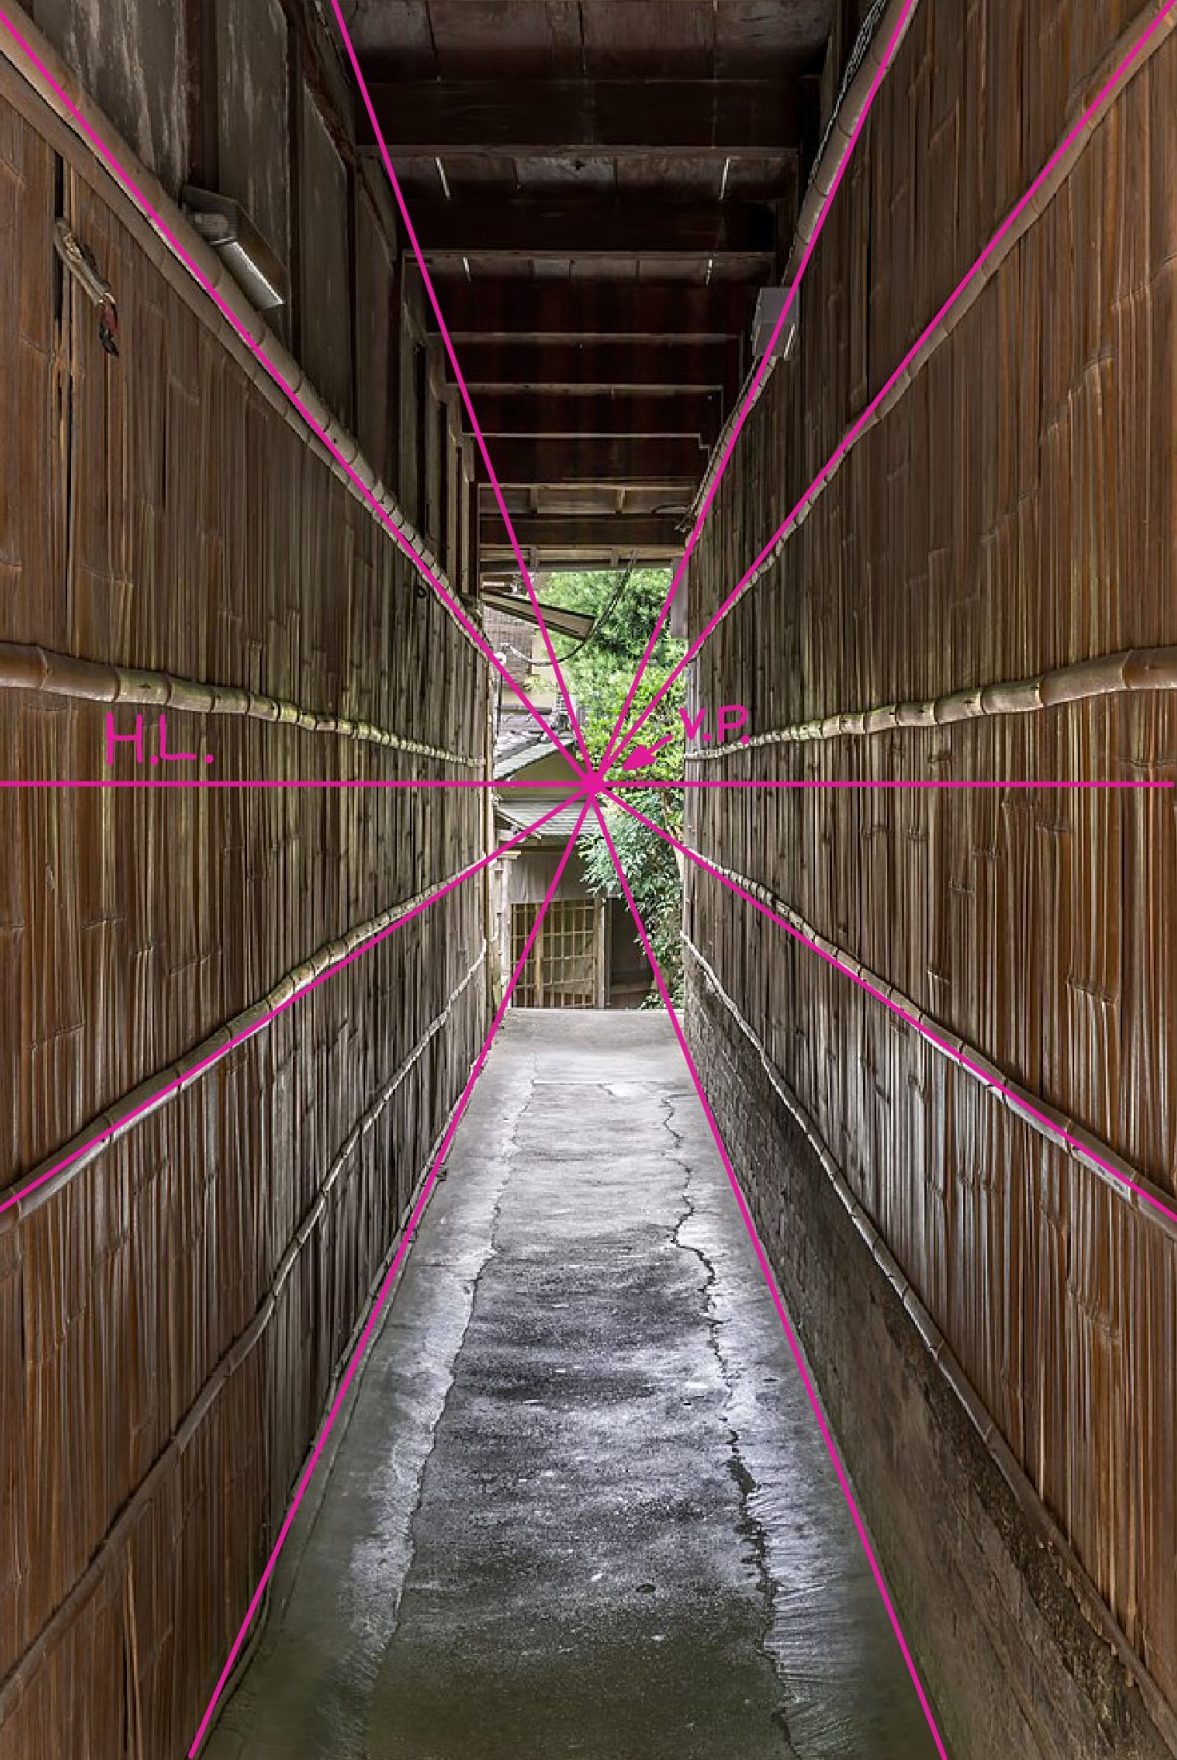
The image on the left shows a bit more clearly how the horizon line height is at the viewer’s eye level. As the hallway gets further from the viewer, it will appear to get smaller, just like the example of the road above. Note how all the lines that we would consider horizontal now appear to converge into one vanishing point. You can now use these converging angled lines to find the vanishing point. Once you find the vanishing pint you can draw a horizontal line intersecting the vanishing point to create the horizon line. The height of the horizon line is roughly half way between the floor and ceiling. So you now know the placement of the camera in the hall that was used to take the picture. The camera was exactly in the middle of the hall.
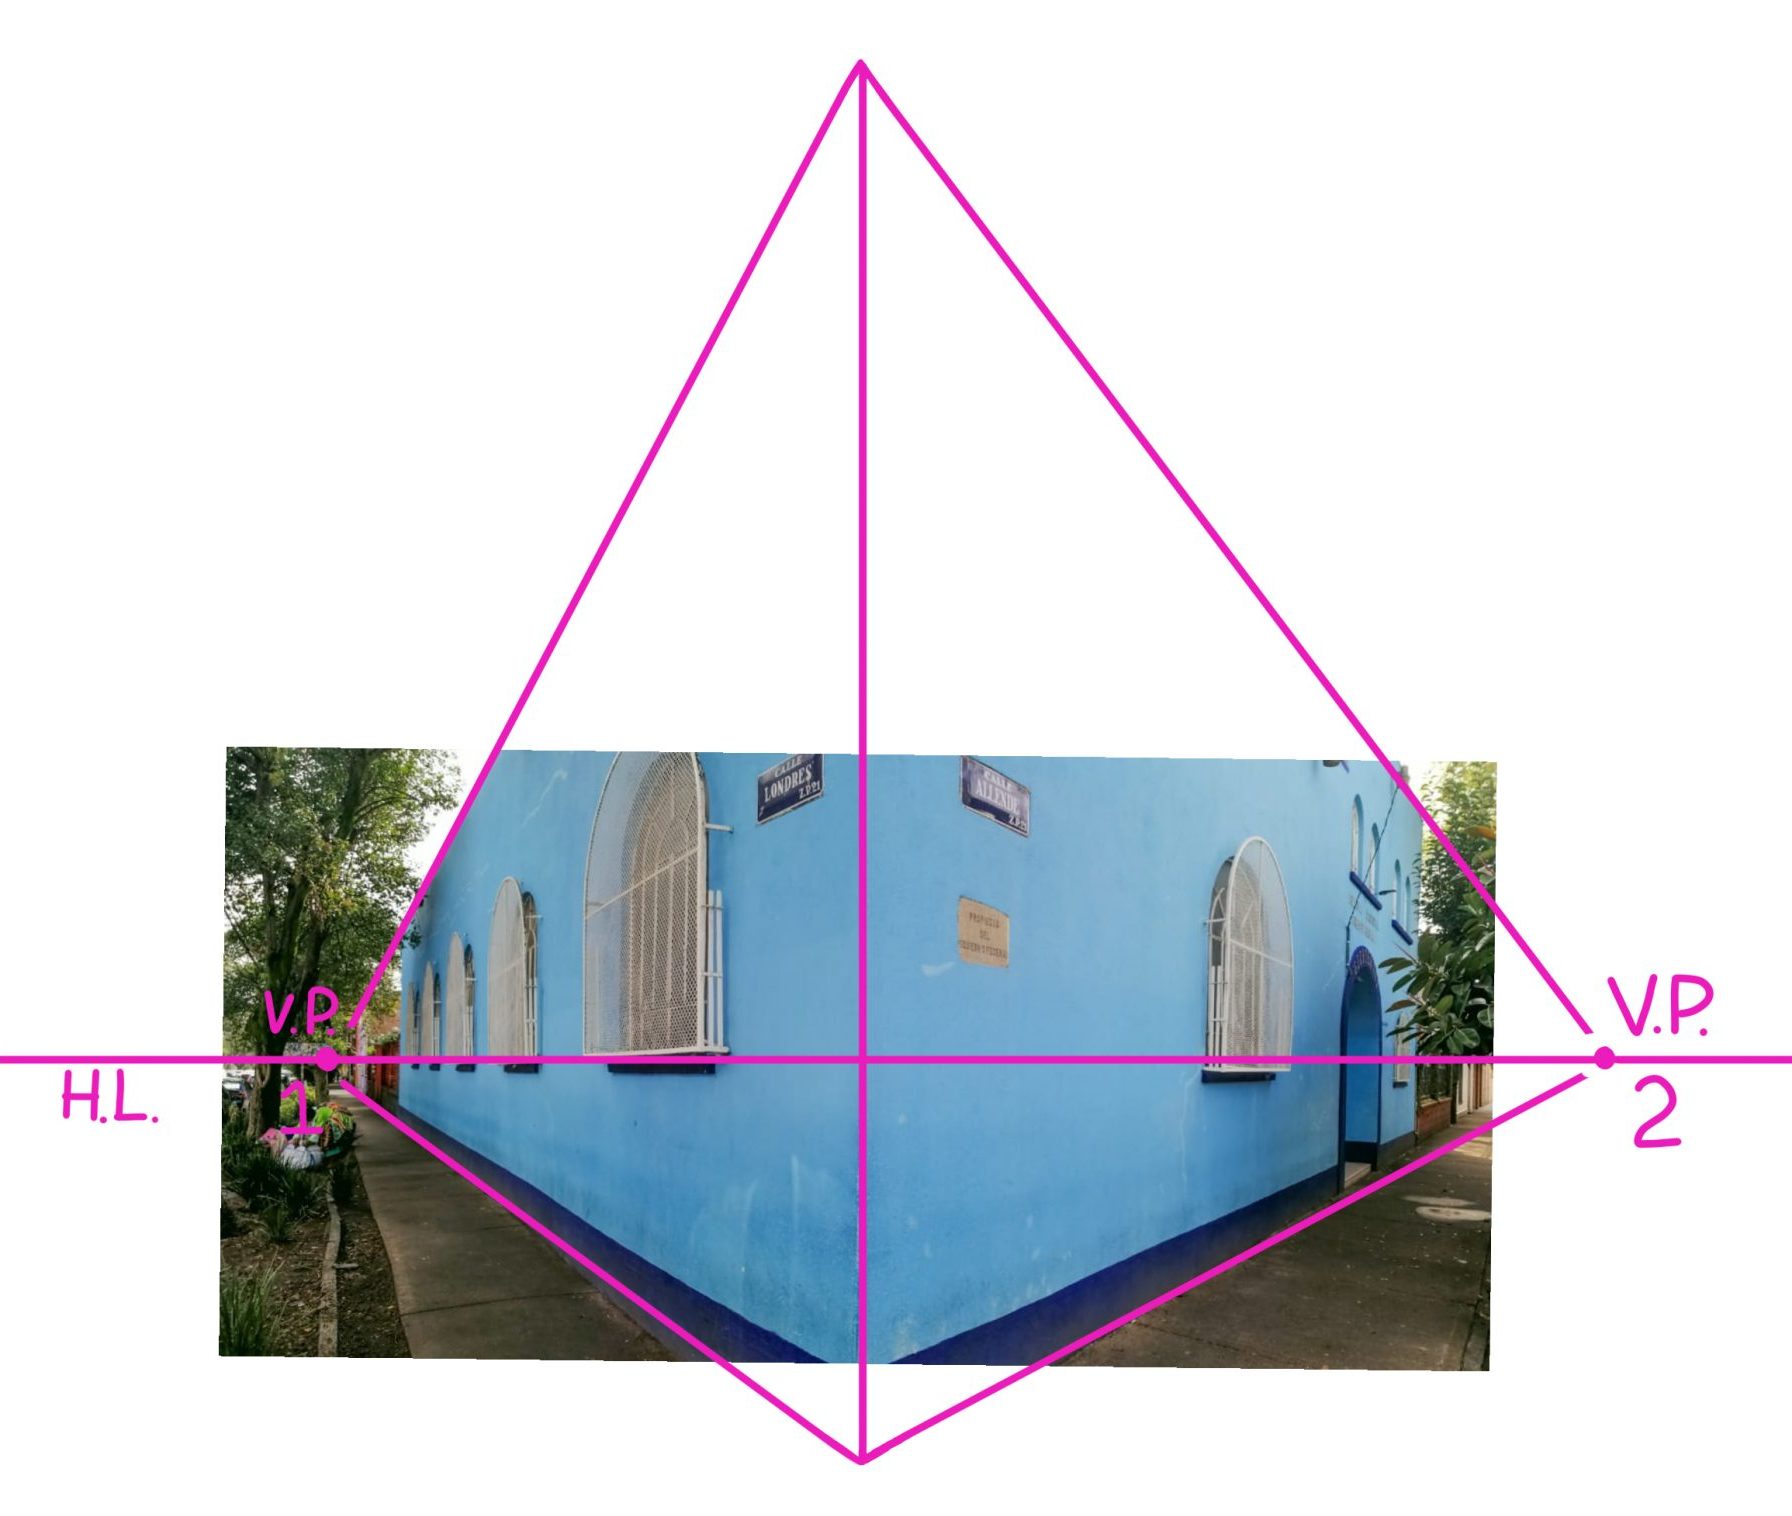
“One point” perspective only works if you are looking straight down a road or hallway. However, what if you turn and now you are looking at a corner where two roads meet? You can now see down two roads. The image on the left shows how you can see two roads going in two different directions. Notice how the corner of the building appears the largest. As the building goes off in the distance to the right and left, it appears to get smaller. The two vanishing points are needed to describe the building’s two sides receding into the horizon. If you follow the lines on both sides of the building, created by the top and bottom edges of the building, you will obtain the two vanishing points. The height of the horizon line is the height of the camera that took the image. The camera is the same height as the bottom of the windows.
There can be many more than two vanishing points and the vanishing points don’t necessarily need to be on the horizon line. The image below shows how perspective can get rather complex.
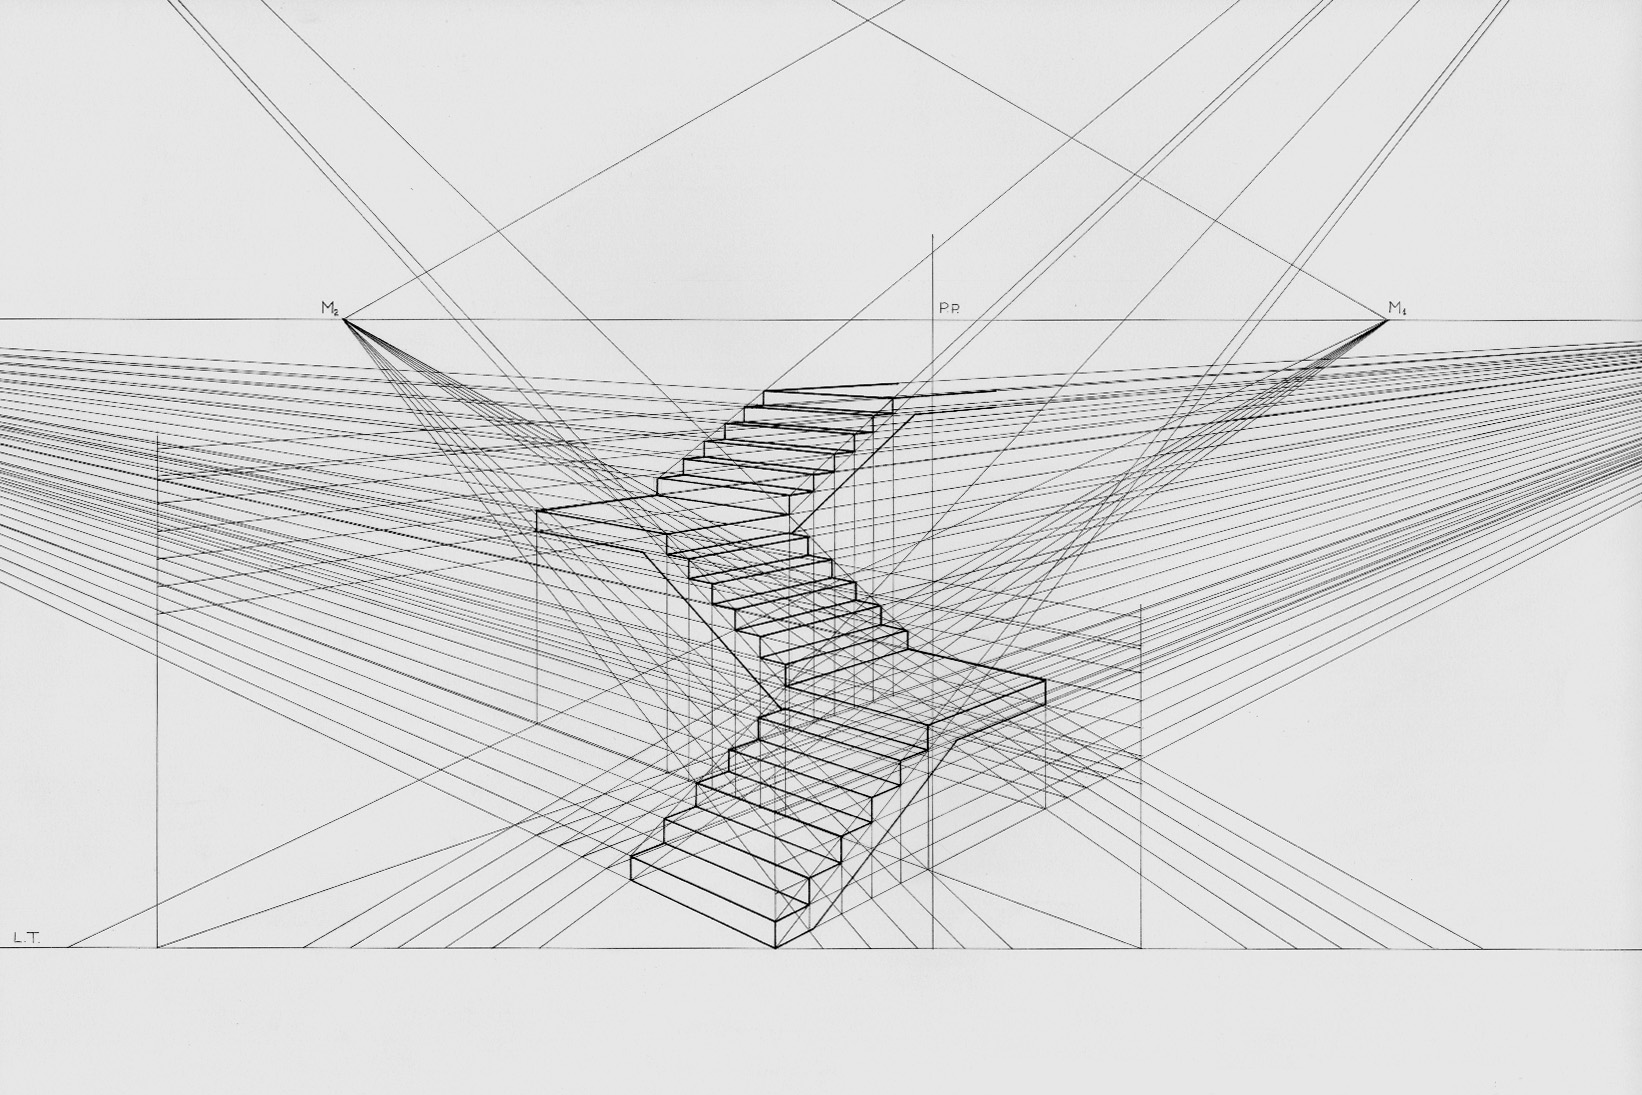
As the above image shows, perspective can get rather complicated and difficult to understand, so let’s go over some ways to help you “see” these three dimensional objects or areas.
As a reminder, there are two ways to find the correct angle within your subject: either with your pencil or with your viewfinder. Working with a viewfinder is a very helpful way to figure out the perspective of an object or area. This is due to the fact that you will not always have a vanishing point to work off of. It may be far off the page, such as in the example on the left. Vanishing point #2 is outside of the picture plane so you will not have a vanishing point to draw your lines to. With two point perspective drawings, this is a common occurrence, many times the vanishing points will be far off outside of either side of the picture plane or drawing area.

Sometimes you will not be looking straight ahead at what would be considered the horizon line. The horizon line will not be visible in the picture plane and sometimes the vanishing point will not be on the horizon line. The image to the left is a good example of this. Really tall objects, such as a tall building, will appear to get smaller the higher it goes. This is due to the building getting further away from you the higher it gets. Therefore, the vanishing point will be up in the sky and the building will receding to that point. Vanishing points do not need to be positioned on the horizon line. Again, when looking at an image such as this, you must trust the angles you are measuring. If you follow the angled lines you will find that the vanishing point is in the middle of the frame. Note how the angles look very similar to the bamboo walkway in the example above.
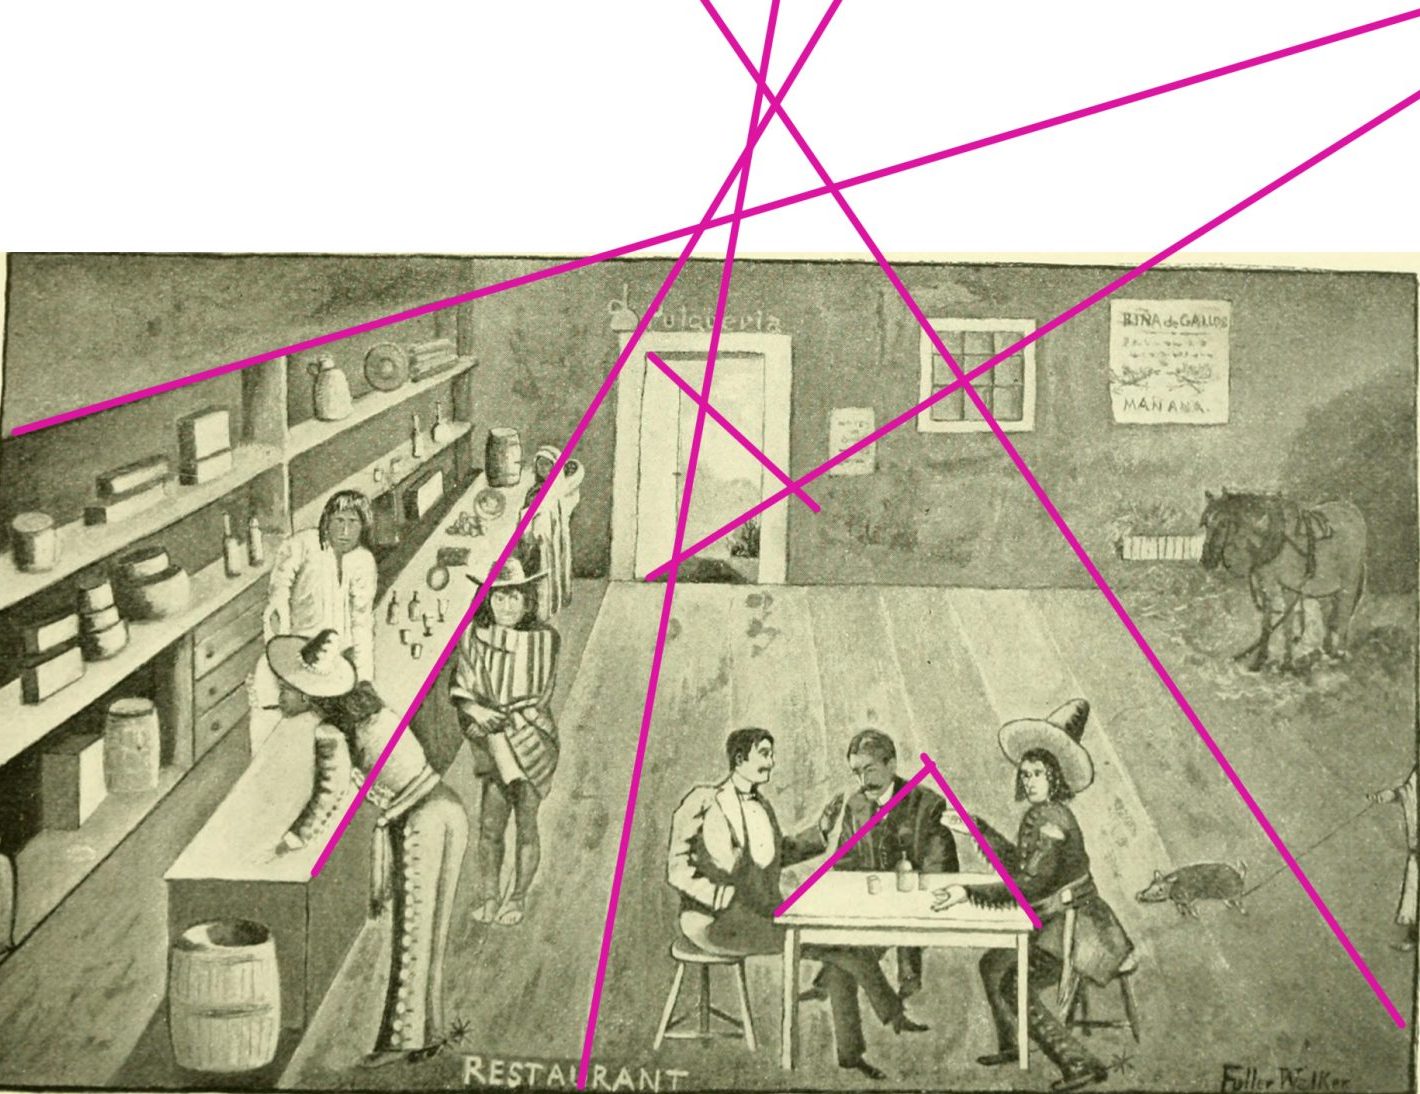
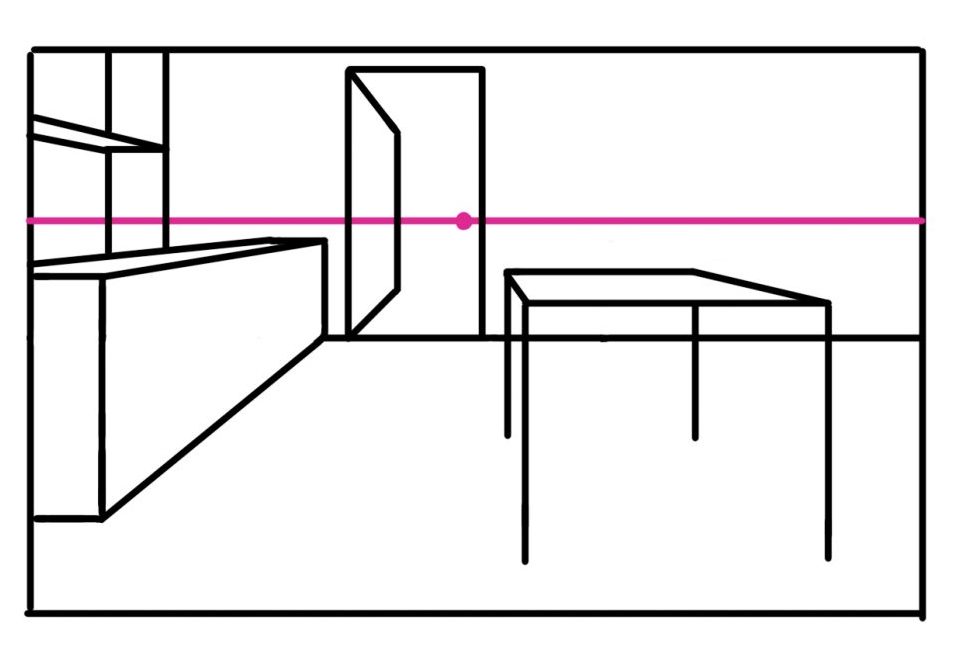
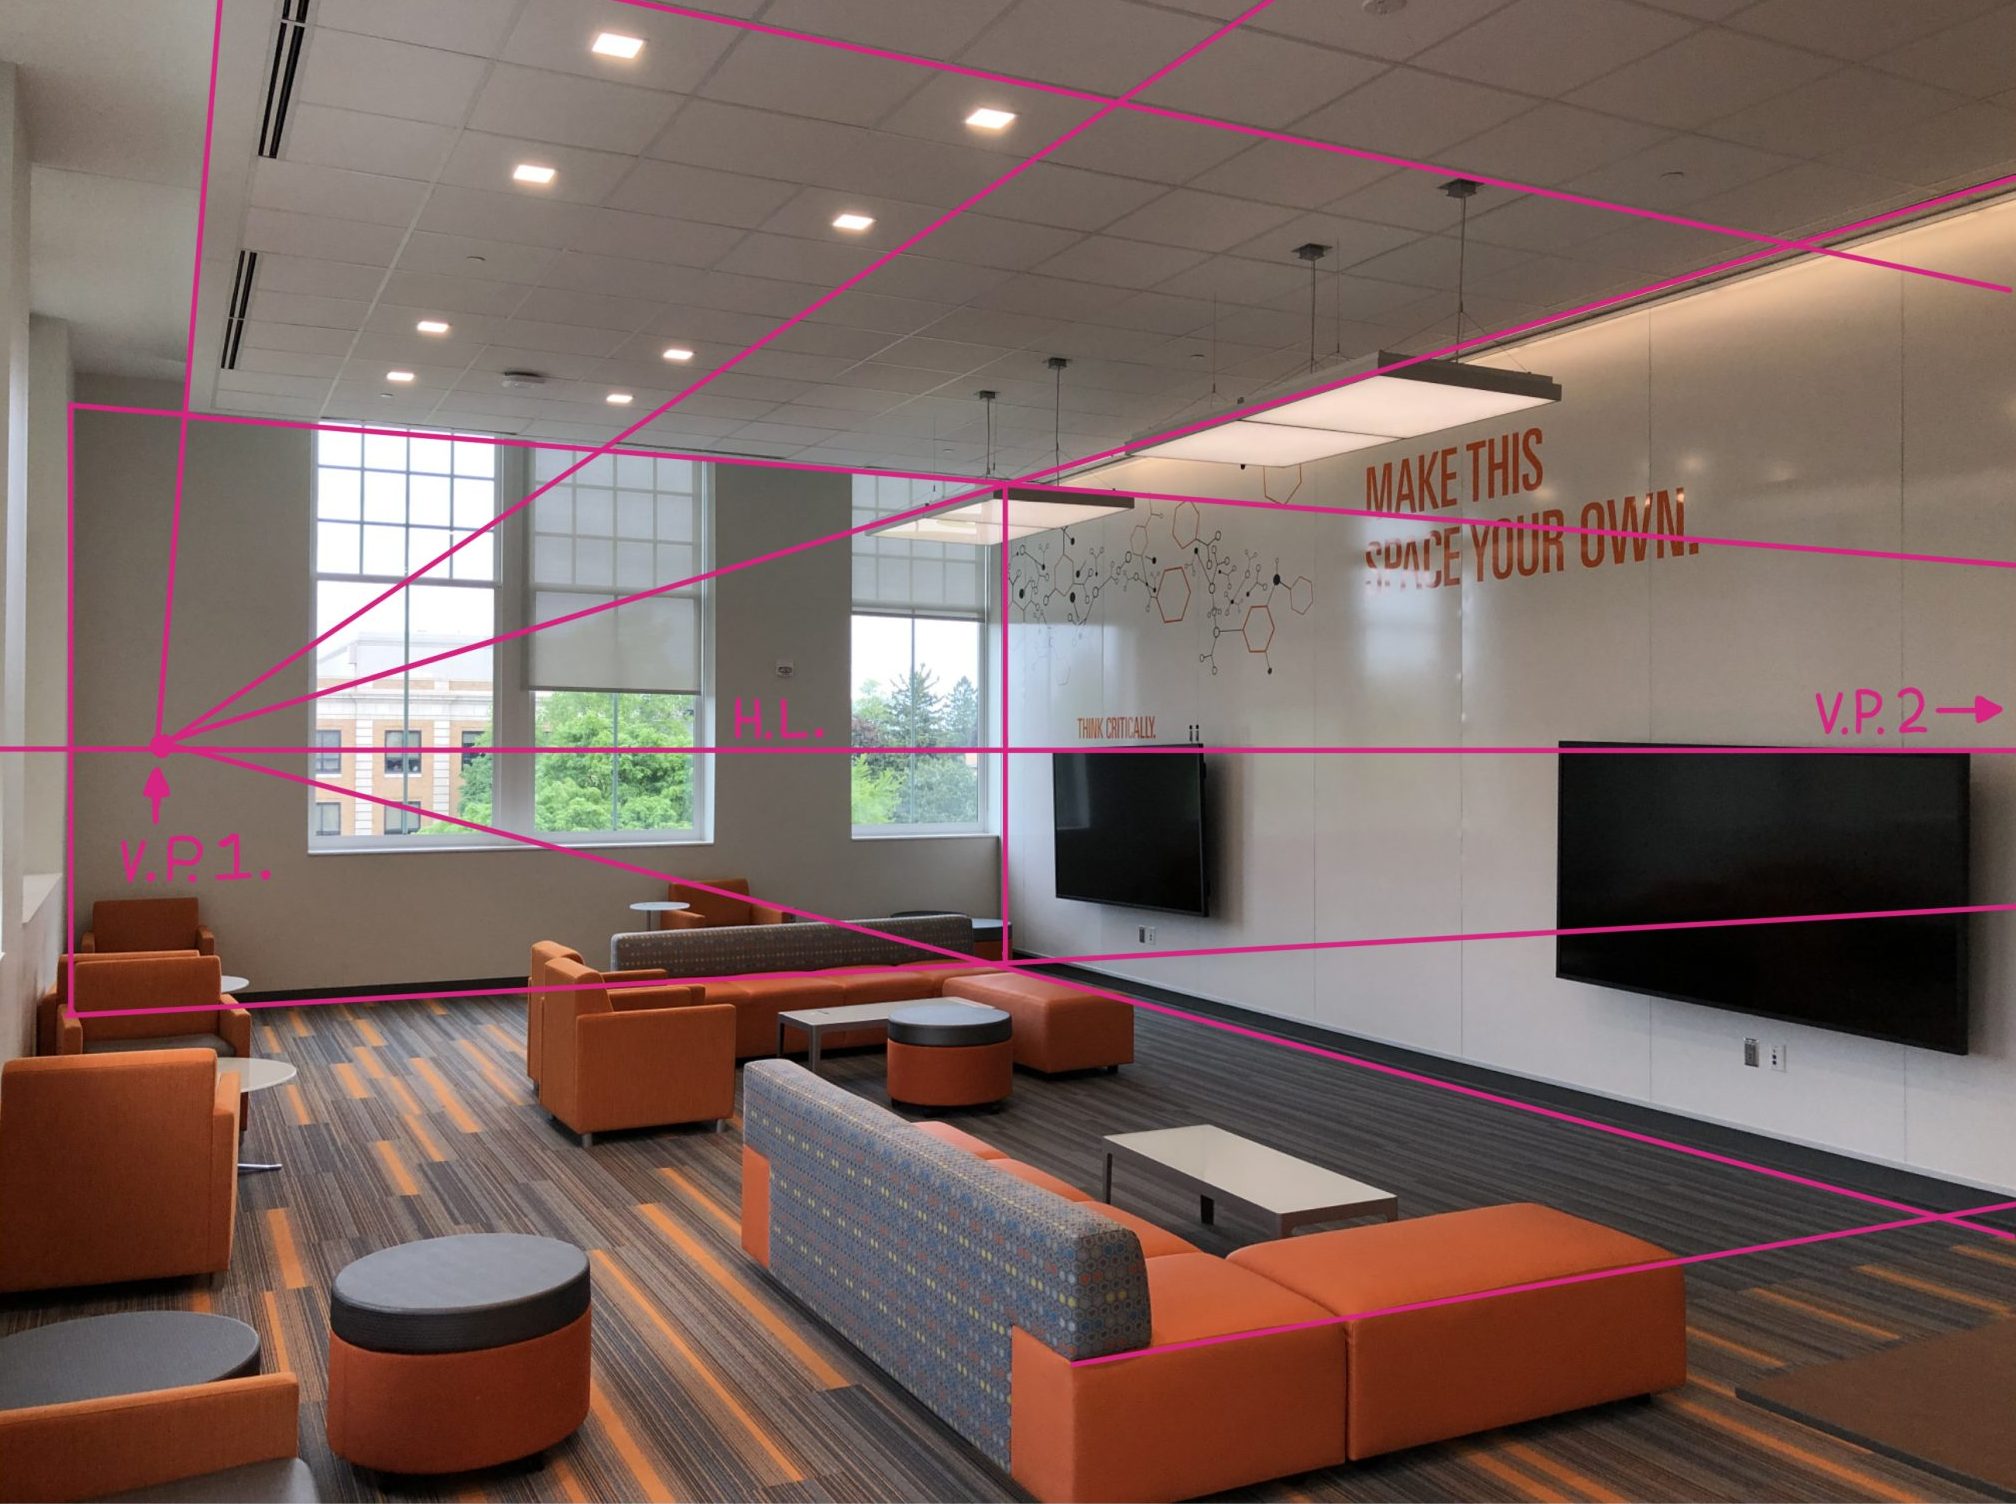
The image on the left shows how guessing at the angles can cause a drawing to look incorrect. Technically, the area in the artwork would only use one point perspective. Most of the angled lines should have all gone to the same vanishing point along the horizon line. Lines are added over the top of the drawing based on objects lines in the room. This is done to show how none of the lines meet at the same point, even though they should. Note the figures in the image are not sized correctly either. The figures sitting at the table are the closest and should be the largest. The person at the closest end of the bar is perhaps correctly sized, however, the bar is too short in relation.
The drawing on the left is based on features from the previous image. Note how all the angled lines converge on the one vanishing point and that all the other lines are either horizontal or vertical. This is a really important aspect to remember. If you are creating a simple one or two point perspective drawing, all lines will be either horizontal, vertical, or will be angled in a way that they end at a vanishing point.
Creating a Singe Point Interior Space Drawiing
Since perspective can get complicated and can go in so many directions, this chapter will focus on creating a drawing of an interior space using both one and two point perspective. Below will help you step through the process of drawing a one point perspective drawing.
Step one: Frame your object or area.
Remember, the border around your image, your viewfinder, and your drawing are all the same ratio of height to width. Your viewfinder will work the best for helping you see a three dimensional space to create a perspective drawing. Use the viewfinder to help frame your area, find angles, and also look for alignment points. Another helpful thing a viewfinder can assist with is to help locate where an angled line leaves the frame. A tick mark can be placed at the point a line leaves the frame. A line can then be draw from that tick mark to the vanishing point to obtain your angled line.
Step two: Create the shape at the end of the room or tunnel.
At the back of a room or at the end of a tunnel there will be a shape, which is usually a square or rectangle. To make sure the setup of you drawing is correct, the size of this shape in the picture plane is important.
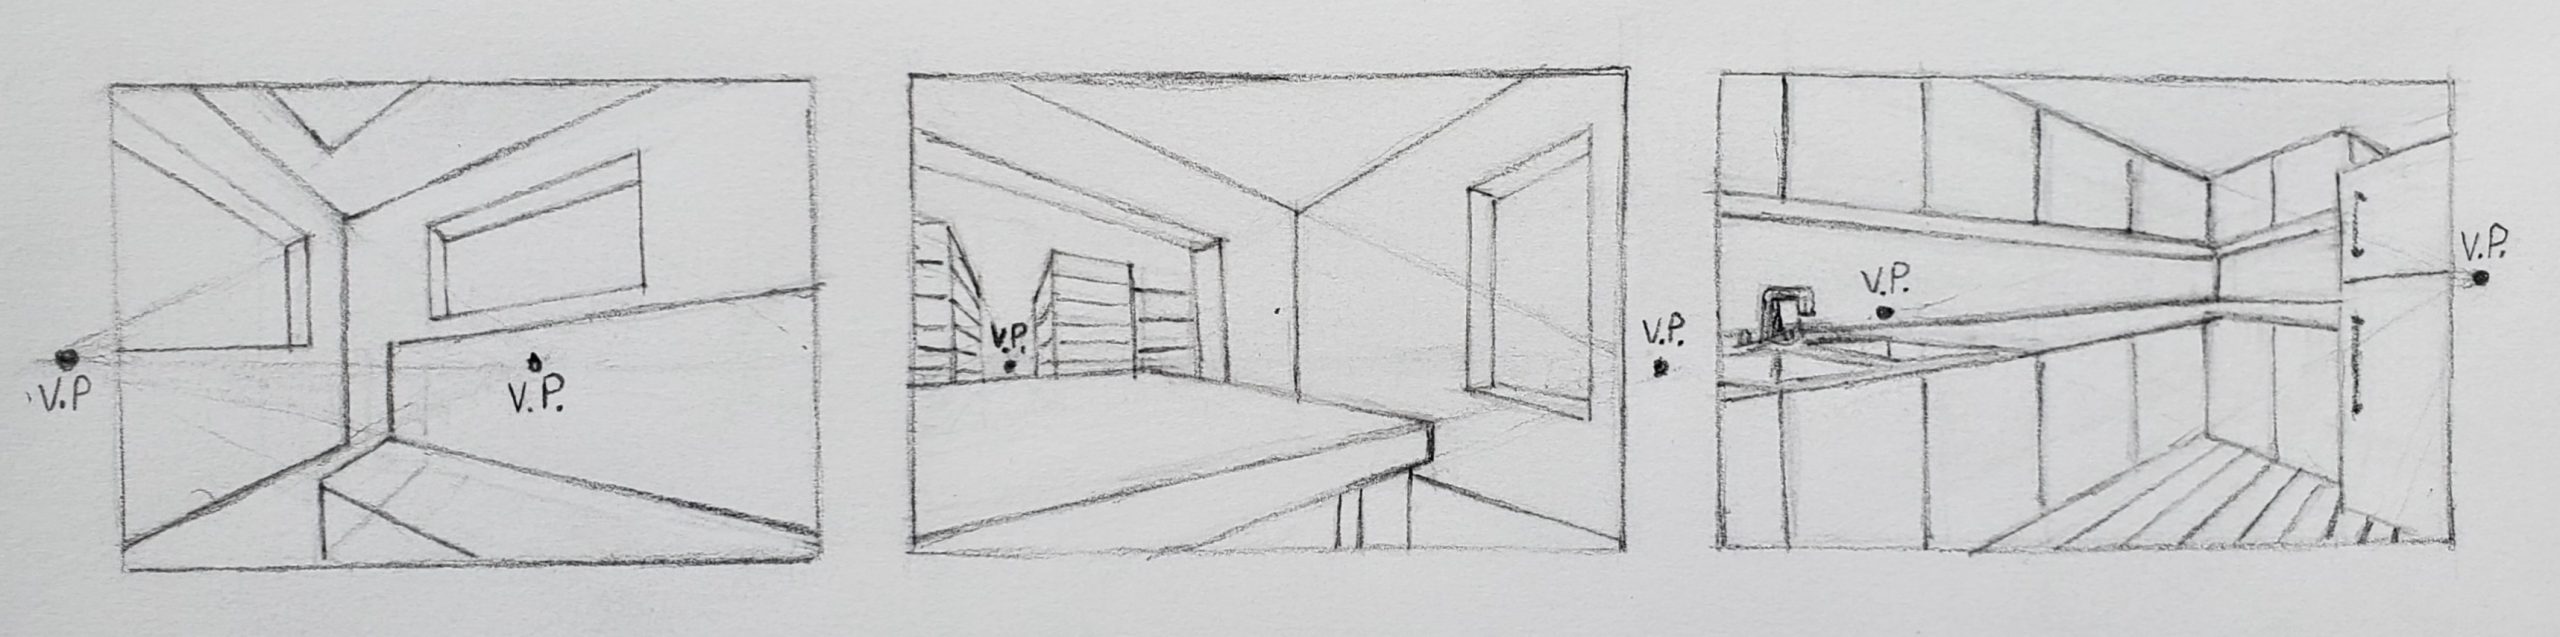
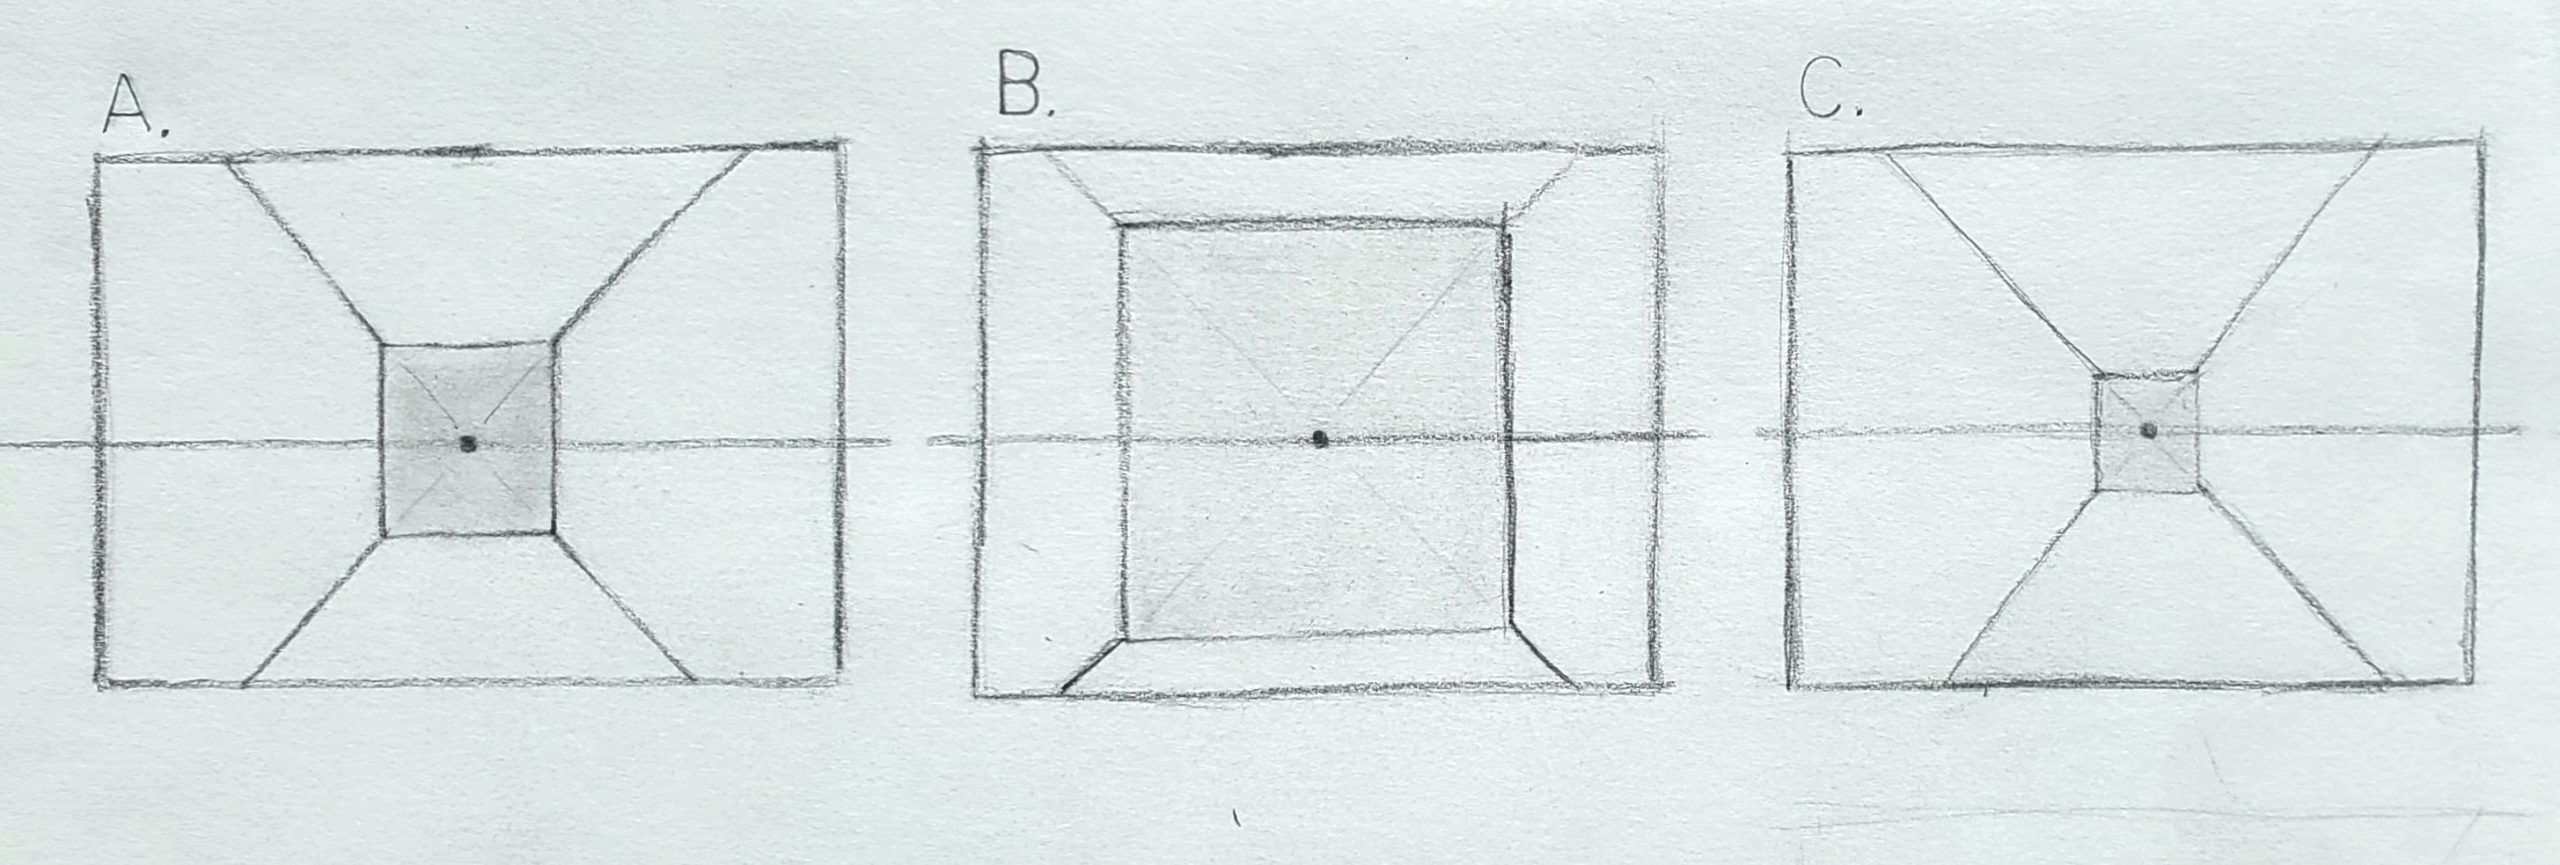 In the examples on the left, the initial shape is the shaded square and the vanishing point is in the center of the picture plane with a horizon line running through the middle. Note how the size of the square within the picture plane influences how much of the walls, ceiling, and floor you see. In example A, the square is about the right size to show a good portion of the surrounding room. In example B, the square is rather large within the picture plane and you will only be able to draw a small amount of the surrounding space. In example C, the square is small within the picture plane so you will see a lot of the surrounding space. However, if you make the back shape too small for the size of the space, you may not have enough objects to fill the drawing area. It is a good idea to use your viewfinder to zoom in or out to help determine what you want to see within the picture plane and the size for the initial back shape.
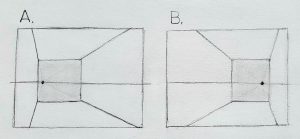
The examples on the left show how your position within the room can influence the angles and placement of the back shape within the picture plane. The person observing the area in example A is right up against the left wall and in example B the person is up against the right wall. Your positioning in the room will influence the angle dramatically. Note how the position of the vanishing point and back shape is moved within the picture plane. In example A, the vanishing point and back shape both move to the left. In example B, they both move to the right. Since you will naturally see more objects in the wall farthest from you, it may help the composition to move the vanishing point and back shape within the picture plane like in the examples.

The examples on the left show how your height within the room can influence the angles of the room. In example A, the viewer is low to the ground within the room. In example B, the viewer is close to the ceiling. Note how the horizon line moves up and down within the back shape. Remember, as you look out in front of you, your eye height remains the same off the ground and this is why the horizon line moves up and down within the room as you move up and down within it.
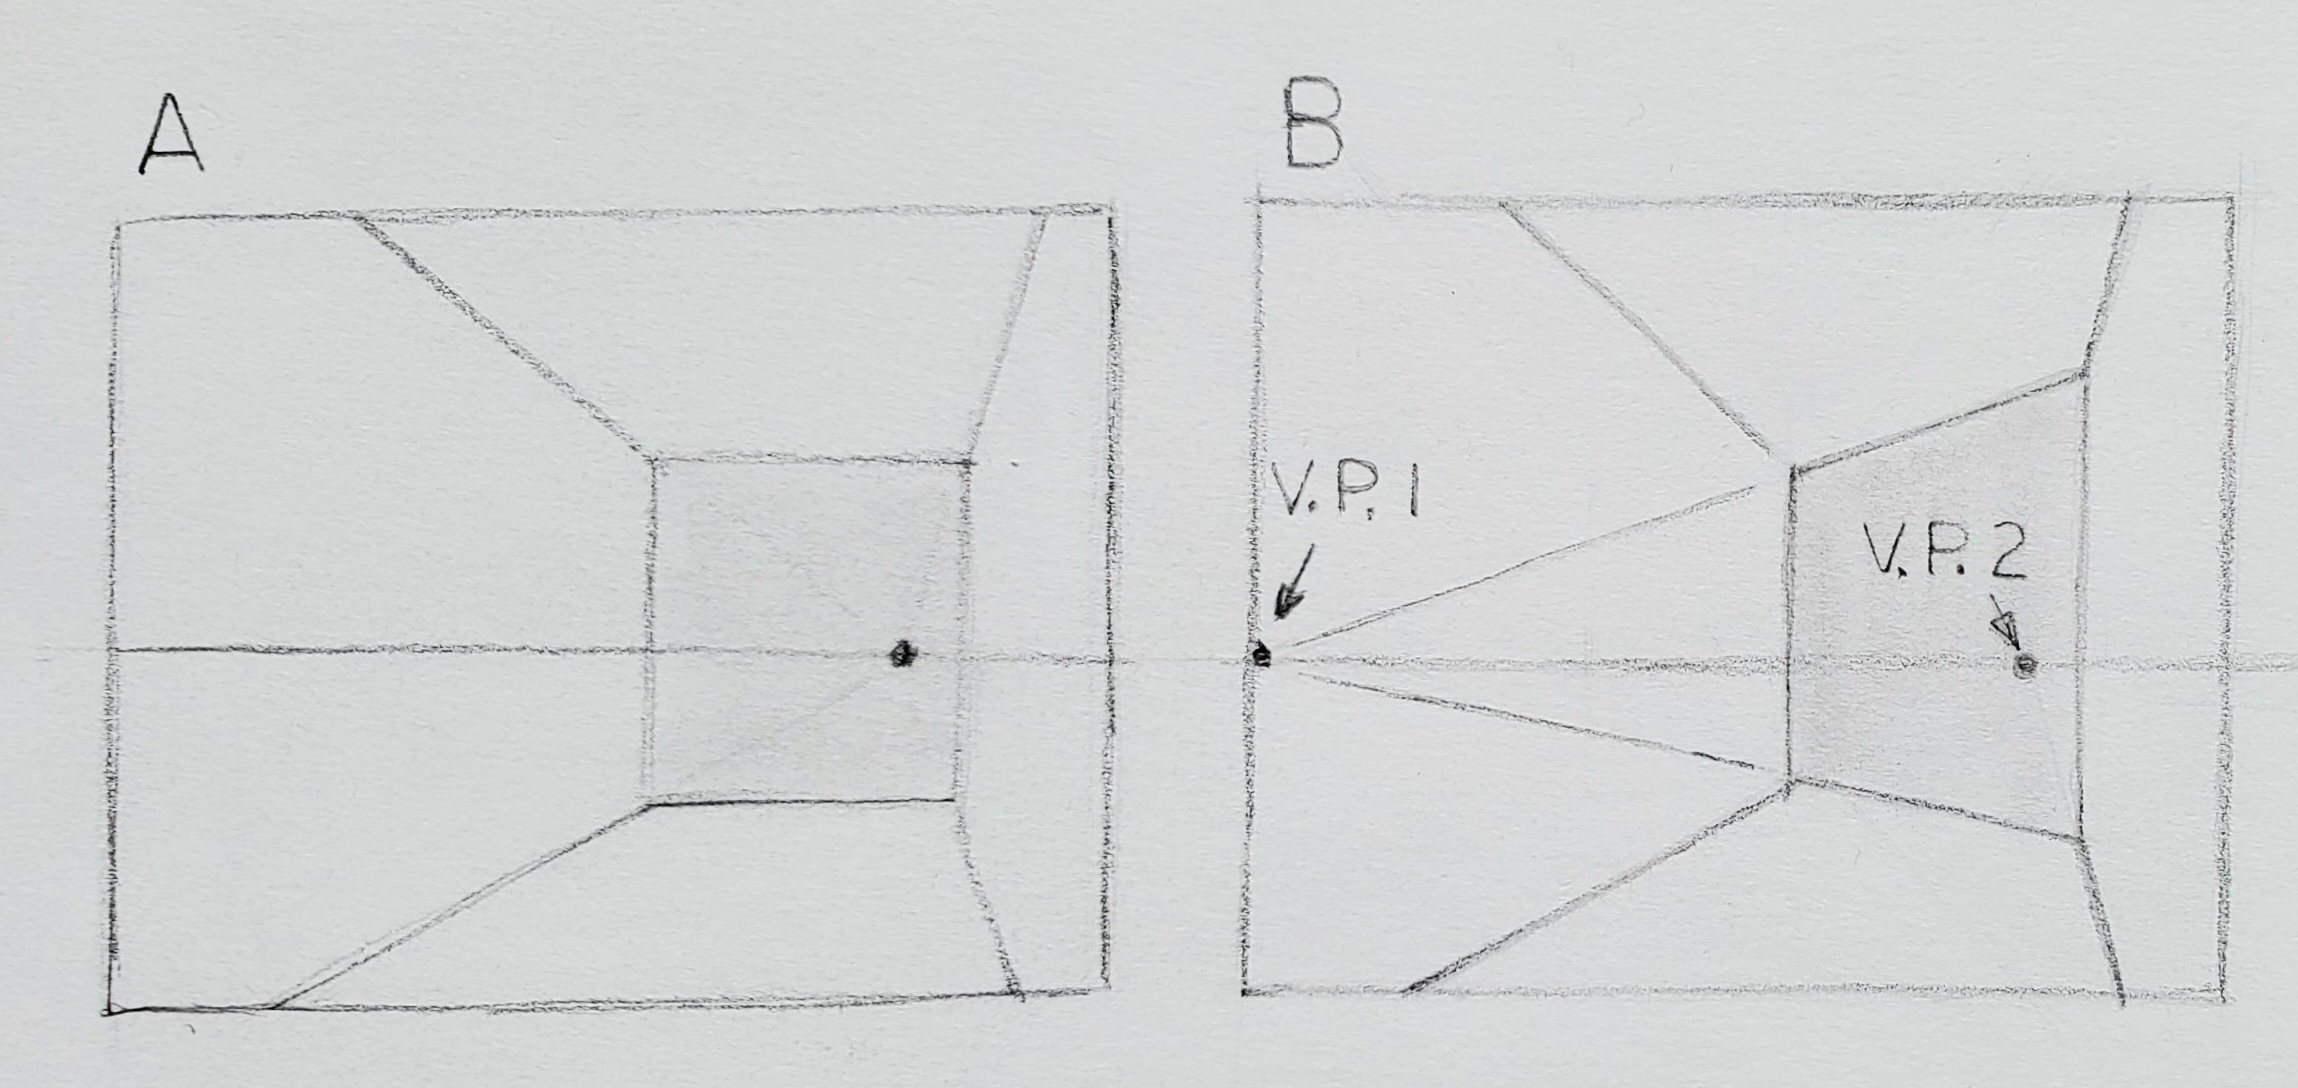 The example on the left shows two areas that are the same, however, example A is considered a one point drawing and B is considered a two point drawing. In example A, the viewer is positioned within the room near the right side wall looking straight at the back shape. In example B, the viewer is in the same place within the room, however, they are turned slightly and looking at the far left corner. Note that since the far left corner is slightly farther away from the viewer than the right corner, it may appear smaller. Be aware of this aspect if you are close to a wall on your right or left and drawing a large area. The larger the area, the further the far corner would be from you and you may need to turn your head to see the whole area. You may think you are facing forward, however, your head is now rotated and you will be looking at the far corner to see the whole room. If you are drawing a large area with one point perspective, it helps to do so closer to the middle of the room so this effect is not too dramatic.
Step Three: Add additional elements.
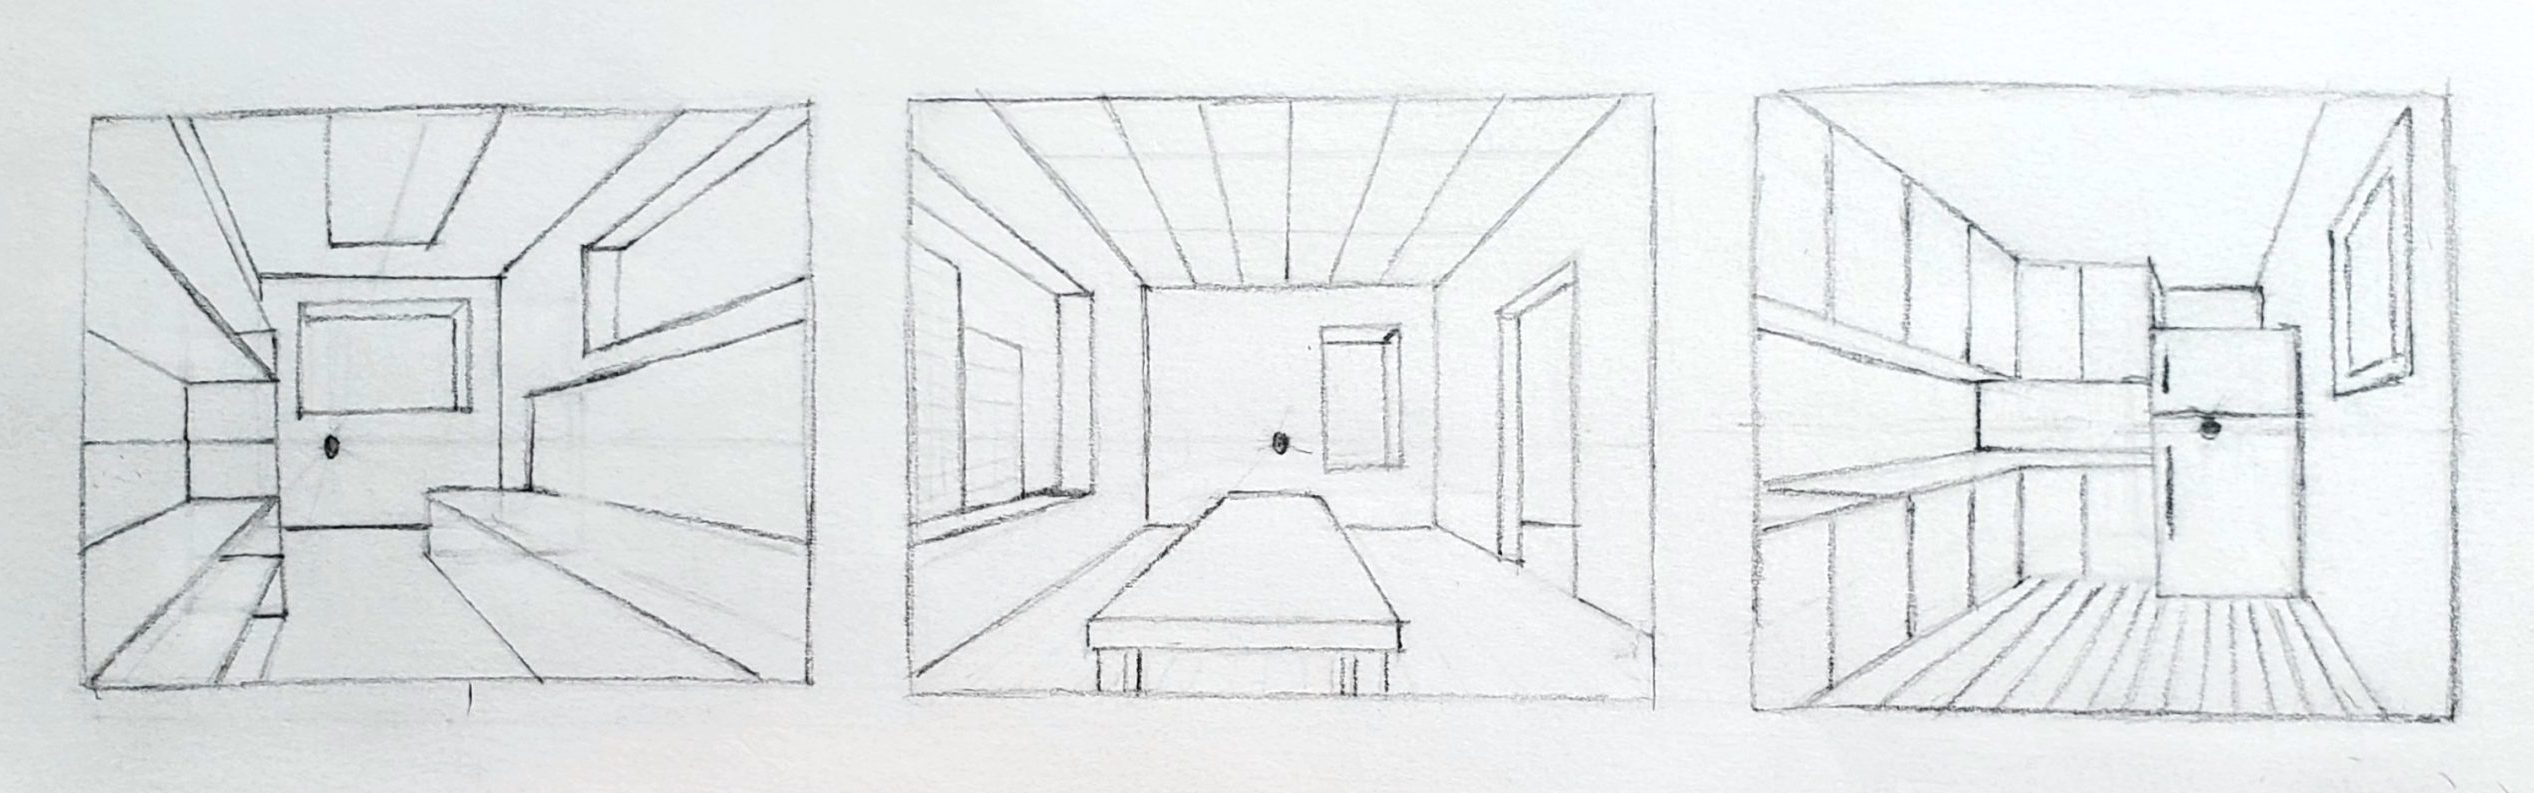
Now that you have the your initial shape and vanishing point established, you can add additional elements. Below are three made up examples of one point perspective drawings. All lines in these drawings are either vertical, horizontal, or go to the single vanishing point. Sometimes it helps to lightly draw everything first as basic cubic shapes, just to make sure everything fits correctly in the space and the major angles are correct. Also, do not forget to use your viewfinder for help to compare your drawing to the area you are drawing.
Creating a two Point Interior Space drawing
Starting a two point perspective drawing is similar to how a single point perspective drawing starts. With a one point drawing, the basic shape at the end of the room or tunnel is found, however, this time you will first find the size and location of the corner of the room. Below is a step by step method for drawing a two point perspective drawing.
Step one: Establish the corner location and size
An easy way to figure out if the object or area you’re looking at is considered a two point perspective drawing is if you are looking at a prominent corner and that corner is close to the center of the picture plane. You may think the image on the left is an example that uses only one point, however, the far corner is in the middle of the picture plane. This means the camera was facing that corner. In the image, we can see two corners. However, for this to be a one point drawing, the camera would need to be closer to the center of the room pointing at the back wall.
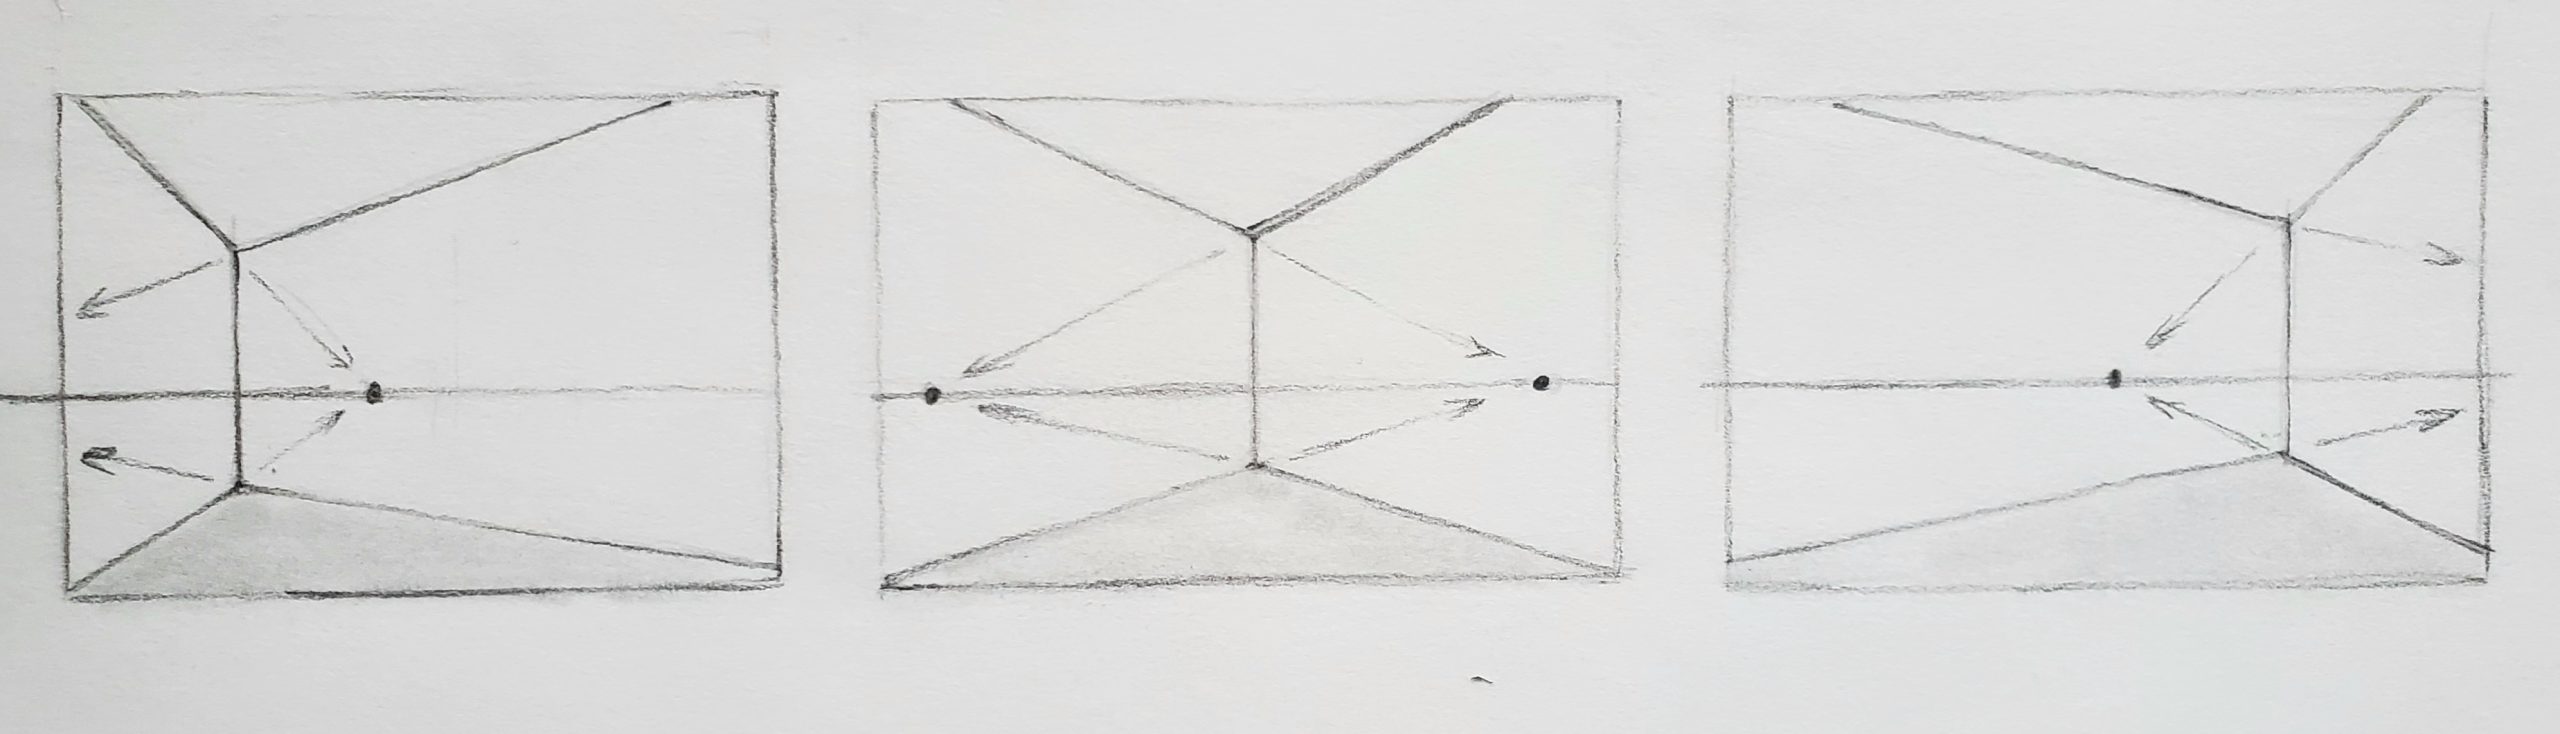
In the example on the left, the corner is in three different locations within the picture plane. The floor is the shaded area, which is added for reference. In the middle drawing, the two vanishing points are noticeable within the picture plane. This is not always the case and sometimes you will find that one or both vanishing points are outside of the picture plane.
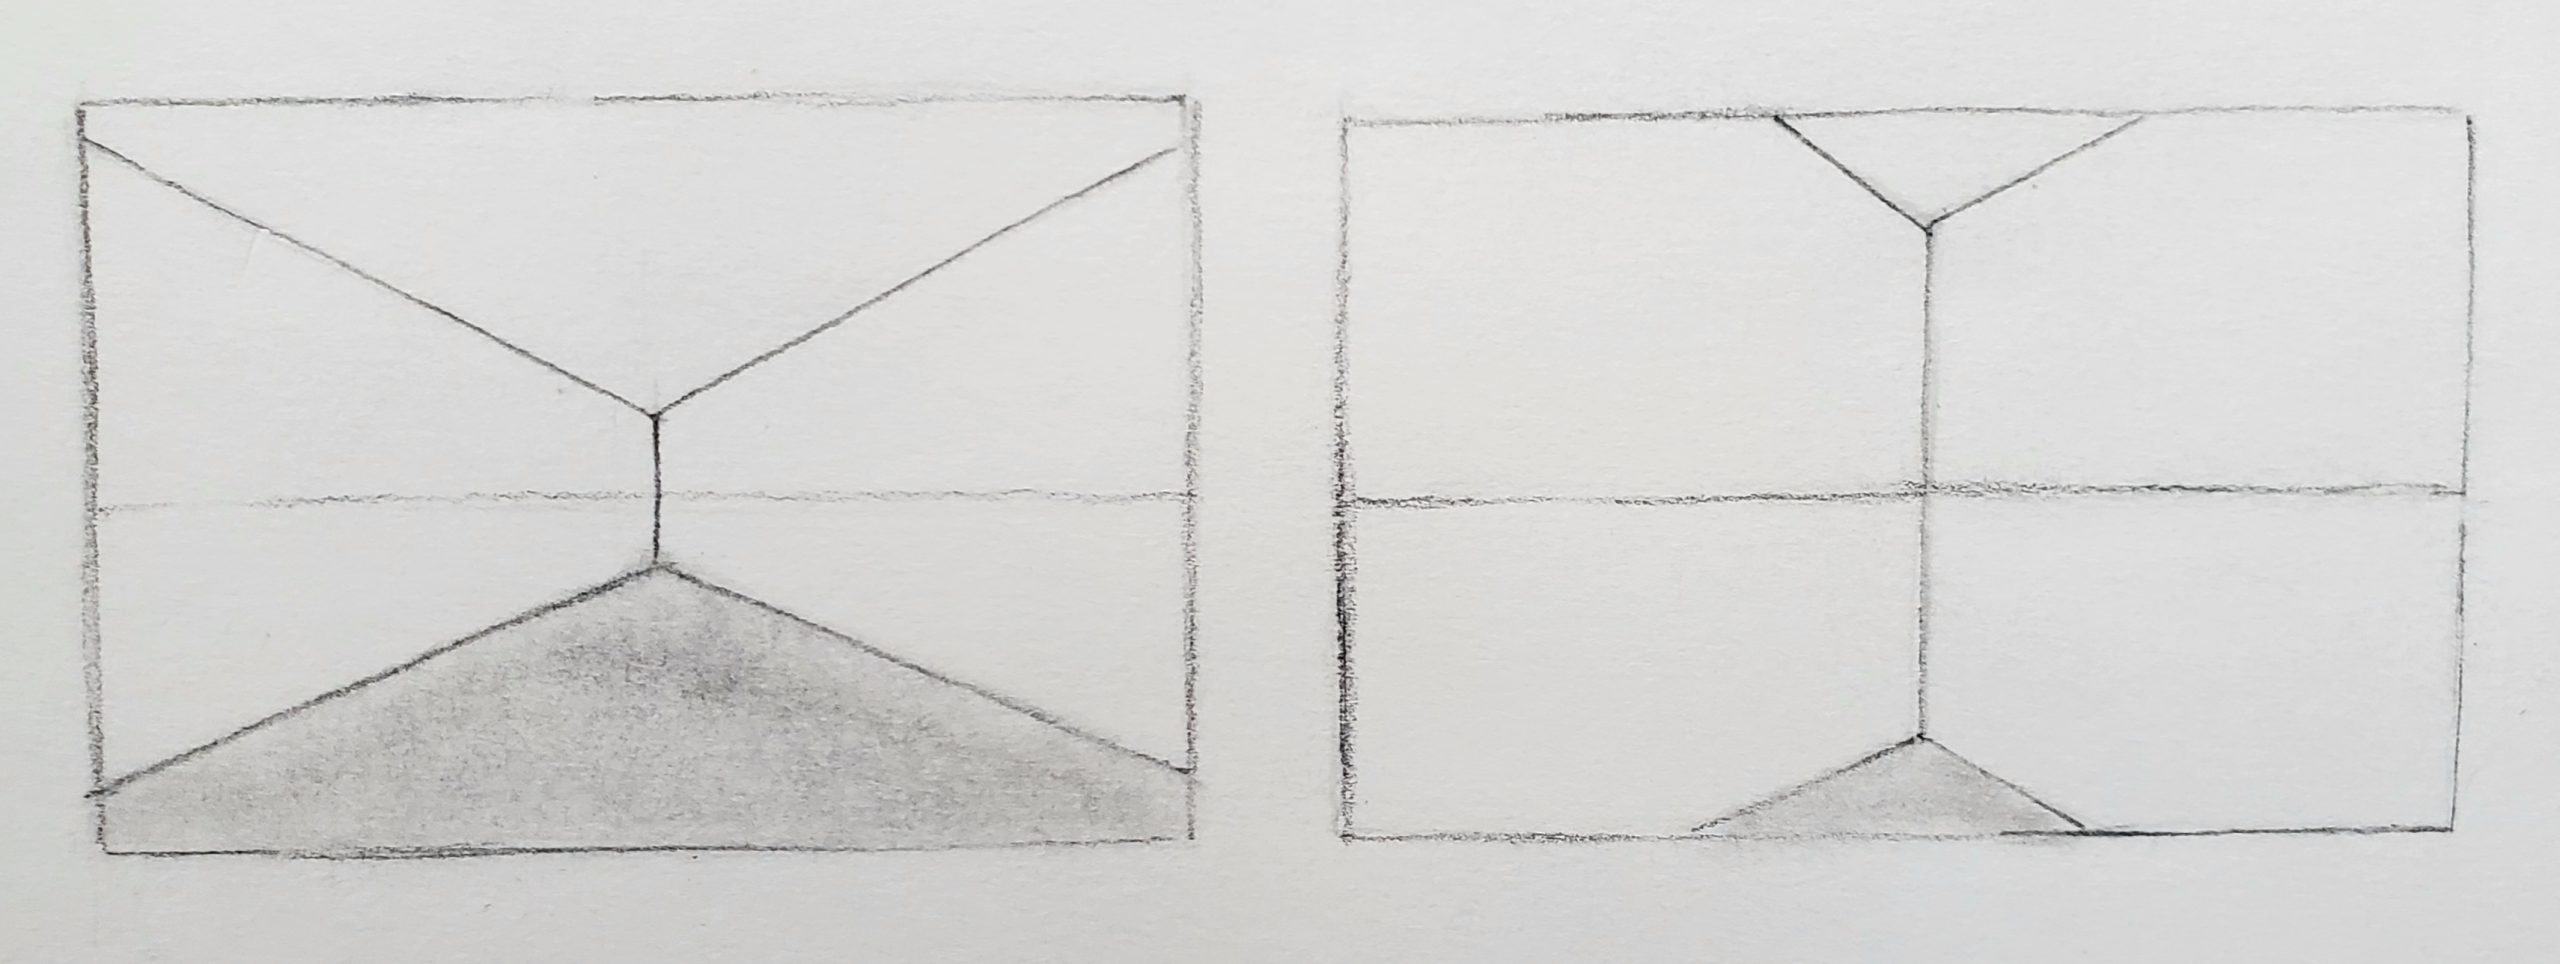 The example on the left shows how the amount of floor (shaded area) or ceiling seen will change when the length of the corner is changed. Like the size of the initial shape of the back wall in single point perspective, the larger the corner line within your picture plane, the less of the area you will see. Again, the viewfinder can be used to see how much area you want to draw.
Step two: Trust your angles
The biggest problem people have while creating a two point perspective drawing is trusting the angles they find of the subject. Remember, many of the vanishing points are out of the picture plane area and all you can do is use your angle finding skills to find the proper angle. You have to trust the angles you find and sometimes they will be much steeper than you believe. Also, if starting with a basic line drawing, all lines will either be vertical or will fan out from one of the two points.
Below are three examples of two point perspective drawings based off the same three single point drawings done previously. The difference is the viewer is now looking at one of the corners instead of the back wall. The vanishing points are shown, however, in reality they would be further apart if these were real areas. Having the two vanishing points too close together can make the angles steeper than what you would typically find in the real world. Again, note how all lines are either vertical or will fan out to one of the two vanishing points.
Additional Notes on Perspective
Below are some more examples that may help you understand what you are seeing when creating a perspective drawing.
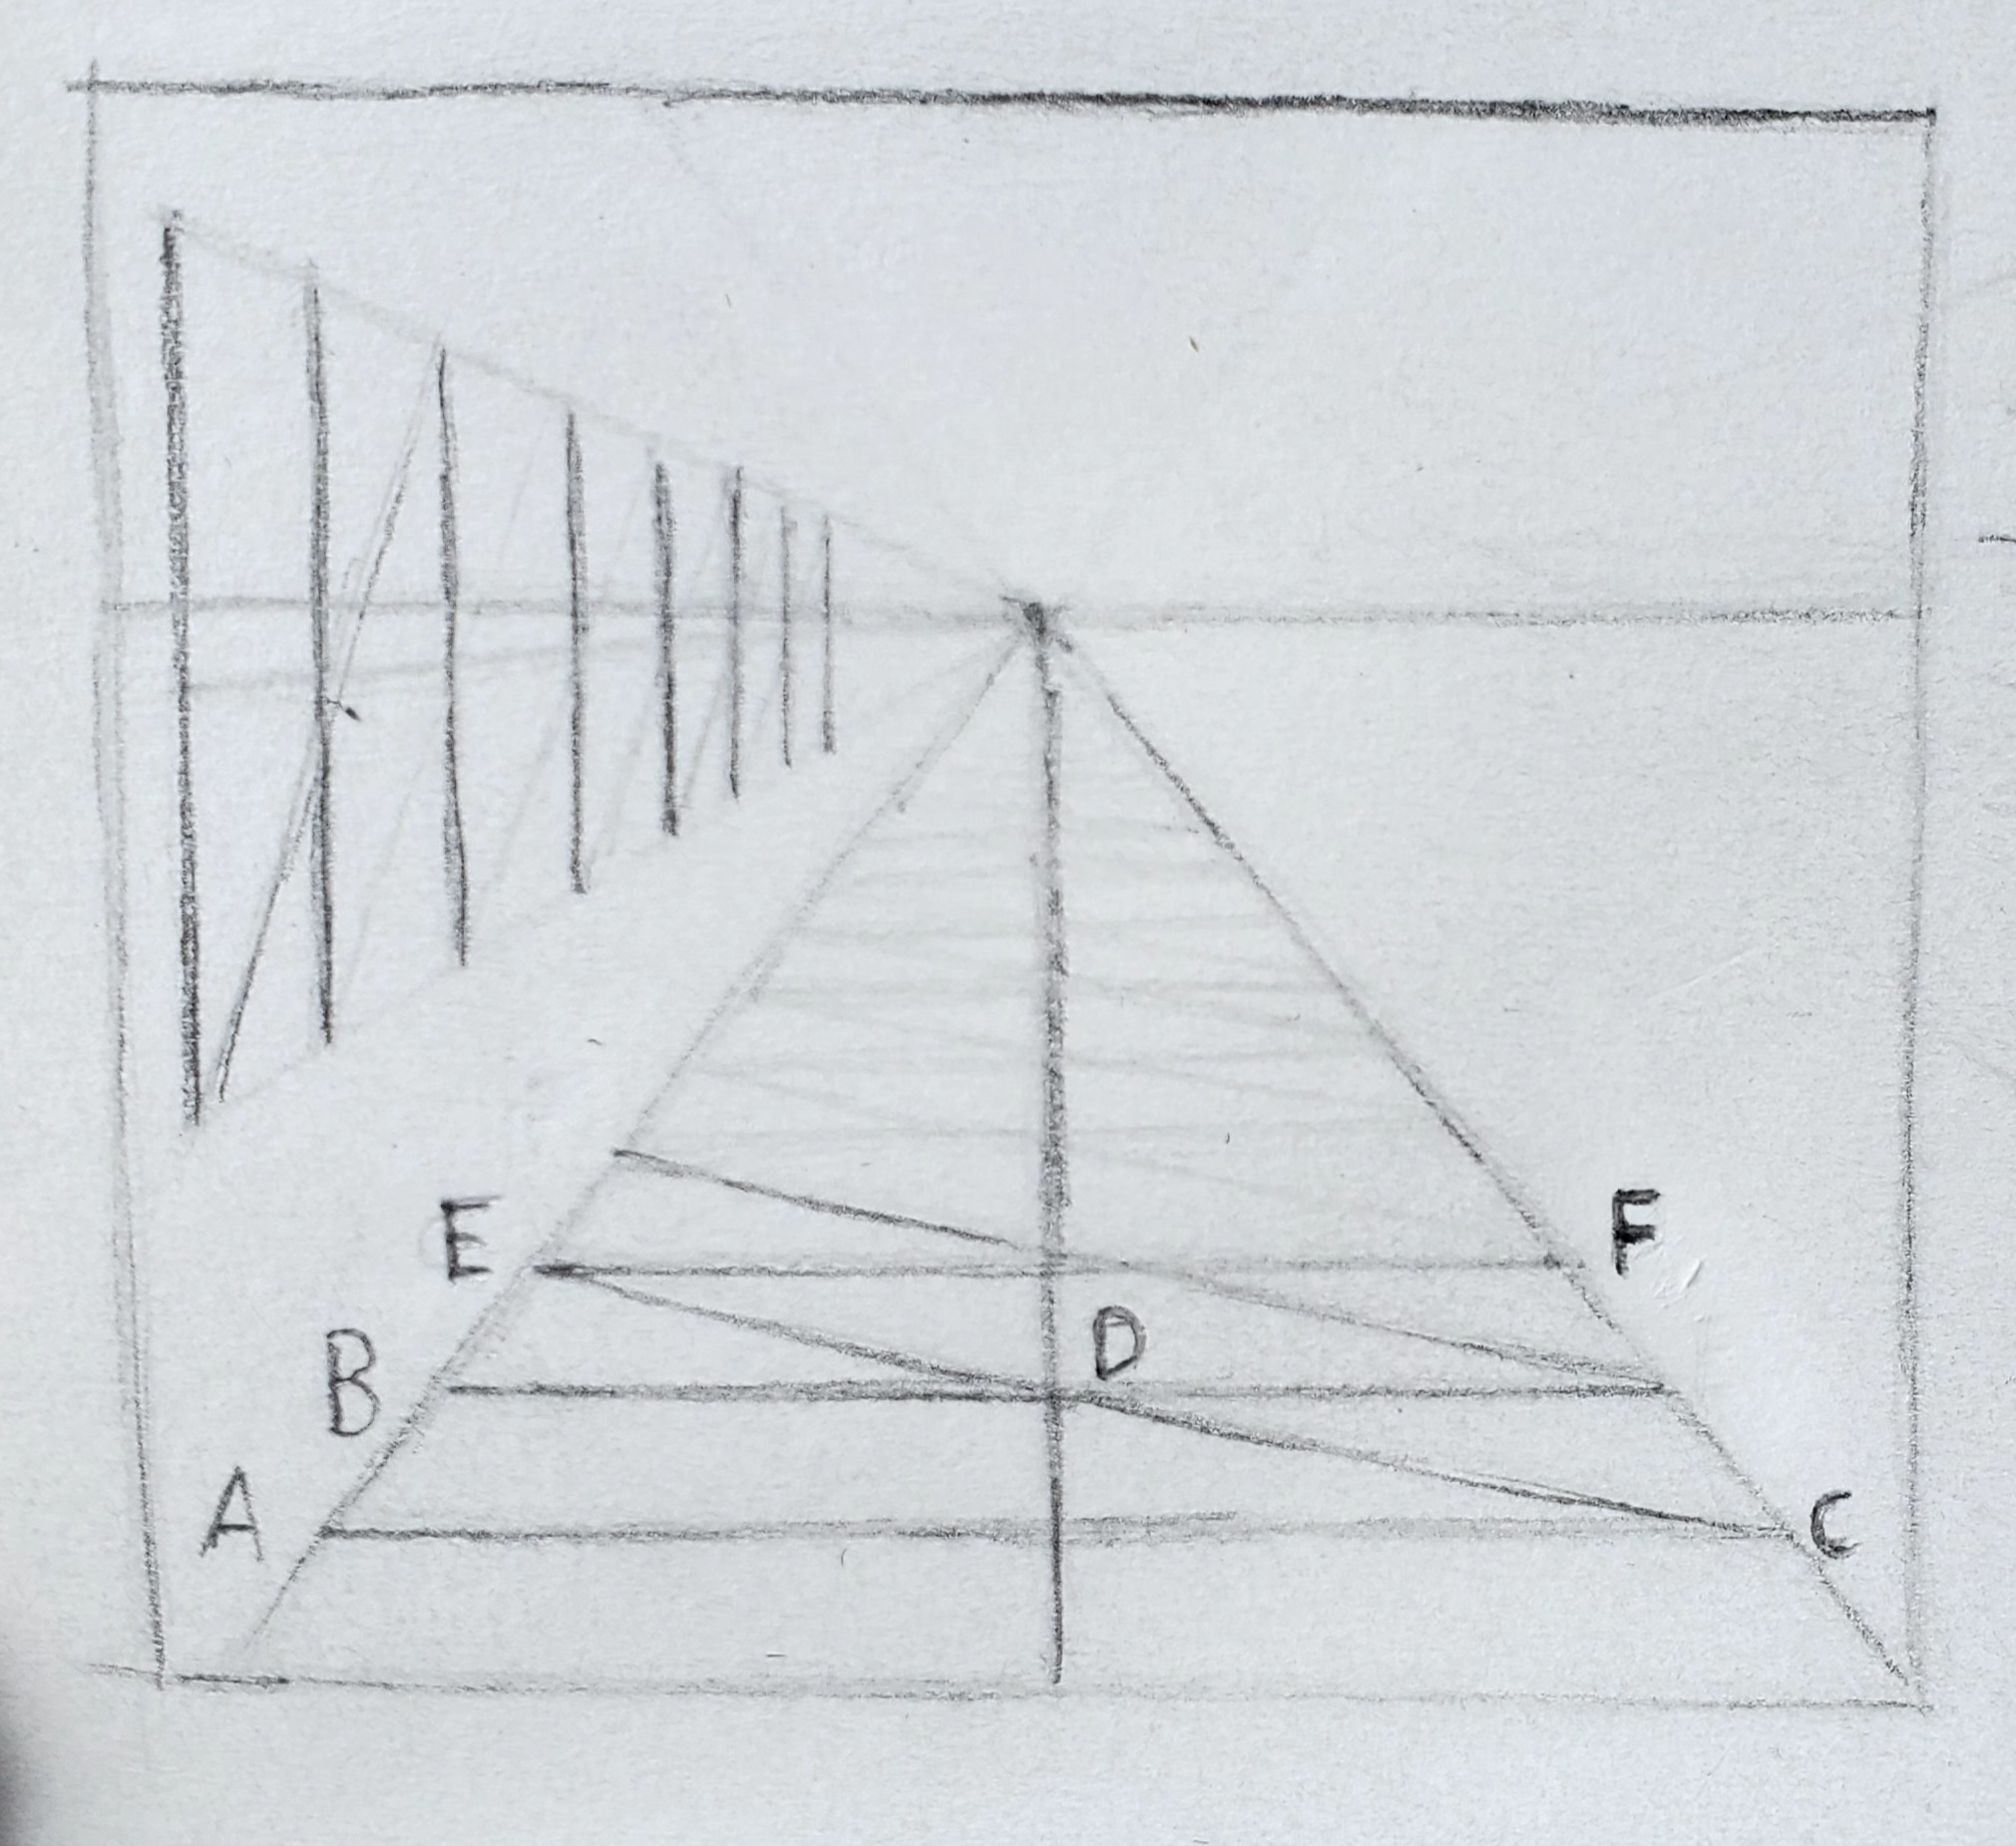 The example on the left shows how to create horizontal equally spaced parallel lines, such as railroad tracks or telephone poles that recede into the distance. For creating railroad tracks, the first step would be to draw a line from point A to point C to form the width of the first track. From point A and C, draw two lines to the vanishing point. Then, draw another line between the center of the A-C line to the vanishing point. Next, you would draw another horizontal line for the second track at a distance you think would look correct, for this example we will use the line next to B. Next you would draw a line connecting points C, D which will end at point E. From point E you would draw another horizontal line to point F. Now you can start the process all over again and the tracks should get smaller as they go off in the distance.
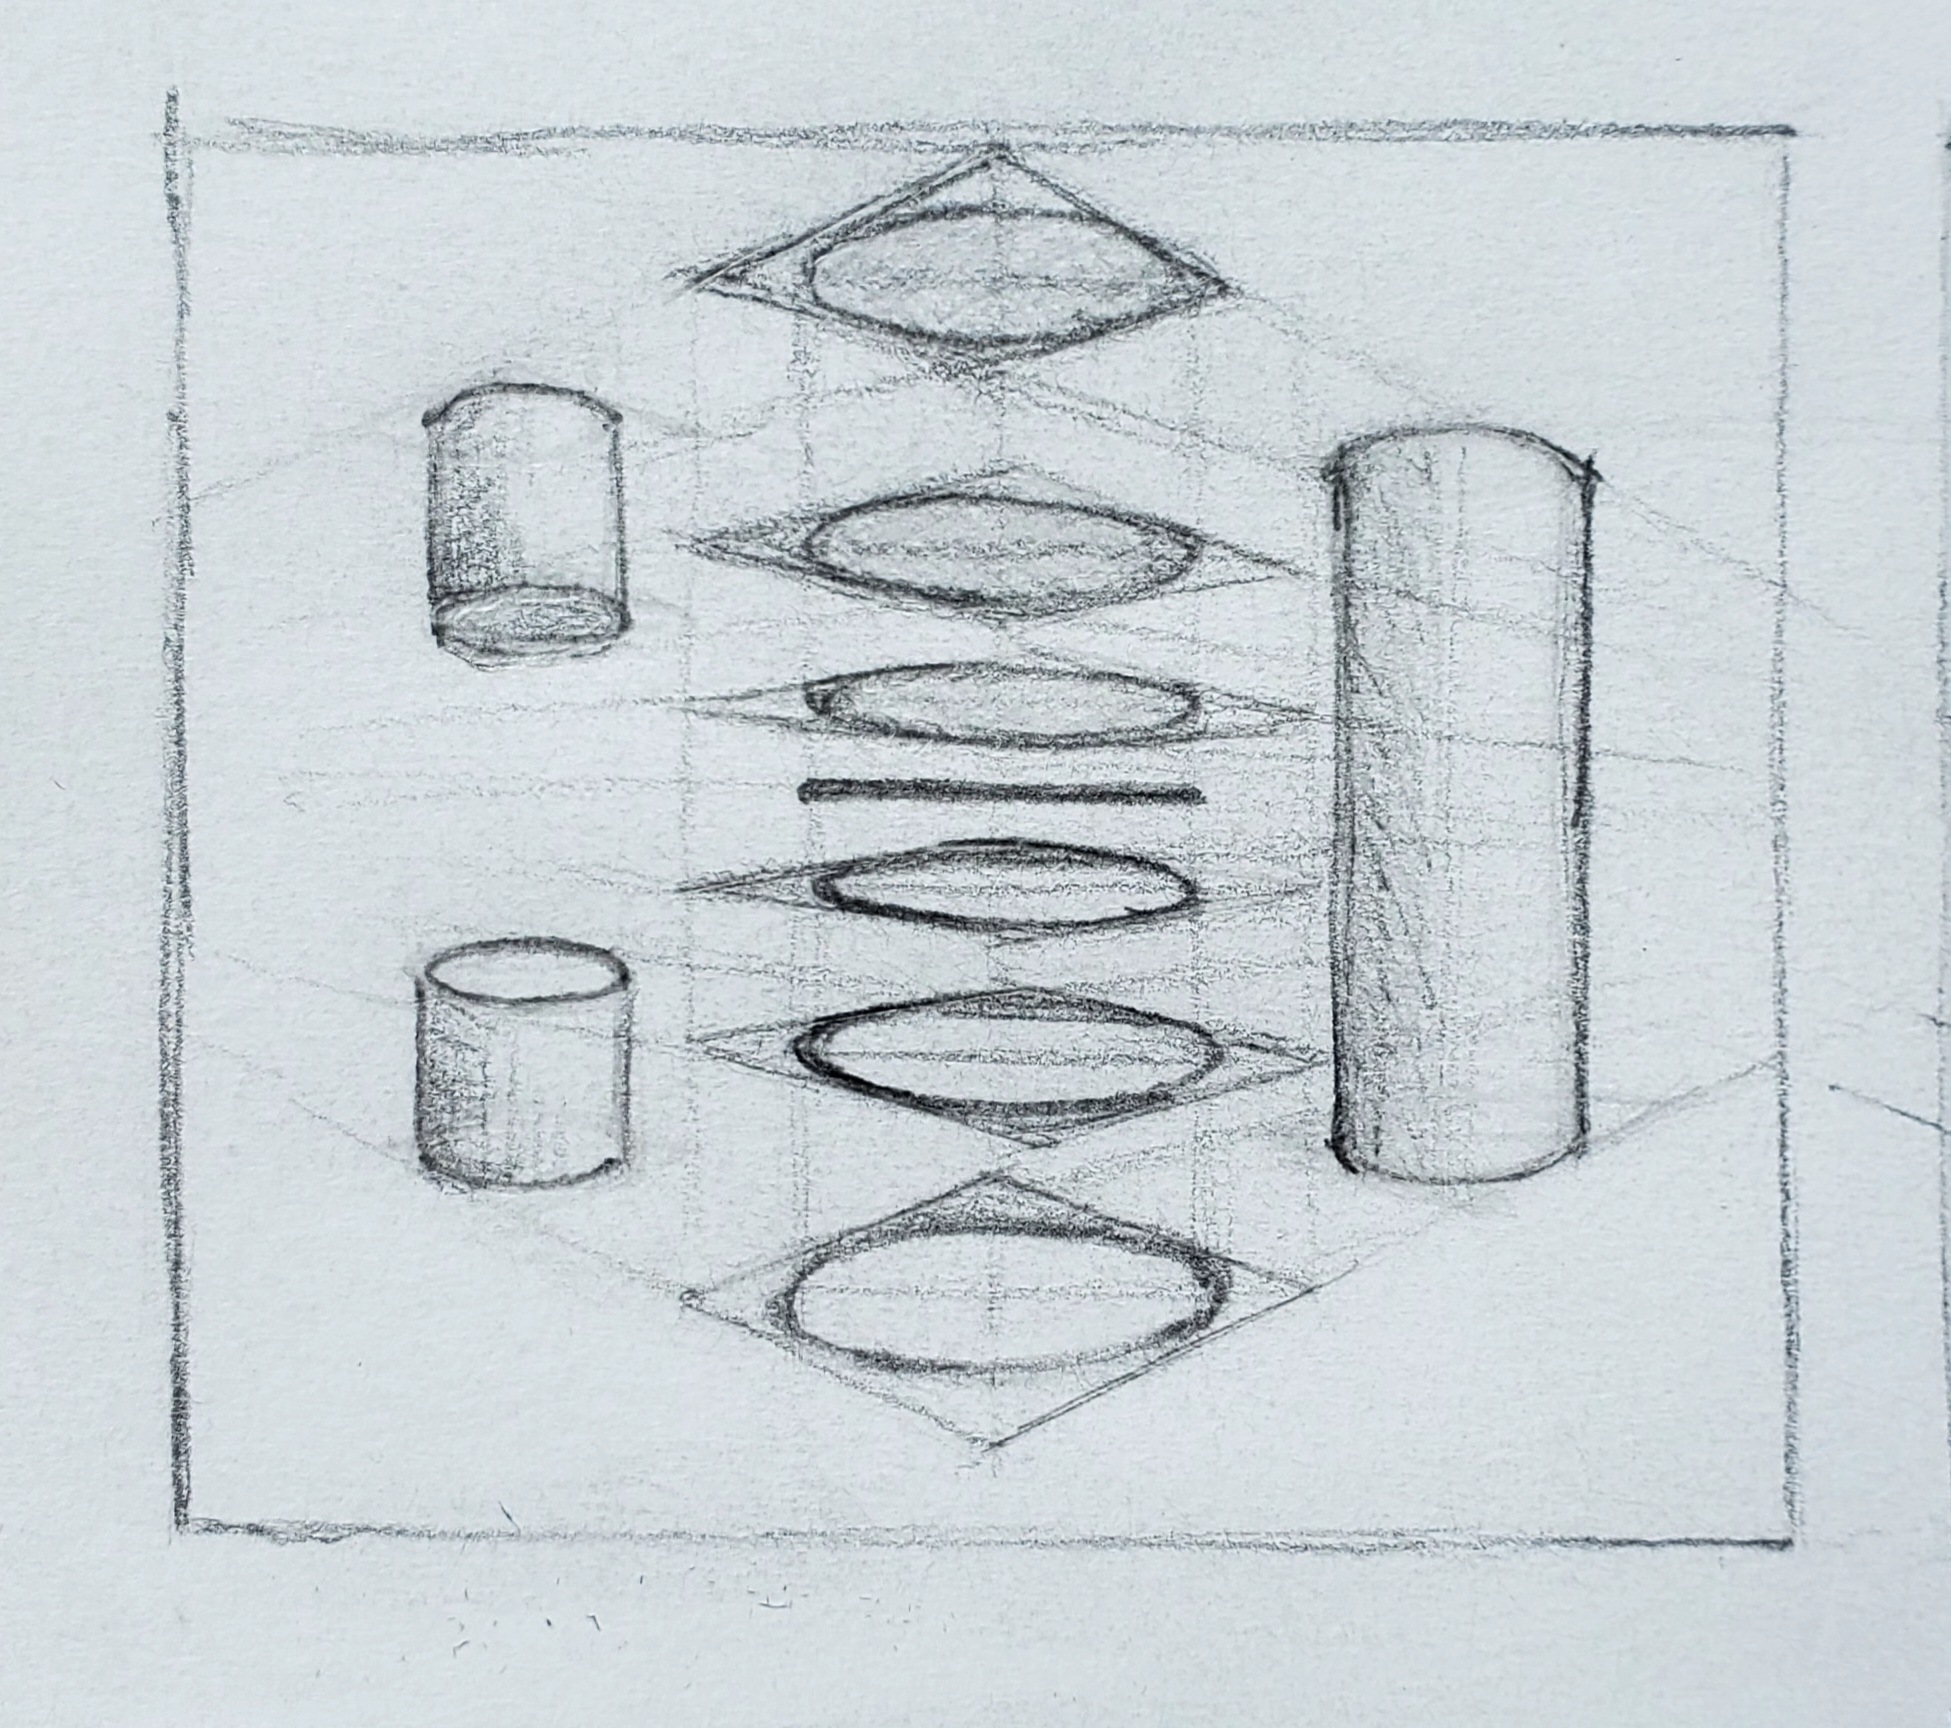 The example on the left shows how ellipses are created using two point perspective. Note how your view of the ellipses changes in the center row. Below the horizon line you see the top of the ellipse. At eye level or at the horizon line, the ellipse is just a flat line. Above the horizon line, you see the bottom of the ellipse. The other three cylinders show how the ellipse looks on a solid cylinder if it is above or below the horizon line.
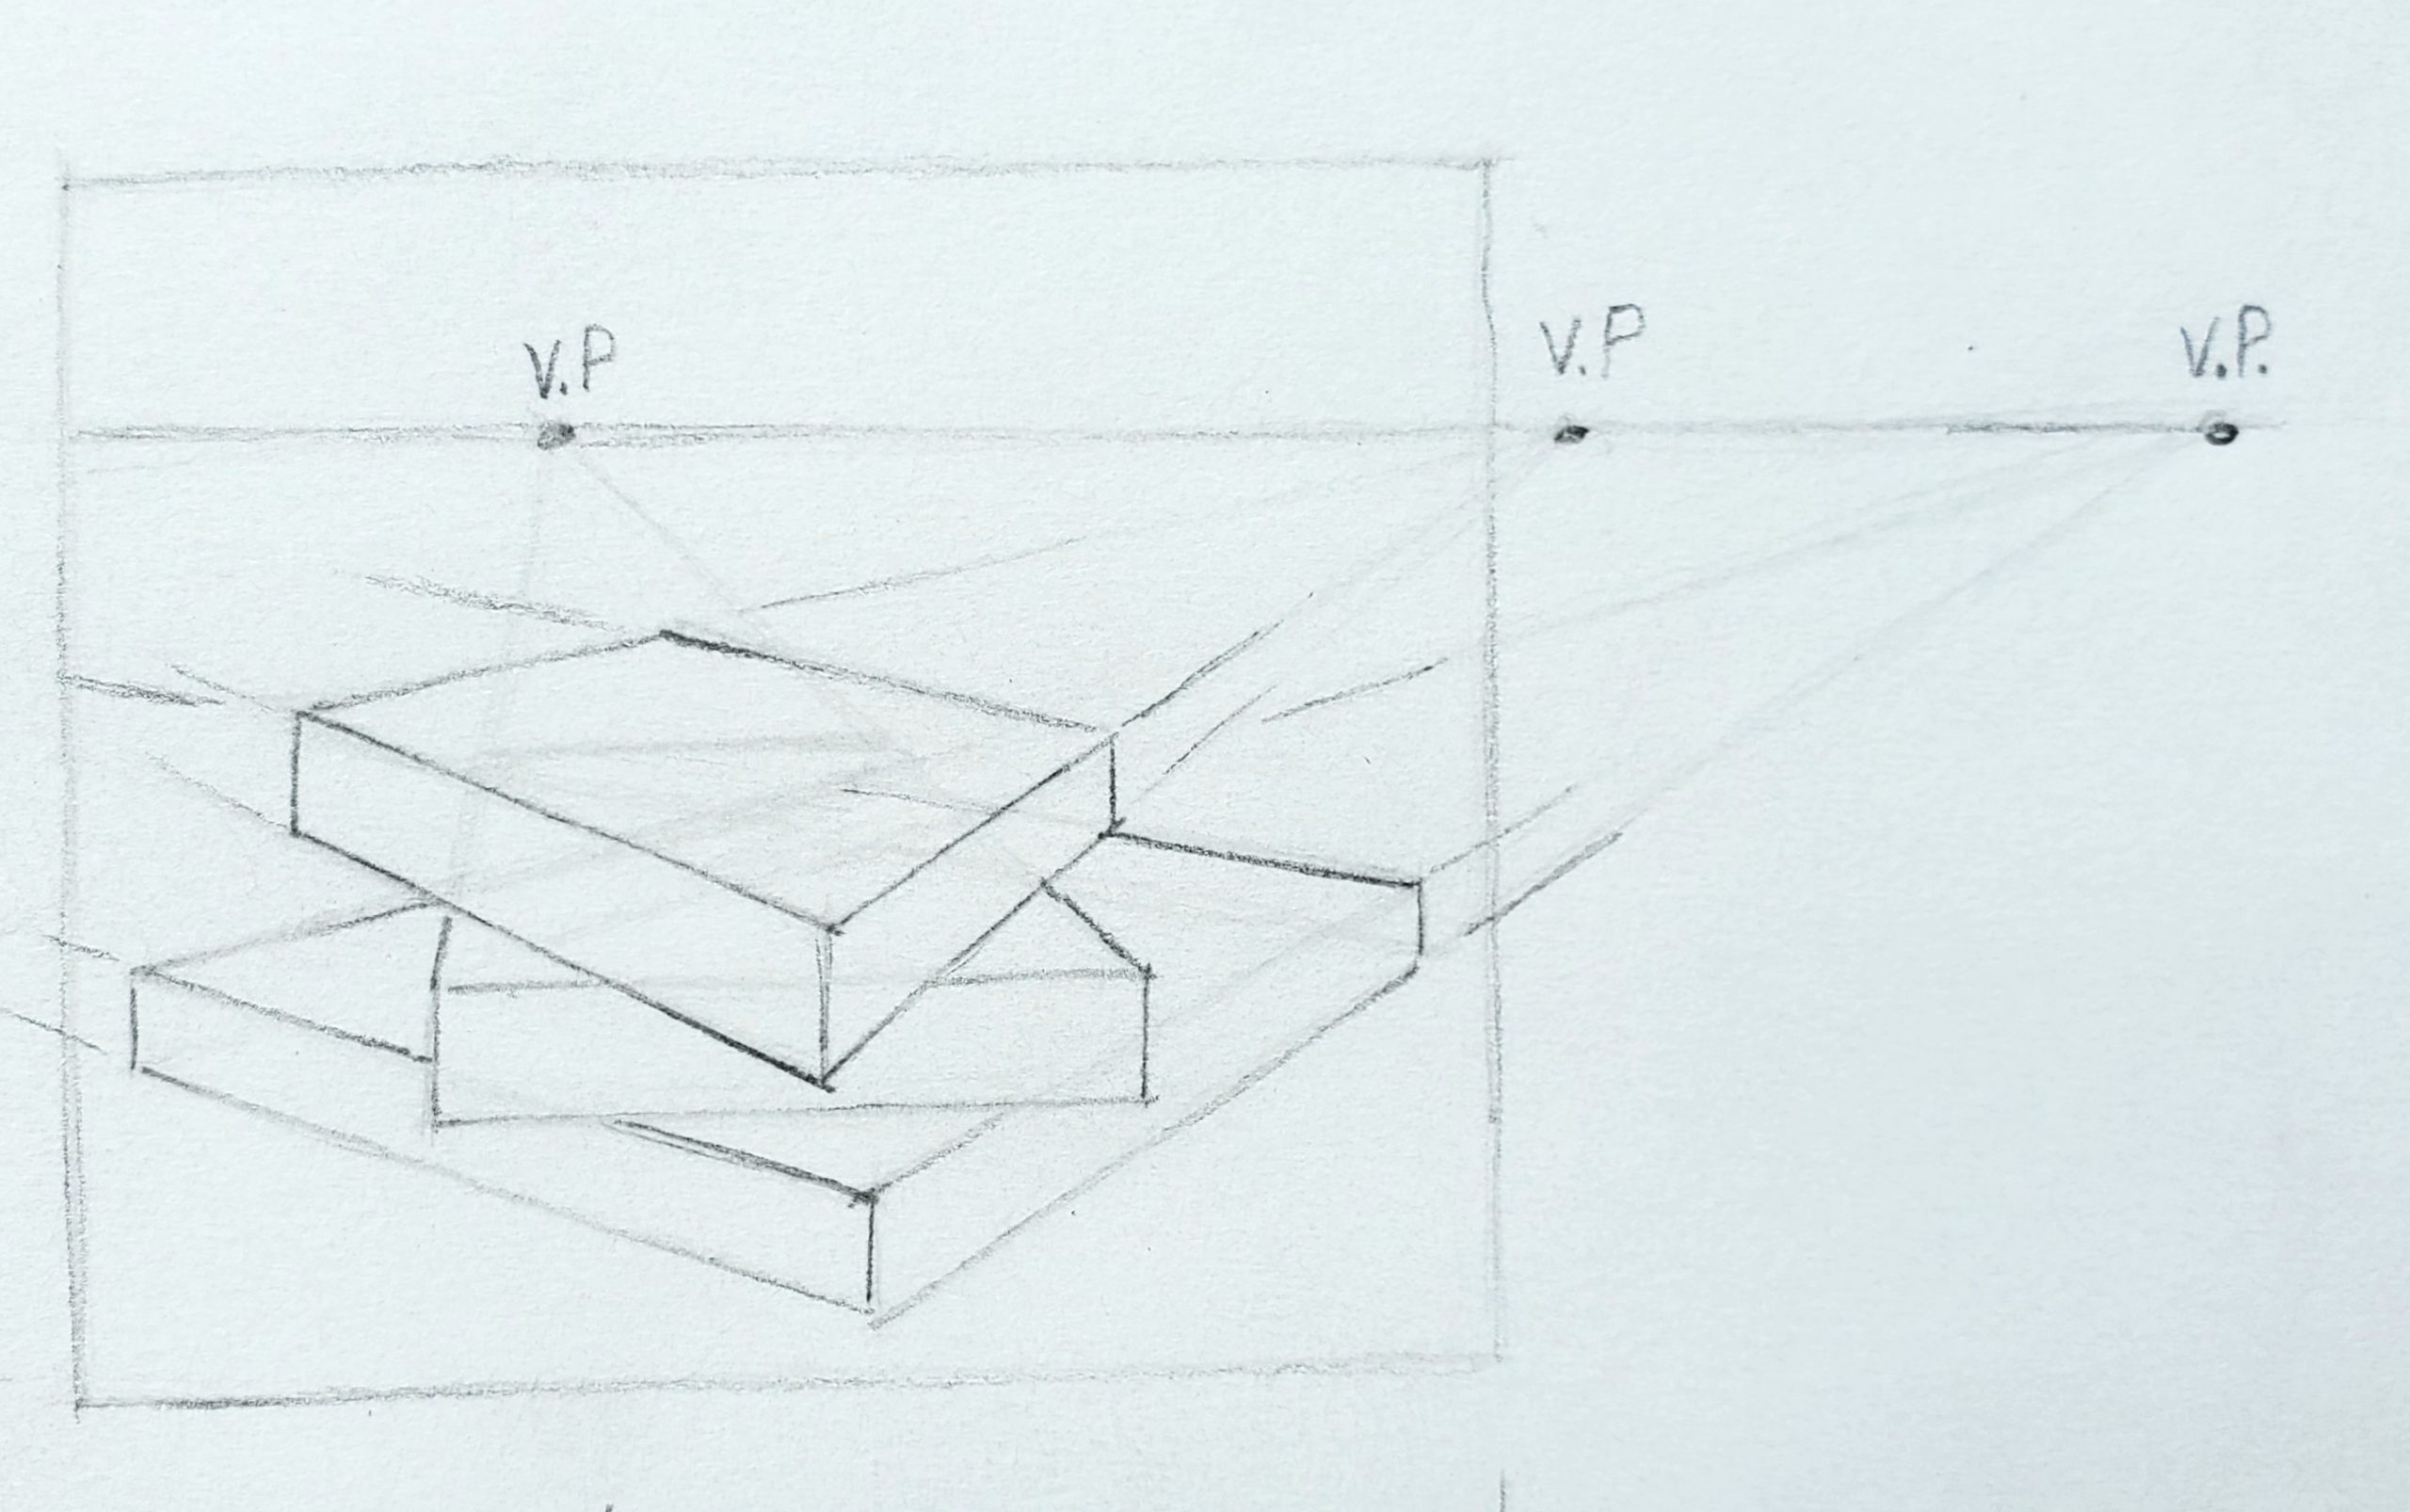 The example on the left shows a stack of books that are each oriented or rotated differently. The bottom and top books use two points to establish their shape. However, each book uses its own vanishing points along the horizon line. The middle book only uses one point, since you are not looking at a corner. If you see only one side of an object, such as the middle book, then the object will only use one vanishing point. If you see two sides, then the drawing will use two points.
