
EMT as a Team member for Advanced Life Support Assist Skills
In urban environments the EMT will be partnered with one or more paramedics. The EMT often fills the vital role of assisting the paramedic team leader by performing assessments and skills within the EMT scope of practice as well as leading logistic efforts on a call.
Paramedic providers may ask for assistance in setting up equipment for advanced life support (ALS) treatments, including:
- Intravenous “IV” Cannulation Set Up
- Intravenous Bolus Medication Administration set up
- Electrocardiogram (ECG) set up and placement
- Endotracheal Intubation set up
Intravenous Cannulation Set Up
Advanced providers will often elect to establish intravenous “IV” access. Sometimes IV access is needed to prepare for or administer medication, fluids, or to facilitate expedited care upon arrival to the Emergency Department. As an EMT, setting up IV equipment for your ALS team members is one way to support overall team function and contribute to patient care.
As you assemble the equipment ask the requesting provider which size IV catheter they would like in the given situation. IV catheters are sized by the diameter of the catheter using the universal “French’ system and expressed in common sizes of 22 gauge (written as ‘ga’), 20, 18, 16, or 14 ga. Important to note that the smaller the gauge, the larger the catheter diameter size (ex. 14 ga is much larger than a 22 ga). For most patient situations, an ALS provider will choose between 18 ga, 20 ga or 22 ga needles.
The equipment must remain clean and aseptic to reduce the chances of exposing the patient to dangerous infections. Be mindful of contamination and if the equipment becomes contaminated, throw it away and replace.
Items needed:
- IV needles varying size 18 ga, 20 ga, 22 ga unless otherwise directed.
- Chlorhexidine, Povidone-iodine wipes, or Alcohol preps – to clean the skin prior to insertion of the IV needle.
- Extension Set – connects the IV catheter to drip set and fluid bag or remains isolated to administer medications.
- 10 mL saline flush – to remove the air from the extension set and replace with sterile saline.
- Band tourniquet – not the same as a bleeding control tourniquet.
- Op-site / Tagaderm – usually clear plastic that covers the IV catheter after insertion.
- 2-4 pieces of short strips (2”-3”) of tape
- 4×4 gauze pads
- Sharps container
To set up for an IV:
- Check all equipment expiration dates (should be done at the beginning of your shift during the kit check so that you don’t need to waste time doing it on-scene).
- Unwrap the extension set and 10-mL flush.
- Place the 10-mL flush on the hub of the extension set and connect it by twisting it into place on the end of the extension set.
- At the far other end of the extension set, unscrew the capped end ¼ turn, just enough to keep the cap on but allow fluid to pass.
- Push the plunger of the 10mL saline flush to remove all the air from the extension set.
- Look for air bubbles within the extension to move as the saline moves the trapped air out.
- The saline fluid will flow out the other end of the extension until this step is complete.
- Place all items within reach of the person conducting IV Cannulation procedure keeping the items in their packages and as aseptic as possible.
|
IV Set Up |
1 Instructor |
|
Initials |
|
IV Fluid Set Up Overview
IV fluids are administered for a variety of reasons such as volume replacement in shock. Fluid bags come in multiple sizes, primarily in 250 mL, 500 mL, 1000 mL bags. There are two main types of IV fluids used in EMS: Normal Saline (NS) and Lactated Ringers (LR). Protocols, availability, and ALS provider preference will dictate what type of fluids are appropriate for the patient and the set-up listed below is the same for either type of fluid (NS or LR).
The other piece of equipment required to administer fluids is what’s called a “drip set”. A drip set is simply tubing that connects into the fluid bag on one end with the other end connecting into the IV extension set and allows the fluid to flow into the patient via the established IV site. Drip sets are available in many sizes, however the most common in EMS are 10-drip set (expressed as “10 gtt/mL”) or sometimes called a “macro” drip set, or a 60-drip set (expressed as “60 gtt/mL”), sometimes called “micro” drip set.
The strange abbreviation “gtt” is from the Latin word “guttae” which means “drop” indicating that the macro drip set administers 1 mL of fluid for every 10 drops and the micro drip set administers 1 mL or fluid for every 60 drops.
Items needed for IV Fluid Set Up
- All items above with patent IV access placed in the patient.
- IV bag – ask which size and type.
- IV tubing – assume a macro drip set (10gtt/mL) unless otherwise directed.
Steps:
- Check all equipment expiration dates (should be done at the beginning of shift during the kit check).
- Unwrap appropriate IV tubing, make sure that it is unknotted and untangled.
- Gather the appropriate bag of fluid and remove the cover over the port where you will insert the IV tubing.
- Puncture the fluid bag port with the pointy end of the IV tubing drip set.
- Squeeze the drip chamber to allow fluid to run into the drip chamber filling it ¼ to ½ full.
- This doesn’t need to be precise but can’t be completely full.
- If the chamber does completely fill, simply invert the bag and chamber, and squeeze the chamber. Repeat as necessary.
- Open the rolling stopcock that is below the drip chamber thus allowing the fluid to flow through to the bottom of the tubing.
- Slightly untwist the cap at the end of the IV line to allow for fluid to escape.
- Ensure the fluids have filled the entire tubing set from start to finish and that minimal air bubbles are present.
- Close the rolling stopcock on the IV tubing to stop the flow of fluids.
- Hang the bag of fluid at a location that is higher than the patient’s heart and keep the end of IV tubing capped until needed.
- Place capped end within reach of the provider starting the IV line.
|
IV Bag Set Up |
1 Instructor |
|
Initials |
|
Cardiac Monitor Setup
Electrocardiogram or “ECG,” sometimes referred to as an “EKG” (from the German spelling although ECG is preferred) is a tool used to help determine a patient’s cardiac rhythm. An advanced provider will use the cardiac rhythm to aid in establishing a working diagnosis of the patient’s condition. There are two main cardiac assessments you will be asked to set up for your ALS team, the “4-Lead” and “12-Lead.”
To set up the 4–Lead you will need the following items:
-
- Cardiac monitor
- ECG electrodes (the sticker part) already attached to the wires.
- ECG 4-Lead and 6-Lead wires
- You may also need a disposable razor if the patient’s chest has thick hair or a towel if the patient’s chest is wet or overly sweaty to ensure you can get the stickers to stick to the patient.
Communicate with the patient what you plan to do:
Use terminology that is appropriate to a non-medical person and start by introducing yourself and your certification. Try out this script or make up your own when introducing this procedure to the patient.
“Hello, my name is , I am an EMT. To check your heart activity, I need to place these stickers (or electrodes) on your chest/shoulder/arms. This test is painless and will tell us about the electrical activity of your heart. Do you have any questions before I begin?”
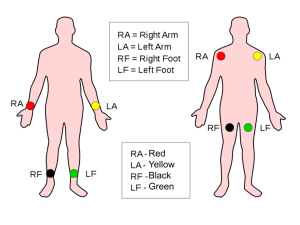
Remember, “right” means the patient’s right!
White – RA (marked on the end of the ECG lead wires) – Right Arm, shoulder, wrist, or upper chest.
Black – LA – Left Arm, shoulder, wrist, or upper chest.
Green – RL – Right Leg, or RLQ of abdomen.
Red – LL – Left Leg, or LLQ of abdomen.
At this point you should start to see a cardiac rhythm appear on the cardiac monitor. Don’t worry about trying to figure out the rhythm (that’s the ALS provider’s job) but do make sure a rhythm is being displayed on the monitor. If it’s not, recheck your ECG leads as one or more of them may have become disconnected from the patient and needs to be reapplied. Once complete and a rhythm is being displayed on the monitor, be sure to “close the loop” by letting the ALS provider know that the requested task is complete, the cardiac rhythm is being displayed, and you are ready for another task.
If requested by your ALS partner for a 12-Lead, continue to place the ECG leads required to obtain a 12–Lead cardiac reading:
Continue your communication with the patient…
“To further check your heart activity, I need to place these stickers (or electrodes) on your chest around the left side of the ribcage. If applicable: I need to lift your breast to place the ECG stickers appropriately. This may pinch slightly as I am placing the stickers. I will do my best to protect your privacy. Once I have placed these stickers the monitor will run a test. This test is painless and will show us more detail about the electrical activity of your heart. I will need you to hold as still as possible once the test starts. I will walk you through this process. Do you have any questions before I begin?”
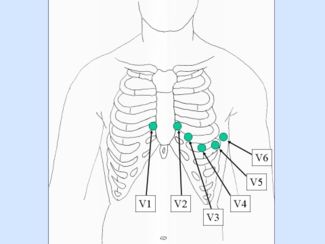
V1 is placed on the right side of the sternum in the 5th intercostal space.
V2 is placed on the left side of the sternum in the 5th intercostal space.
V3 is placed on the left side of the sternum on the 5th rib.
V4 is placed on the left side of the sternum in the 6th intercostal space.
V5 is placed on the left side of the sternum in the 6th rib.
V6 is placed on the left side of sternum in the mid axillary on the intercostal space.
Be mindful! This is a procedure that can cause fear in patients with a history of trauma and is generally uncomfortable for most people. This is an especially vulnerable position for female and LGBTQ patients. Think about it: we arrive on scene and after just a few moments, request access to a person’s bare chest. That’s crazy!
Due to the nature of the test, you may need to move breast tissue and unhook a bra. Use the backside of your hand when moving breast tissue and tell the patient everything you are doing, ideally before you are doing it (“Now I’m going to now lift your left breast up slightly and apply some electrodes just underneath it”) and you will protect their privacy. Based on the situation on your scene, you can protect the patient’s privacy during this procedure in a number of ways, including facing them away from the public if you are in a public setting, making sure your team members are not staring at the patient during the procedure, and if achieving privacy is difficult on scene, conducting the 12-lead procedure in the back of the ambulance. Also consider that in some cases it may be appropriate to match the patient’s gender and the provider’s gender who’s applying the 12-lead when available to increase the patient’s comfort. This may be especially true for younger patients (12-30 years of age).
|
ECG Set Up |
1 (4-lead) Instructor |
2 (12-lead) Instructor |
|
Initials |
|
|
Intubation Set Up
Field intubation is a high-stakes procedure that requires a well-functioning team to implement successfully. The need for intubation represents a series of the most challenging critical thinking tasks performed in the prehospital setting.
If the patient has a pulse, the paramedics will use medications to assist in obtaining a secured airway via intubation. This procedure can commonly be accomplished with either a Rapid Sequence Intubation (RSI) or a Delayed Sequence Intubation (DSI). The medications include an induction medication to put the patient to sleep and a paralytic to eliminate the gag reflex. The ALS providers on scene may also be managing medications to treat the precipitating condition. If the patient does not have a pulse the situation is easier on the paramedic and team, but still represents significant challenges and high cognitive loads so your assistance preparing for the procedure is critical.
It is the role of the EMT to reduce the cognitive load on the paramedic wherever possible. The EMTs may have several different roles depending on experience level, relationship with the paramedic, and the patient’s condition. Common roles for an EMT when assisting with this procedure include:
- BVM ventilation – you may be asked to briefly hyper-oxygenate the patient.
- BURP/cricoid pressure (gentle backward pressure on the cricoid ring) to assist with placement of the intubation tube.
- General equipment set-up.
If you are asked to set up equipment gather the following:
- Monitor – it needs to be on (see cardiac monitor set-up) and positioned in such a way for the PIC to clearly see the screen.
- BVM attached to the oxygen tank with the oxygen flowing at an appropriate rate.
- Passive oxygenation may include the use of a nasal cannula attached to separate oxygen tank and flowing at 10-15 lpm.
- Properly sized adjuncts – OPA, NPA
- Laryngoscope handles and blades Mac and Miller – ensure proper functioning.
- Video laryngoscope if available
- ETT tube holder
- Water soluble lubricant
- ET Tube range of sizes 6.0-9.0 mm
- Empty 10 cc syringe
- Stylet
- Endotracheal Tube Introducer or “Bougie”
- Stethoscope
- Suction Device, ready to suction.
- Supraglottic airway – King Airway or i-Gel (sized, ready, perhaps open)
- In-line end-tidal carbon dioxide attached to the BVM
Steps for Setup
If in the ambulance:
-
- Clear off the counter space next to the airway seat in the ambulance.
- Start by placing the needed equipment on the shelf.
- Keep all equipment as sterile/aseptic as possible by opening packages and leaving the equipment in the package.
- Communicate with your EMS team to see how to further help in the process of intubation set up.
If in the field:
-
- Clear an area near the head of the patient.
- Gather all needed equipment.
- Place equipment near head of patient
- Keep all equipment as sterile/aseptic as possible by opening packages and leaving the equipment in the package.
- Communicate with your EMS team to see how to further help in the process of intubation set up.
|
Intubation Setup |
1 (Instructor) |
|
Initials |
|
The original copy of this book resides at openoregon.pressbooks.pub/emslabmanual. If you are reading this work at an alternate web address, it may contain content that has not been vetted by the original authors and physician reviewers.
