
Medical Assessment
The EMS medical assessment forms to fit the situation and is molded by the information and details that are uncovered in the process. Unlike in trauma, where most threats to life are readily apparent and treatments are algorithmic, the medical assessment relies on the EMT’s ability to be a medical detective; observing scene clues, combining them with tailored questions which reveal the nature of illness and guide treatment options. If the trauma assessment is rock and roll, then medical assessments are jazz.
A firm foundation of physiology is essential for the EMT to be effective in assessing the medical patient. The EMT must then listen to the patient’s chief complaint (“C/C”), form and ask appropriate questions, listen to the answers, and form a differential diagnosis (“DDx”) to establish a working diagnosis.
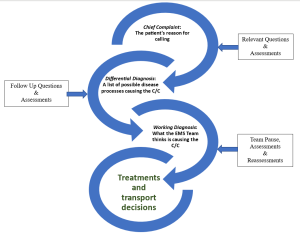
It may be tempting to jump to the working diagnosis from dispatch information or the chief complaint. This error is called premature closure and may lead to missing important information that is contrary to your working diagnosis. To prevent premature closure, the EMT must manage information overload.
There are hundreds of pieces of information to take in and try to fit into a story. The ability to manage information overload takes time. Be patient with yourself as you learn this skill. It’s okay if you feel uncomfortable leading a call. This is normal. For most in EMS it takes around 3 years of full-time work to feel comfortable with the range of possibilities and challenges a 911 call has to offer.
Here are some tips to help you listen actively and manage information overload under stress. Come back to these as you progress in your practice:
- Take notes on a piece of paper. Your brain will not retain much under stress. Take notes on everything you hear including C/C, vitals, and answers to history questions.
- Many EMS providers carry a small notebook or folded piece of paper with them in addition to run sheets and electronic charting tools.
- Always have a pen!
- Avoid taking notes on gloves – they are nasty and need to be thrown away at the end of a call rendering them useless for recall later.
- Shorthand is fine, these notes are for you.
- Notice – Breathe – Control
- Notice that you are under stress. We all have noticeable reactions to stress; it is part of being human. Just like a master poker player, you need to learn your “tells.”
- See your hands shaking? – notice this as a sign of stress.
- Can’t remember what step you are on in your questioning? – notice.
- Voice shaking? – notice.
- Chest tight? – notice.
- Lips tingly? – notice.
- Notice when you feel your “tell” and acknowledge you are under the effects of stress.
- Breathe. That’s it. Take a deep breath and release. You’ve noticed you are under stress. One of the typical responses to stress is breath holding. So now that you’ve noticed, breathe.
- Control something simple. This may be something within yourself such as wiggling your toes, or external such as spinning a ring or snapping a rubber band on your wrist. It might be taking another controlled breath. Whatever action you choose is fine. Controlling something simple will help you distance yourself from the stress of the situation and regain the control of yourself, the call and scene.
- Notice that you are under stress. We all have noticeable reactions to stress; it is part of being human. Just like a master poker player, you need to learn your “tells.”
- Don’t just do something, stand there. If you are leading the call, take a moment to stand there and absorb the information. A 5 or 10 second pause helps. Use the Notice-Breathe-Control techniques while you pause.
Scene Size Up:
As you approach the scene you need to pay attention. Where is the call? Every location has details that may be relevant to your safety and to establishing the working diagnosis. A call for help at a preschool will likely be different than if it were for someone at an airport or in a houseless camp. If you are responding to a residence, notice the neighborhood and pay attention to the upkeep of the patient’s lawn. These tidbits of information help tell the story of your patient’s situation. Store this information for possible use later. For example, the elderly patient complaining of a ground level fall may tell you that everything is “fine” or “normal” but a quick glance at the once well-kept lawn and out of place pile of dishes tell a story of decline over a longer period of time.
Be careful here! Try not to make gross generalizations of an individual’s character based on the environment, rather allow this information to feed into the patient’s chief complaint to compare to what you are finding during their story.
EMT School Tip: it is impossible to simulate the variety of environments necessary for a good scenario. For additional details here, ask your proctor, “What does the scene look like?”
BSI & PPE:
As you exit the response vehicle and approach the scene, make sure you don the appropriate PPE.
EMT School Tip: Your program may request that you verbalize PPE or that you don equipment. Follow the guidance of your instructor for this step.
Call for assistance:
Many calls warrant Advanced Life Support (ALS). Not all systems automatically dispatch a paramedic or the appropriate resources. It is encouraged to actively consider calling for additional assistance at the beginning and periodically throughout the call. Calls may change from being safe to unsafe warranting a request for law enforcement. Patients change from stable, BLS interfacility transfers to cardiac arrests which need additional medical resources. Help is generally available through dispatch and can always be canceled if the situation turns out not to require the extra assistance. If you think you might need additional assistance, request it; they can always be turned around if they aren’t needed.
EMT School Tip: Unlike the field, most calls in EMT school are critical and instructors also assume you are a single resource, and that ALS and other units must be requested. Verbalize calling for ALS early.
General Impression:
As you get within sight of the patient you can establish your first general impression. A general impression is how sick you think the patient is by observing them in their environment.
EMT School Tip: you will need to ask your proctor “what do they look like as I walk up?”
Determining Level of Responsiveness:
This step happens simultaneously with the introduction. In the field, this will be a subconscious process. However, you are in EMT school, and you will need to externalize everything until it becomes second nature. To externalize level of responsiveness, use the *AVPU scale:
A – Alert, patient is alert, responding to you as you approach
V – Verbal, patient only acknowledges you if you directly address them
P – Painful, patient only responds to painful stimuli – **Trapezius Pinch
U – Unresponsive, patient does not respond to any of the above
*If the patient responds to “A” or “V” there is no need to continue the assessment and elicit painful stimuli.
**There are many ways to elicit a painful response. The authors recommend using a standard “trapezius pinch”. To perform this skill, pinch approximately 2 inches of the trapezius muscle at the base of the neck and twist. A response to painful stimuli will produce a facial grimace or a response in arms or hands. Experiment on yourself to determine appropriate pressures.
“P/U” Painful & Unresponsive patients:
Take immediate action to correct the situation. Check a pulse, give oxygen, manage airway, breathing and circulation as you find them. The next steps can happen simultaneously or come in a few minutes.
|
AVPU Practice |
Patient Description |
Level of Responsiveness (AVPU) |
|
Initials |
50 y/o male complaining of chest pain. Looks at you as you enter the house |
|
|
|
22 y/o non-binary patient does not show signs of movement when you give them a trapezius pinch |
|
|
|
88 y/o male pulseless and apneic |
|
|
|
30 y/o transgender male appears to be sleeping but opens his eyes when you shout his name |
|
|
|
5 y/o male screaming in pain from falling down the stairs |
|
The first interaction, introduction:
Assuming the patient is Alert or responsive to Verbal stimuli, the first thing we say to our patient or bystander sets the tone for the whole call. The patient has called us for help generally because they feel out of control and need reassurance from EMS. Start every call off with a reassuring tone of voice, stating your name, that you are here to help and asking their name and preferred pronoun.
The process of establishing a working diagnosis starts with an introduction and active listening.
We start with names and pronouns to personalize and humanize people.
Try this, say out loud to a partner:
“Hi, my name is____, I am here to help. Can you tell me your name and pronouns?”
|
Introductions |
1 |
2 |
|
Initials |
|
|
Easy, right? Great. Let’s move on to the next step, determining chief complaint and age.
Continue with your partner in this template:
“Can you tell me why you called for help today?” – actively listen
“How old are you?” – actively listen
|
Chief Complaint |
1 |
2 |
|
Document your partner’s C/C here: |
|
|
|
Age here: |
|
|
|
Initials |
|
|
Easy-peasy. Now that they’ve told you what is bothering them it is time for you to determine how to proceed.
Note: if at any time there is an immediate threat to life, address it then and there. Use your life-saving skills to breathe for someone who needs it, administer supplemental oxygen or start CPR. etc. Note, this can be done simultaneously with your introduction/history taking if patient condition dictates.
EMT School Tip: This is a great time to do a quick “Team Pause.”
History taking:
The next few questions follow the pneumonic, SAMPLE. This memory tool will help you collect all the essential information and be a touchstone for when you get stuck in asking questions. Remember to write the answers down!
S – Signs and symptoms. You started this when you asked your C/C. Continue digging into their complaint by asking some follow-up questions.
-
-
- Are they experiencing other symptoms today.
- Check for pertinent negatives. Explore some specific questions on these symptoms, shortness of breath, chest pain, weakness, nausea, vomiting, and diarrhea.
-
A – Allergies. Are you allergic to anything? Follow up, if necessary, “Is it possible you ate x today?”
M – Medications. Are you prescribed any medications? Are you taking your medications as prescribed?
P – Past Medical History. Have you experienced this before? If so, what happened then? Do you have any medical problems?
L – Last Oral Intake. When was the last time you had anything to eat or drink? What was it?
E – Events Leading Up to Call for Help. What were you doing when this all started?
Concurrent Tasks:
Your team members are there to help you too! As a team leader, you need to delegate them to specific tasks. These might be assigned at dispatch or decided on scene, in the moment. Tasks that need to happen while you take a medical history may include, vital signs, taking blood glucose, hooking up appropriate oxygen delivery, questioning bystanders, writing down medications, and preparing for transportation.
EMT School Tip: Use closed-loop communication whenever possible. See the Closed Loop Communication section of this manual for more information.
History Taking Continued:
It’s not all about the SAMPLE in history taking. To help us get a bit more detail about the present illness we will use the mnemonic OPQRST. This mnemonic is especially helpful when questioning patients about pain. However, it can be easily adapted to non-pain related complaints as well.
O – Onset. When did this all start? Did it come on gradually or suddenly?
P – Provocation. Have you done anything to make it better? Does anything make this better? Worse?
Q – Quality. Can you describe the feeling for me?
R – Radiation. Does this feeling radiate anywhere?
S – Severity. On a scale of 1-10, one being mild, ten being the worst imaginable, where would you put this discomfort?
T – Time. Does this happen to you every time you do “X” (season, activity, ingestion, etc.). This is different from onset/events.
Transport Decision:
Transport can take place in the call whenever it makes the most sense. There are several key factors to consider when deciding when to transport and what transport code (code 1, normal driving. Code 3, lights and sirens. There is no Code 2. It was eliminated when we stopped driving lights but no sirens.)
For most medical patients, we have a roughly 30 min maximum on scene time. Though when the patient is suffering from a time-sensitive condition such as a myocardial infarction (MI) or stroke (CVA) we attempt to limit scene times to less than 10min. These conditions also warrant a C-3 transport to an appropriate facility (more on destinations later). Patient severity and time from the hospital or advanced life support should also factor into the decision making for when and how fast to transport a patient to the hospital. Ask your instructors about local EMS systems and decision making.
Secondary Assessment:
The secondary assessment in medical calls is different from that of the trauma assessment. In medical assessment the EMT will dig deeper into the chief complaint and perform a focused physical assessment based on the working diagnosis. Here are some examples of secondary assessments that should be performed for different patient types:
- Acute Coronary Syndrome – Palpate the chest to identify if pain is reproducible. Check the ankles for edema. Repeat lung sounds.
- Respiratory Complaints – Repeat lung sounds, identify position of comfort (i.e., sit them up). Re-evaluate oxygenation status and adjust as necessary.
- Altered Mental Status – Repeat GCS scale. Repeat CBG as indicated.
- Gastrointestinal – Palpate abdomen (no need to repeat), ask about bowel movements (last, frequency, straining, color, or blood) listen to lung sounds, identify position of comfort. Check pedal pulses.
- Back – Visual inspection for bruising, rashes and palpate for pain as indicated.
- Genitourinary – Palpate abdomen, ask about urination habits (frequency, color, smell), identify position of comfort.
- Obstetric – Ask about prenatal care, pregnancy history, palpate abdomen, ask about water breaking, contraction frequency & duration, if labor is imminent – visually inspect.
- Gynecologic – “Is there a chance you could be pregnant?”, last menstrual cycle, “normal” bleeding for patient.
- Male Reproductive – Trauma history, visual inspection if necessary.
Reassessment:
For this step, the team lead will re-check any interventions and reassess symptoms. Vital signs should be repeated every 5 min for critical patients and 10-15 min on non-critical patients.
The original copy of this book resides at openoregon.pressbooks.pub/emslabmanual. If you are reading this work at an alternate web address, it may contain content that has not been vetted by the original authors and physician reviewers.
