
Chapter 1: The Metaphor of Using Graphics Applications
1.1 Exercise 1: Working with files and folders
Results of Chapter 1 Exercises 1-4:

Create a new folder
- To create a new folder on your computer, navigate to the place where you want your new folder to reside (for instance, the Desktop), and from the menu, choose File > New Folder. Most computer users typically store folders in the Documents folder or on the Desktop or in a designated folder on their Desktop. As soon as you create a new folder, the operating system temporarily names it untitled folder. As long as you do not click outside of the folder name, the name area remains highlighted in blue, and is ready for you to type a new name. We named ours digital_foundations and pressed the Return key.
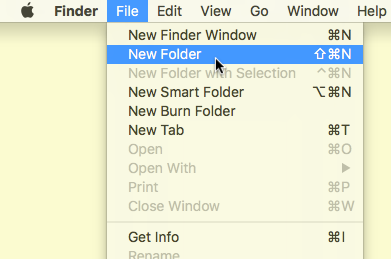
From the menu, choose File > New Folder - If you clicked somewhere on the Desktop after creating the new folder, it may seem like you are stuck with a folder named ‘’untitled folder’’. All folders can be renamed. To rename a folder, click once on the folder to select it, pause, and then either click on the name of the folder or press Return. Once the name is highlighted, you can type on top of the original name to replace it. We renamed our folder digital_foundations.
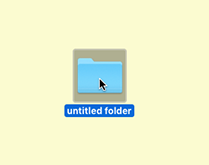
New untitled folder 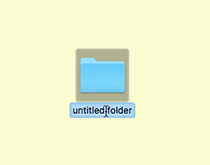
Select the folder, pause and click on it again 
Name/rename the folder by typing the new name into the name space 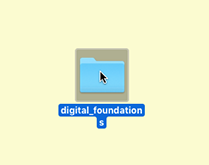
Hit your return (enter) key to have your change accepted - Move the new digital_foundations folder you just created to the Documents folder by clicking and dragging it from the Desktop into the Documents folder. To open the ‘Finder’ window click on any clear area of your desktop. Notice the menu bar at the top of the screen will change to Finder. The Finder is the default file manager and graphical user interface shell used on all Macintosh operating systems. It is what allows you to manage files, applications and drives.
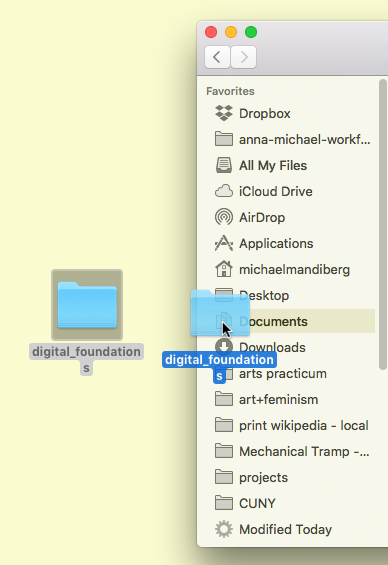
Move your folder to the Documents folder Delete a file
- Next we will review three ways to delete a file or folder. Choose one method and delete the new folder you just created. The metaphorical trash or recycle bin appears in most computer operating systems. To delete a document in Mac OS, drag it onto the Trash icon on the Dock.
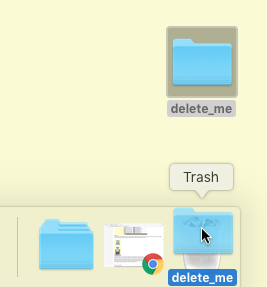
There are three ways to delete a file or folder. One is dragging it to the Trash. Another way to move an item to the trash is by selecting the item and pressing Command+Delete. The Command (, ⌘) keys are located directly to the left and right of the spacebar. They are used in most keyboard shortcuts in Mac OS, much like the Control key is used in Windows.
Contextual menus provide yet another way to delete a file. The contextual menus appear by right-clicking the mouse. If your mouse has only one button, Control+click accesses the contextual menu. Contextual menu options change depending on the context in which you click. If you right-click on a folder, you will see a list of actions that can be performed on that folder. This menu is different from the menu that would appear if you right-clicked on a file instead. To delete an item using the contextual menu, right-click on the file and select Move to Trash from the contextual menu.
It is important to remember that there is almost always more than one way to complete any given task. The best method is usually the one that fits most efficiently within your personal work habits.Files: vector vs. bitmapComputer graphics are created in one of two formats: vector and or bitmap. Computer files containing these graphics may contain vectors, bitmaps, or both, as we will explore in chapters 6 and 11.
Vector graphics are created by using mathematical algorithms: formulas that describe where points, lines, and planes exist and how these elements relate to one another. Vector graphics can be scaled up to any size and retain their smooth edges. Vector graphics look smooth and crisp at their edges, and they can be easily scaled to any size. Logos are nearly always developed as vector graphics, as a logo has to fit easily on a business card, a website, and possibly a billboard or bus wrapping.
Illustrator® is the application most often used to create and modify vector images.Bitmap or raster graphics are built from grids of pixels. Each tiny pixel contains a unit of color information. Bitmaps are used for digital photography and scanned images. Bitmap files are not as easily scalable as vector graphics.
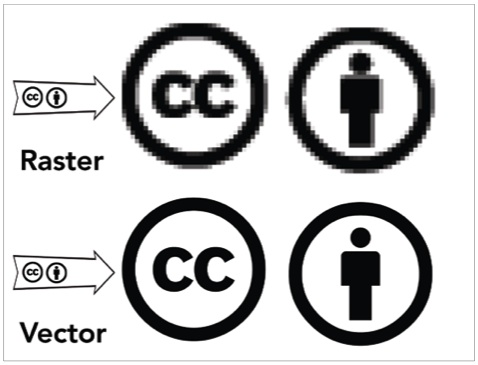
Bitmap or raster graphics are built from grids of pixels. Each tiny pixel contains a unit of color information. Bitmaps are used for digital photography and scanned images. Bitmap files are not as easily scalable as vector graphics. In the top and bottom images we “zoomed in” on the same logo to 700%. This means we are viewing the images at 7 times their actual sizes. If you enlarge a raster image too much, the pixel grid becomes visible to the human eye. The only possible compensation is to blur the edges. Either way, enlarging a pixel-based image results in loss of quality. Vector images don’t have this limitation. On the other hand, extremely complex vector images take an excessive amount of computer processing power. The top image is a raster; it is easy to see the individual pixels that comprise the digital logo as tiny squares of color. In the bottom image, the logo has been created in the vector-based application, Illustrator®. Notice that the edges of the lines, letters and figure are still rendered as smooth lines.
