
Chapter 3: Symmetry
3.2 Exercise 2: Symmetry with passive negative space
In this exercise, the black circle in the center of the composition is the positive space and the white surrounding area is the negative space. The negative space is not active, it is dictated by the active positive form. The circle is evenly distributed within the composition. It is perfectly symmetric in relation to both the x and y axes, from the left to the right and the top to the bottom.
- Open Adobe® Illustrator® and create a new document (File > New). In the New Document dialog box click the Art & Illustration category, then click the View All Presets + button.
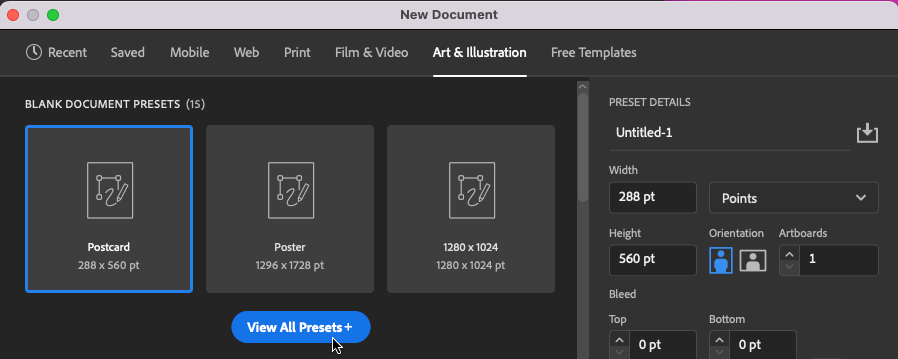
Choose the Art & Illustration category, then click the View All Presets + button. - Follow these steps to set up and create your new document:
- Click the Letter preset. This will set up a letter-sized page in the RGB color space.
- Next, click the box under the “Preset Details” heading and name your document ‘lastname-firstname-symmetry’ (using your own last and first name).
- Then change the unit of measurement to Inches.
- Make sure to set the Orientation to vertical (portrait). This will set the Width to 8.5 in and the Height to 11 in.
- After you’ve set all of those options, click the Create button.
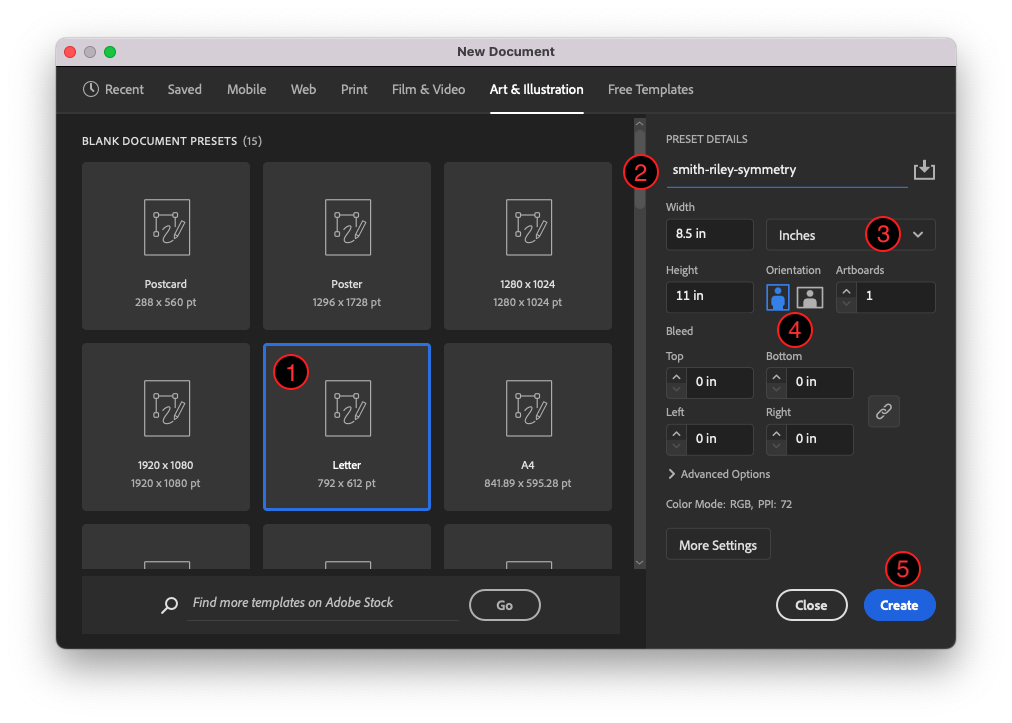
Choose the Letter preset, then set the document name as specified above, set the unit of measure to Inches, and set the orientation to vertical (portrait). - Now, save your document using File > Save from the menu bar. Save as the default file format, Adobe Illustrator (ai). Later you will save a copy of the file as a PDF (Portable Document Format). For more on saving files in Illustrator, see Chapter 1, Exercise 3.
- Click on the Rectangle tool in the Tools panel (or use the shortcut key M to make the Rectangle tool active). Before drawing anything, set the fill and stroke colors. Remember, the fill and stroke icons are stacked on top of each other at the bottom of the Tool Palette (see chapters 1 and 3 for working with the fill and stroke).Double-click the icon that is on top and select the color you want to use from the Color Picker. Once you set the color for the top icon (fill or stroke), click once on the bottom icon (if you took care of fill first, now you will set the color for the stroke) and define this color by using the Color panel (use Window > Color if the panel isn’t displayed).
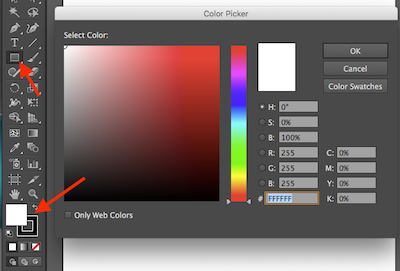
Location of the Rectangle tool and Color Picker - With the white fill and black stroke colors defined, hold down the shift key on your keyboard then click and drag with the Rectangle tool on the Artboard. Holding down the shift key will lock the proportions and draw a square instead of a rectangle. When dragging out your square, release the mouse button before letting go of the shift key. The square we made was about 2.5 x 2.5 inches.
- If you need to, you can adjust the size of your square to match the 2.5 x 2.5 inch dimensions by selecting the square with the Selection tool, then use the Width (W) and Height (H) inputs in the Properties panel (located on the right of Illustrator’s interface). Note: you can also access W and H inputs in the Control bar at the top of Illustrator’s interface by clicking Transform.
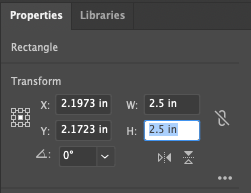
Example of adjusting Width (W) and Height (H) of the square with the Properties panel. 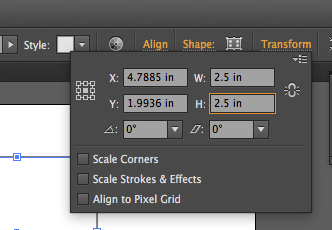
Example of adjusting the square’s Width and Height by using the Control bar > Transform functions - Now we’ll duplicate this square to create a grid of squares. While the Copy and Paste commands accessible through the Edit menu can be used to duplicate objects, we will instead use the Selection Tool to duplicate and position five copies of the square.
Hot Key: While you are working, you can hold down the CMD (command) key to temporarily switch to the Selection Tool. Letting go of CMD will return you to your active tool as selected in the Tool panel.
Choose the Selection Tool, then hold down the option key (OPT) on your keyboard and click on the original square, keeping the mouse button pressed down. Then drag the mouse to the right. In Adobe® Creative Cloud®, Smart Guides are active by default and help to easily align and center objects with other objects or with the Artboard. Hold the shift key to keep the movements restricted to a 0, 45, 90, or 180 degree motion (in other words, you’ll position the new square along the same baseline or x-axis to the right of the original square).
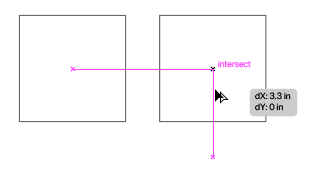
Duplicating and moving a square on a horizontal axis, with Smart Guides providing help with alignment and spacing. Hot Key: The relationship between SHIFT and the Select Tool is two-fold: 1. Shift will constrain the proportions of objects as you drag to resize a shape or image, and 2. Shift keeps the movement of objects aligned vertically or horizontally on the Artboard. - Now that you have two squares that are exactly the same, side by side, select both squares at one time by marqueeing over them (using your Selection Tool click and dragging over both of them beginning on an empty area of the artboard outside of the objects you want to select) or by selecting the first square and then holding shift while clicking with the mouse to add the second square to the selection. Group the two squares using (Menu bar) Object > Group.
- Grouped objects can be moved, transformed, and have their colors edited as one unit while their individual properties are maintained. In this case, the squares will be copied and positioned together.
- Using the same method that you used to copy the first square, copy the two grouped squares two more times, moving down the page. The goal is to create 6 squares total, in 3 pairs arranged vertically and aligned in the center of the artboard. Use the Select Tool to position the squares into place as needed. Be attentive to the space between the margins of the page and the space between the outlines of the squares (the Smart Guides can be very helpful with this, as shown below). Your result should look something like this:
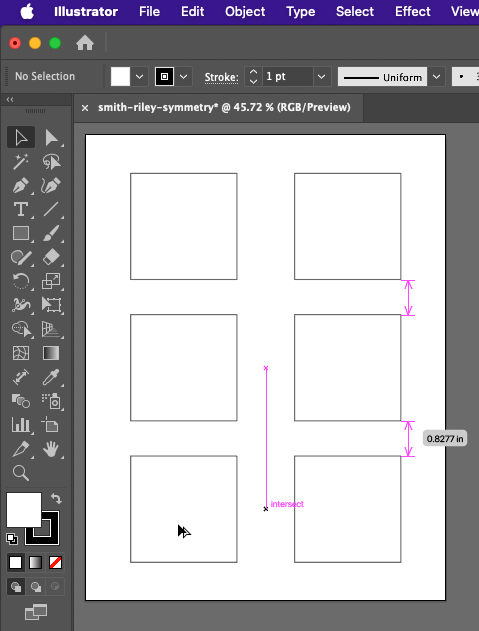
After you’ve copied and arranged your squares, they should resemble this example. This image shows the process of copying the last pair of squares, with Smart Guides providing alignment hints. - Now that you have your squares set up, use the Layers panel (Window > Layers) to lock the squares on Layer 1. In the Layers panel, you’ll see an empty square to the right of the eyeball icon in Layer 1. Click on that empty square as shown below. A lock icon will appear in the square, indicating that the layer is locked. Locked layers cannot be modified until they are unlocked. This is a protective measure that a designer often takes when part of a project is complete and they doesn’t want to accidentally select or move objects that are already established.
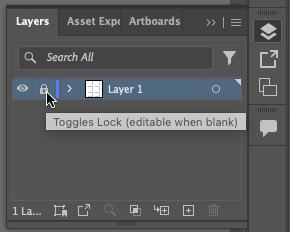
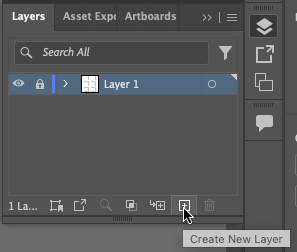
Location of the Lock toggle icon on the Layers panel. - Once the layer is locked, create a new layer to work on by clicking the “Create New Layer” icon at the bottom of the Layer Palette. Layer 2 will appear above Layer 1. This is the layer that will contain the rest of the vector art objects in this chapter. Be sure that it is active (it will be highlighted) before proceeding.
Creating a new layer from the Layers panel. - Create a black circle in the middle of the top left square with the Ellipse Tool. The Ellipse Tool might be buried beneath the Rectangle Tool in the Tool Palette, access it by holding a mouse click for a couple of seconds on the Rectangle Tool. All of the Shape Tools will then be visible in a sub-menu. Move the mouse over the Ellipse Tool to select it (or you can press the L key on your keyboard to select the Ellipse tool). With this tool, click and drag within the top left square. Hold the shift key once you begin dragging the mouse so that the ellipse becomes a perfect circle. Remember to change the Fill color to black.
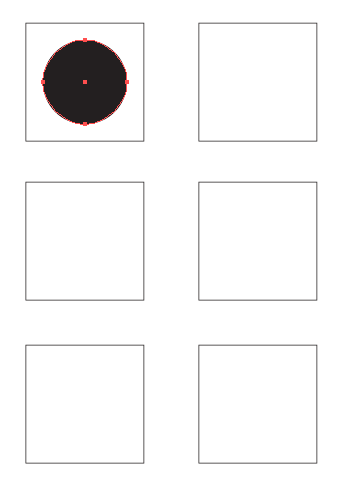
Positioning of your black circle is in the top right square. Be sure to save your work frequently! An easy way to do this is to press CMD+S on the keyboard (Ctrl+S for the Windows OS).
