
Chapter 6: Line Art and Flat Graphics
6.2 Exercise 2: Recreating straight lines with the Pen Tool
- Select the Pen tool from the Tools panel. The Pen tool plots an anchor point each time you click the mouse and can be used to create elaborate vector shapes with precision. Click and hold your mouse on the Pen tool’s icon to see additional tools for use with vector paths.
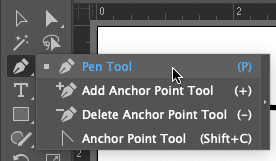
The Pen tool’s location in the toolbar. Additional related tools can be accessed by holding down on the Pen tool’s icon. Click once on the Stroke icon at the bottom of the Tools panel and set the stroke color to red, so that you will see your work when it sits on top of the black template layer. Set the fill color to none.
- To make a straight line in red, click once near the left end of the black painted line and release the mouse button. Move the mouse pointer to a spot near the other end of the black line, you’ll notice that a line is attached to the cursor. This line represents the path that will be created when you set the next anchor point. Click and release the mouse button again to set the second anchor point. In two clicks, the Pen Tool creates two anchor points and joins the points with a straight line. If you are having trouble seeing the red line increase the stroke size to 6pts.
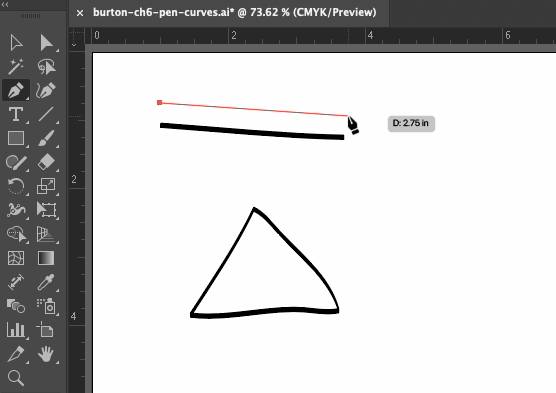
Creating a line with the Pen Tool - Once the line is made, it can be modified with the Selection tool for moving, rotating, or transforming or by the Direct Selection tool, to modify one anchor point at a time. Deselect the line, then use the Direct Selection tool to click once on the anchor point at the end of the line and drag it to increase the length of the line.
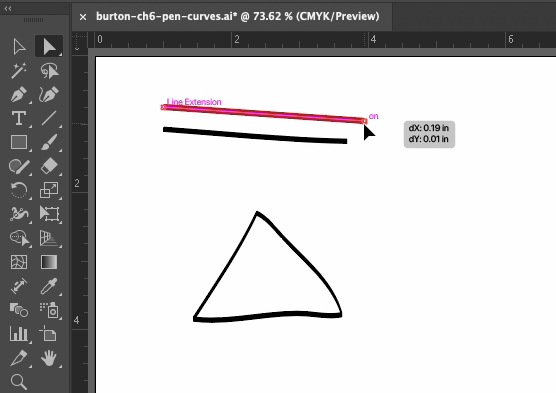
Modifying a line with the Direct Selection tool. Watch for this: The anchor points grow larger as the mouse hovers near them, making it easier to find the anchor points when nothing is selected. - Use the Selection Tool to select the line and change the weight of the stroke from the Control panel. Notice how the line can be bold and aggressive with a larger stroke size or faint and slim with a stroke size that is less than 1 point.
- Deselect the line.
Part A: Recreate the triangle with the Pen Tool
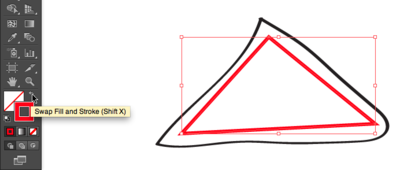
- Click once at one corner of the triangle with the Pen Tool. Release the mouse. Click on the next corner of the triangle. Release the mouse. Click on the third corner of the triangle. Release the mouse. The fourth click needs to be exactly where the first anchor point was made.Image Caption: Notice in this image that the Pen Tool displays a small o, symbolizing that the path is closed and a whole object is made when the last click with the Pen Tool is made directly on the first anchor point. This is referred to as “closing the path.” When a path is closed, or a shape is whole, it is easy to fill the shape with a color using the Selection Tool and the color tool panels.
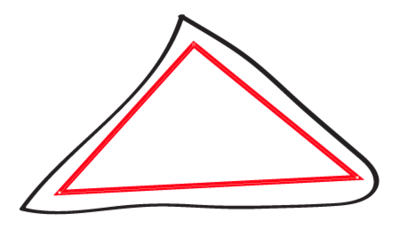
Notice in this image that the Pen Tool displays a small o, symbolizing that the path is closed and a whole object is made when the last click with the Pen Tool is made directly on the first anchor point. This is referred to as “closing the path.” When a path is closed, or a shape is whole, it is easy to fill the shape with a color using the Selection Tool and the color tool panels. - Select the triangle with the Selection Tool if it isn’t already selected. Click the curved arrow above the fill and stroke tools in the tool panel. The stroke and fill colors switch places, (in this example, the triangle becomes red with no stroke, as opposed to a triangle with no fill, outlined in red).
Key Command: The letter x on the keypad will switch the fill/stroke color in Illustrator® (in PhotoShop the same hot-key switches the foreground and background colors).
Location of :Swap Fill and Stroke on the main Tool panel 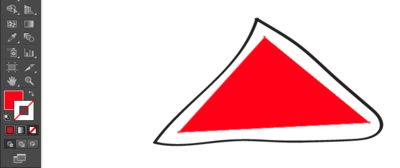
Filling the triangle with color
Part B: Modify anchor points using the Direct Selection Tool
Just for practice, use the Direct Selection Tool to modify two anchor points at a time. Click on one anchor point of the triangle. Hold the shift key and click a second anchor point (so one whole side is selected), then begin dragging the mouse to move both anchor points at one time. Alternatively, you can marquee over one side of the triangle, and two anchor points will be selected. You can click and drag with the mouse to move these anchor points, or you can use the up, down, left, and right arrows on the keypad. SHIFT + ARROW modifies the placement by ten pixels.
Part C: Create a second shape to add dimensionality
- Begin by creating a second shape (a parallelogram) using the Pen Tool. Plot the first anchor point near the top of the first triangle.
- Use the edge of the first triangle to help visualize the dimensionality of the second shape. Plot the second anchor point to create a parallel line between the two shapes.
- Set the third anchor point so the area recedes in space, creating a unified perspective between the two shapes.
- Close the path by using your fourth mouse click to return to the first anchor point. If the shape isn’t perfect, you can always go back with the Direct Selection Tool to modify individual anchor points.
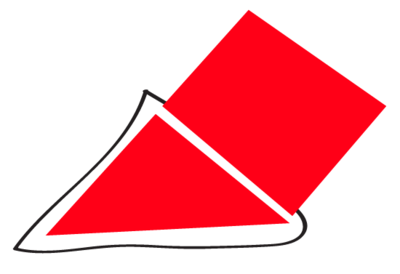
Closing straight lines to create a parallelogram
Part D: Atmospheric Perspective
Stand outside early in the morning or at twilight and look far down the street towards the horizon. Objects that are further away appear less saturated than those that are near. Atmospheric perspective accounts for the perceptual change that happens to the overall opacity of objects as they recede in space.
- Select the parallelogram and fill it with the same color you used in the triangle.
- Open the Transparency panel (Window > Transparency). While the parallelogram is still selected, change the transparency to 80%.Flat, basic shapes created with the Pen Tool can be combined to imply complicated shapes and three-dimensional space.
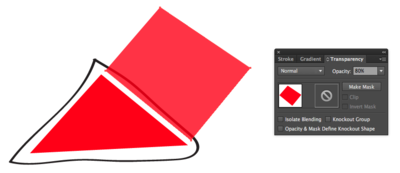
Change the transparency of your shape using the Transparency panel (Window > Transparency)
