
49 Body Levers
Leverage
Moving patients is a routine part of Jolene’s work as a MED floor RN, but in reality there is nothing routine about the biomechanics of lifting and transferring patients. In fact, “disabling back injury and back pain affect 38% of nursing staff” and healthcare makes up the majority of positions in the top ten ranking for risk of back injury, primarily due to moving patients. Spinal load measurements indicated that all of the routine and familiar patient handling tasks tested placed the nurse in a high risk category, even when working with a patient that “[had a mass of] only 49.5 kg and was alert, oriented, and cooperative—not an average patient.”[1] People are inherently awkward shapes to move, especially when the patient’s bed and other medical equipment cause the nurse to adopt awkward biomechanic positions. The forces required to move people are large to begin with, and the biomechanics of the body can amplify those forces by the effects of leverage, or lack thereof. To analyze forces in the body, including the effects of leverage, we must study the properties of levers.
Lever Classes
The ability of the body to both apply and withstand forces is known as strength. One component of strength is the ability apply enough force to move, lift or hold an object with weight, also known as a load. A lever is a rigid object used to make it easier to move a large load a short distance or a small load a large distance. There are three classes of levers, and all three classes are present in the body[2][3]. For example, the forearm is a 3rd class lever because the biceps pulls on the forearm between the joint (fulcrum) and the ball (load).
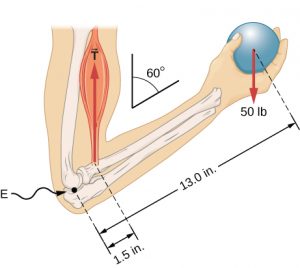
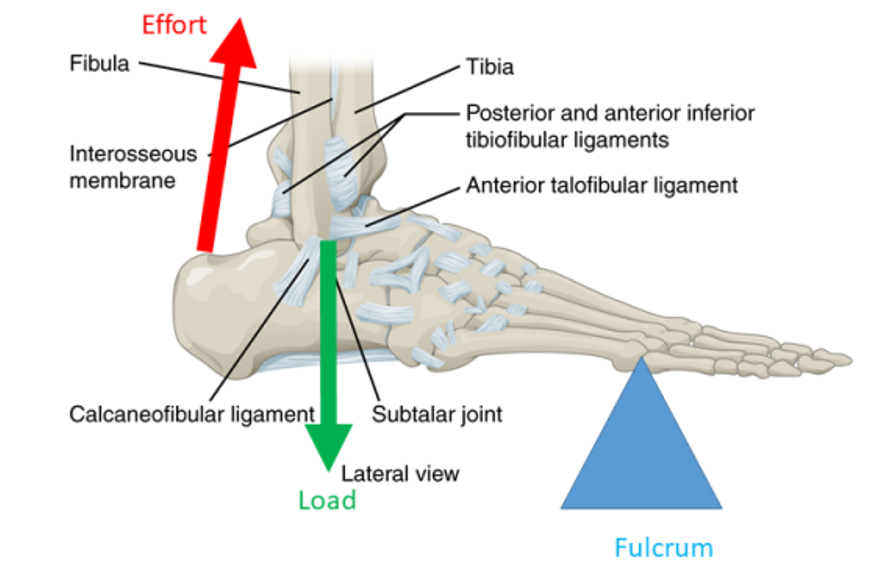
Using the standard terminology of levers, the forearm is the lever, the biceps tension is the effort, the elbow joint is the fulcrum, and the ball weight is the resistance. When the resistance is caused by the weight of an object we call it the load. The lever classes are identified by the relative location of the resistance, fulcrum and effort. First class levers have the fulcrum in the middle, between the load and resistance. Second class levers have resistance in the middle. Third class levers have the effort in the middle.

Reinforcement Activity
Static Equilibrium in Levers
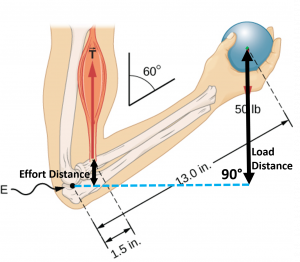
For all levers the effort and resistance (load) are actually just forces that are creating torques because they are trying to rotate the lever. In order to move or hold a load the torque created by the effort must be large enough to balance the torque caused by the load. Remembering that torque depends on the distance that the force is applied from the pivot, the effort needed to balance the resistance must depend on the distances of the effort and resistance from the pivot. These distances are known as the effort arm and resistance arm (load arm). Increasing the effort arm reduces the size of the effort needed to balance the load torque. In fact, the ratio of the effort to the load is equal to the ratio of the effort arm to the load arm:
(1) 
Every Day Examples: Biceps Tension
Let’s calculate the biceps tension need in our initial body lever example of a holding a 50 lb ball in the hand. We are now ready to determine the bicep tension in our forearm problem. The effort arm was 1.5 in and the load arm was 13.0 in, so the load arm is 8.667 times longer than the effort arm.

That means that the effort needs to be 8.667 times larger than the load, so for the 50 lb load the bicep tension would need to be 433 lbs! That may seem large, but we will find out that such forces are common in the tissues of the body!
*Adjusting Significant Figures
Finally, we should make sure our answer has the correct significant figures. The weight of the ball in the example is not written in scientific notation, so it’s not really clear if the zeros are placeholders or if they are significant. Let’s assume the values were not measured, but were chosen hypothetically, in which case they are exact numbers like in a definition and don’t affect the significant figures. The forearm length measurement includes zeros behind the decimal that would be unnecessary for a definition, so they suggest a level of precision in a measurement. We used those values in multiplication and division so we should round the answer to only two significant figures, because 1.5 in only has two (13.0 in has three). In that case we round our bicep tension to 430 lbs, which we can also write in scientific notation:  .
.
*Neglecting the Forearm Weight
Note: We ignored the weight of the forearm in our analysis. If we wanted to include the effect of the weight of the forearm in our example problem we could look up a typical forearm weight and also look up where the center of gravity of the forearm is located and include that load and resistance arm. Instead let’s take this opportunity to practice making justified assumptions. We know that forearms typically weigh only a few pounds, but the ball weight is 50 lbs, so the forearm weight is about an order of magnitude (10x) smaller than the ball weight[7]. Also, the center of gravity of the forearm is located closer to the pivot than the weight, so it would cause significantly less torque. Therefore, it was reasonable to assume the forearm weight was negligible for our purposes.
Mechanical Advantage
The ratio of load to effort is known as the mechanical advantage (MA). For example if you used a second class lever (like a wheelbarrow) to move 200 lbs of dirt by lifting with only 50 lbs of effort, the mechanical advantage would be four. The mechanical advantage is equal to the ratio of the effort arm to resistance arm.
(2) 
Reinforcement Activity
Range of Motion
We normally think of levers as helping us to use less effort to hold or move large loads, so our results for the forearm example might seem odd because we had to use a larger effort than the load. The bicep attaches close to the elbow so the effort arm is much shorter than the load arm and the mechanical advantage is less than one. That means the force provided by the bicep has to be much larger than the weight of the ball. That seems like a mechanical disadvantage, so how is that helpful? If we look at how far the weight moved compared to how far the bicep contracted when lifting the weight from a horizontal position we see that the purpose of the forearm lever is to increase range of motion rather than decrease effort required.
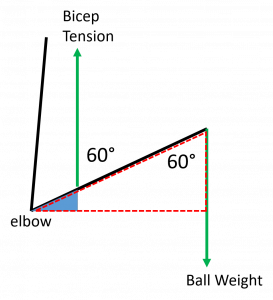
Looking at the similar triangles in a stick diagram of the forearm we can see that the ratio of the distances moved by the effort and load must be the same as the ratio of effort arm to resistance arm. That means increasing the effort arm in order to decrease the size of the effort required will also decrease the range of motion of the load by the same factor. It’s interesting to note that while moving the attachment point of the bicep 20% closer to the hand would make you 20% stronger, you would then be able to move your hand over a 20% smaller range.
Reinforcement Exercises
For third class levers the load is always farther from the fulcrum than the effort, so they will always increase range of motion, but that means they will always increase the amount of effort required by the same factor. Even when the effort is larger than the load as for third class levers, we can still calculate a mechanical advantage, but it will come out to be less than one.
Second class levers always have the load closer to the fulcrum than the effort, so they will always allow a smaller effort to move a larger load, giving a mechanical advantage greater than one.
First class levers can either provide mechanical advantage or increase range of motion, depending on if the effort arm or load arm is longer, so they can have mechanical advantages of greater, or less, than one.
A lever cannot provide mechanical advantage and increase range of motion at the same time, so each type of lever has advantages and disadvantages:
| Lever Class | Advantage | Disadvantage |
| 3rd | Range of Motion
The load moves farther than the effort. (Short bicep contraction moves the hand far) |
Effort Required
Requires larger effort to hold smaller load. (Bicep tension greater than weight in hand) |
| 2nd | Effort Required
Smaller effort will move larger load. (One calf muscle can lift entire body weight) |
Range of Motion
The load moves a shorter distance than the effort. (Calf muscle contracts farther than the distance that the heel comes off the floor) |
| 1st
(effort closer to pivot) |
Range of Motion
The load moves farther than the effort. (Head moves farther up/down than neck muscles contract) |
Effort Required
Requires larger effort to hold smaller load. |
| 1st
(load closer to pivot) |
Effort Required
Smaller effort will move larger load. |
Range of Motion
The load moves shorter distance than the effort. |
Reinforcement Activity
Check out the following lever simulation explore how force and distance from fulcrum each affect the equilibrium of the lever. This simulation includes the effects of friction, so you can see how kinetic friction in the joint (pivot) works to stop motion and static friction contributes to maintaining static equilibrium by resisting a start of motion.
- "Nurses and Preventable Back Injuries" by Deborah X Brown, RN, BSN, American Journal of Critical Care ↵
- "Lever of a Human Body" by Alexandra, The Physics Corner ↵
- "Kinetic Anatomy With Web Resource-3rd Edition " by Robert Behnke , Human Kinetics ↵
- OpenStax University Physics, University Physics Volume 1. OpenStax CNX. Jul 11, 2018 http://cnx.org/contents/d50f6e32-0fda-46ef-a362-9bd36ca7c97d@10.18. ↵
- "Lever" by Pearson Scott Foresman , Wikimedia Commons is in the Public Domain ↵
- OpenStax, Anatomy & Physiology. OpenStax CNX. Jun 25, 2018 http://cnx.org/contents/14fb4ad7-39a1-4eee-ab6e-3ef2482e3e22@10.1. ↵
- "Weight, Volume, and Center of Mass of Segments of the Human Body" by Charles E. Clauster, et al, National Technical Information Service, U.S. Department of Commerce ↵
a rigid structure rotating on a pivot and acting on a load, used multiply the effect of an applied effort (force) or enhance the range of motion
There are three types or classes of levers, according to where the load and effort are located with respect to the fulcrum
a lever with the effort between the load and the fulcrum.
the force that is provided by an object in response to being pulled tight by forces acting from opposite ends, typically in reference to a rope, cable or wire
referring to a lever system, the force applied in order to hold or lift the load
the point on which a lever rests or is supported and on which it pivots
the force of gravity on on object, typically in reference to the force of gravity caused by Earth or another celestial body
the force working against the rotation of a lever that would be caused by the effort
a weight or other force being moved or held by a structure such as a lever
levers with the fulcrum placed between the effort and load
levers with the resistance (load) in-between the effort and the fulcrum
any interaction that causes objects with mass to change speed and/or direction of motion, except when balanced by other forces. We experience forces as pushes and pulls.
the result of a force applied to an object in such a way that the object would change its rotational speed, except when the torque is balanced by other torques
the central point, pin, or shaft on which a mechanism turns or oscillates
in a lever, the distance from the line of action of the effort to the fulcrum or pivot
shortest distance from the line of action of the resistance to the fulcrum
each of the digits of a number that are used to express it to the required degree of accuracy, starting from the first nonzero digit
a way of writing very large or very small numbers. A number is written in scientific notation when a number between 1 and 10 is multiplied by a power of 10.
refers to the closeness of two or more measurements to each other
a point at which the force of gravity on body or system (weight) may be considered to act. In uniform gravity it is the same as the center of mass.
ignoring some compilation of the in order to simplify the analysis or proceed even though information is lacking
designating which power of 10 (e.g. 1,10,100,100)
small enough as to not push the results of an analysis outside the desired level of accuracy
ratio of the output and input forces of a machine
distance or angle traversed by a body part
a force that resists the sliding motion between two surfaces
a force that resists the tenancy of surfaces to slide across one another due to a force(s) being applied to one or both of the surfaces
the state being in equilibrium (no unbalanced forces or torques) and also having no motion
