
115 Scale Biophysical Dead-lift Model
Project Goals
- Use hands-on experience to reinforce physics concepts covered so far
- Jump cognition levels to create
- Practice critical thinking and the scientific process
- Have fun
- Assess Learner Outcomes: 2-2,2-3,2-4, 5-2
Project Description
Background
Lifting with your legs
The old saying “lift with your legs and not with your back” may be a bit vague, but the advice is sound from a biomechanics standpoint. Watch this video of Power-lifting world champion and world record holder Natalie Hanson perform a dead-lift at the 2017 IPF Open World Championships. Notice that Natalie seriously engages her leg muscles during the dead-lift.
Lifting with your back
This project will model the upper half of the body as a lever to estimate the forces applied to lumbar vertebrae when a person attempts to “lift with their back,” meaning they bend at the waist instead of squat with their legs. That looks more like this:
This method moves the center of gravity of the upper body (and the weight to be lifted) farther out from rotation point, which causes more torque. Greater muscular force to is required to counter that torque, which in turn amplifies the forces on the spine. When done correctly and with appropriate weight, this type of lift can be useful in strengthening the hamstrings, glutes, and back, but generally speaking this lifting technique should be avoided in favor of lifting with the legs for both work and play.
Scale Model Project Details
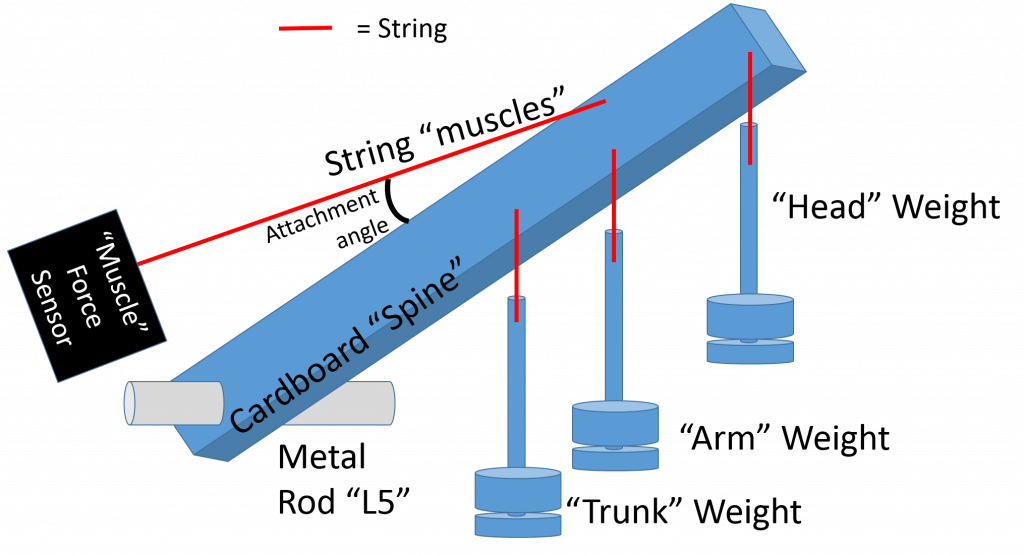
- You will create a scale model of lifting with your back. The spine will be made from cardboard that will be provided.
- The primary rotation point when lifting with your back is the fifth lumbar vertebrae (L5). You will be provided a medal rod to serve as this rotation point.
- You will use provided string to serve as the erector spinae muscles that lift the back and use a force sensor to measure the tension in the string.
- You will use provided protractor to maintain the attachment angle of the erector spinae muscles during each force measurement.
- Your model will incorporate the scaled weight of the head, torso, and arms, located at the correct scaled distances from L5.
- For an average body the distances from L5 to the center of gravity for each body part are:
- 0.36 m to the trunk
- 0.48 m to the arms (this is also the attachment distance point for the erector spinae muscles).
- 0.72 m to the head
- You will need to set the scale of your model to match the length of your cardboard. It should be something similar to 3:1.
- The weights of each body section, as a fraction of body weight are:
- Head is 0.7 of total body weight
- Two Arms are 0.12 of total body weight
- Trunk is 0.46 of total body weight
- You will need calculate the weights based on your choice of human body to model and then scale them accordingly. I suggest something like 20:1 for the weights to ensure you don’t overwhelm the force sensor (make sure the sensor set to + 50 N).
- For an average body the distances from L5 to the center of gravity for each body part are:
- Re-scale your force measurements to predict the actual tension in actual human erector spinae muscles.
- We will work together as a class to calculate the compressive and shear forces on the spine at each angle. You are not responsible for this in your report.
Computer Model Project Details
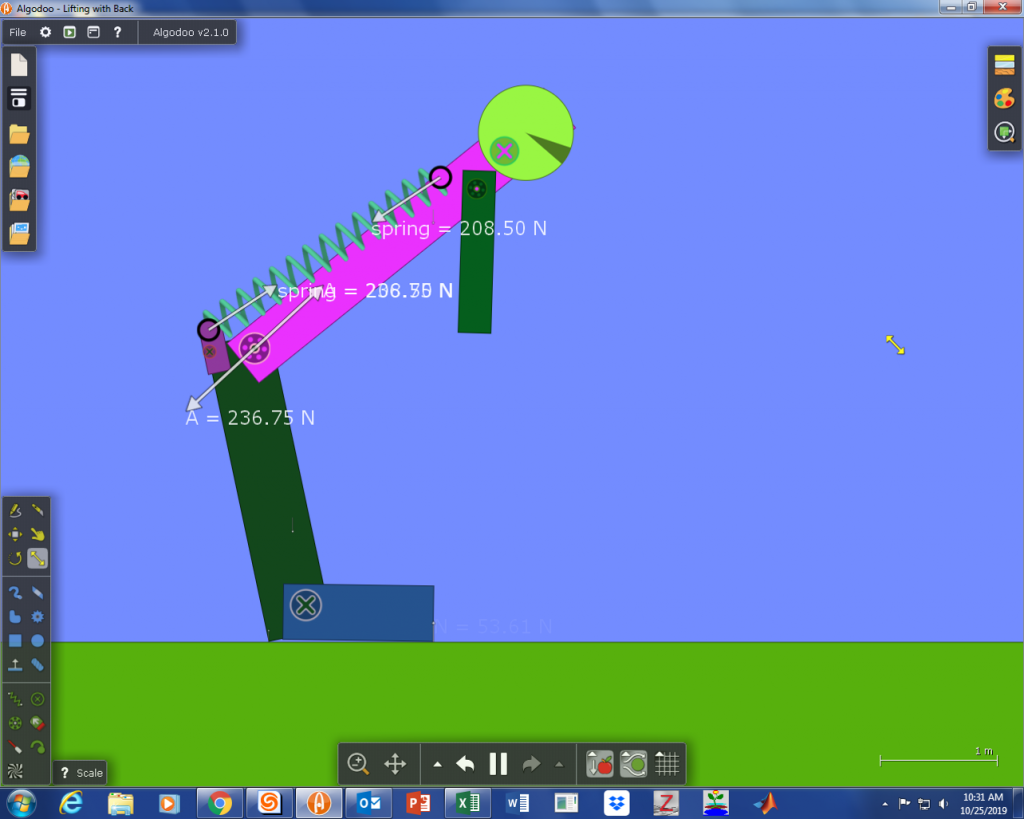
Alternative to the scale model, you may use the free program Algodoo to create a computer model of the human body. The program allows you to attach objects together, control the object properties like size, mass and density, and then the program applies mathematical models based physics concepts in order to predict the forces experienced by the objects and how they will move in response. To build your model you will follow all of the same steps as for the scale model, except that your model will be built in the program, the size and weights of the objects will be the same as for your human body (not scaled) and the force values will be provided by the program (instead of a force sensor). The image below shows an example of such a model, but the example is not to scale.
Project Assessment and Grading
Whether you created a scale model or a computer model, your project will assess the concepts listed below and your project grade will be determined according to the criteria and points listed under each concept. Use this as a checklist to make sure you have completed all parts of the project.
- Unit Conversion: The model is correctly scaled to the human body you chose to model.
- Diagram lengths are correct (to scale) = 1pt
- Model lengths are correct (to scale) =1pt
- The body section weights are correct based on the body-weight fractions provided in the Project Details Section (scaled to the human body you have chosen to model) = 1pt
- The body part weights are placed at the correct locations on your model spine based on the distances provided (to scale) = 1pt
- Levers: The model allows you to measure the forces needed to answer your question.
- Your model spine articulates a full 90° = 1pt
- The 12° attachment angle of the erector spinae muscles remains constant throughout your measurements =1pt
- The “muscular force” measured with your force probe is measured at 5° intervals from 0° to 90° = 2pt
- Strength of Materials: The model materials do not fracture, rupture, tip over, or otherwise fail under the scale load.(The axle of the scale model may be clamped down).
- No failure, tip, fracture or rupture = 1pt
- Scientific Method: Process is well documented in a typed project report with the sections listed in bold below
- Question
- Statement of the question we are trying to answer with our model = 1pt
- Assumptions
- List of assumptions needed to make your model applicable = 2pt
- Build
- Neat documentation of problems encountered during build = 2pt
- Neat documentation of solutions to build issues and changes to design = 2pt
- Initial Testing
- Neat documentation of problems encountered during initial testing of design =2pt
- Redesign
- Neat documentation of solutions to testing problems and resulting changes to design = 2pt
- Neat final updated scale diagram = 1pt
- Analysis
- Neat documentation of results of final testing, including force values and angle values = 2pt
- Spreadsheet with angle and force data entered and labeled with units= 2pt
- A column that correctly calculates the full-scale human tension from your measurement values.
- Appropriately labeled graph of Muscle Force vs. Angle = 2pt
- The maximum force and angle at which it occurs is identified. = 2pt
- Estimates of the uncertainty in measurements of angles and forces= 2pt
- Conclusions
- Explanation of whether the forces predicted by the model are of the right order of magnitude, with supporting evidence = 1pt
- Explanation of specific steps that could be taken to improve the mode = 1pt
- Question
Additional Information to Consider
- You may use any resource you like for guidance, however only students in you group may work on your model or add to the documentation AND you must cite your sources in your project report. You can use these citation guides if you like:
- You do not have to generate your diagrams on the computer unless you want to. You can draw them by hand and attach them to your report as long as they are still neat, well labeled, properly scaled, and the dimensions are indicated.
- Your project will receive a group score, however students not actively participating and contributing will not receive credit for the project.
- You will be able to go through as many rounds of design/build/test as you would like within the time allotted for this project.
- All projects must have their final evaluation on or before the last day of the period allotted for the project.
- Don’t hesitate to ask your instructor for help or ask clarification question regarding the project expectations. Asking early is better than asking late.
