
73 Locomotion Injuries
Preventing Injuries
Injuries can be caused by large forces in the absence of acceleration, such as crushing injuries, and those types of injuries can be analyzed using concepts of static equilibrium. However, more often injuries are caused by large forces associated with large accelerations experienced during locomotion. Therefore, we can reduce the likelihood of injuries by:
- Increasing the ultimate strength of body tissues so that they can handle larger stress and thus larger force.
- Increasing the cross-sectional area of body parts so that the stress remains below the tissue’s ultimate strength, even for larger forces.
- Decrease the size of forces and resulting stress experienced by the body.
The first two options are controlled by genetics and regular exposure to large, but not injury inducing, forces–also known as exercise.[1] The next few chapters will focus on the third option, which is achieved by thoughtful movement.
Everyday Examples: Landing after a Jump
You naturally tend to bend your knees when landing after a jump, rather than keep your knees locked and your legs rigid. The reason is that rigid legs bring you to an abrupt stop, but bending your knees allows you to spread the landing out over a longer time, which we have just learned, reduces the average force.
The force vs. time graphs show the normal force applied to a person when landing on one foot after stepping off from a 0.1 m height as seen in the previous GIF. The graph on the left was the more rigid leg landing (it didn’t feel good) and the graph on the right was a bent-knee landing.
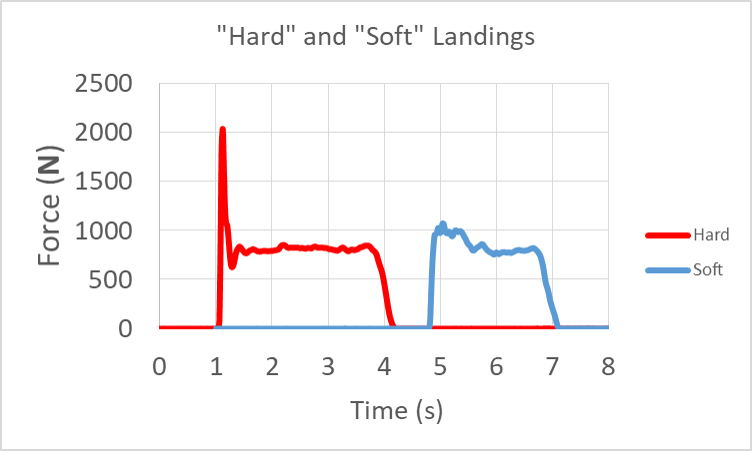
Notice that the stiff-legged “hard” landing nearly doubled the peak force applied to the body.
When thinking about how to reduce acceleration and the associated forces we should reexamine the definition of average acceleration:
(1) 
From the above definitions we see that there are really two options for reducing accelerations. We can reduce the amount that velocity changes, or we can increase the time over which the velocity changes (or both). Of course we could simply stay away from any situation that could lead to large changes in velocity, but then we would have to avoid riding in cars, running, heights, or any situation in which we might trip and fall down. Avoiding large velocity changes all together would not be practical or fun, so we need to make sure those changes happen in a controlled way (slowly). Driving without looking at your phone is a good start.
Softening Impacts
Assuming we do experience large changes in velocities, we need to focus on increasing the time over which the velocity changes in order to reduce the average acceleration and average net force. Said another way, use small net force experienced over a long time to produce the same velocity change as a large net force experienced over a short time.
Reinforcement Activity
The people in this video are well aware of techniques for reducing forces by extending impact time.
We see from the graph in the previous everyday example that the force varies during an impact and it’s often the peak force that we are really worried about with regard to injury prevention. This complicates the quantitative analysis of our force-reducing strategies, however we recognize that lowering the peak force in turn lowers the average force so we will analyze force-reducing strategies in terms of the average force. We start with our definition for average acceleration:

Then we can use Newton's Second Law to relate the average acceleration and average force:

Finally we can rearrange the result as needed to solve our problem. For example, if we want to know the time over which to extend an impact to keep the average force below a certain value, we could rearrange to get:

Of course we can always expand  if it helps us solve a problem:

Everyday Example: Key Drop
An everyday example in the previous unit helped us to determine that when a friend drops a set of keys to us from 35 ft up in their third story apartment, the keys will arrive at 47 ft/s, or 14 m/s,, or 32 mph. We also mentioned that the keys smacking our hands at that speed would hurt, but that we would soon learn about strategies to prevent injury. We have arrived at that point. Now we know what to do: extend the time over which we bring the keys to rest and we will reduce the average (and peak) force applied to the keys. By Newton's Third Law, we know that the force on the keys is equal and opposite to the force on our hands, so analyzing the force on the keys tells us about the force on our hand. Let’s get quantitative and approximate the impact time necessary to prevent damage to our hand. We will use the last equation from the text above, which we solved for  :
:

To use the above equation we first we need to estimate the force required for the key to break skin. If we placed a key on-edge on top of our hand and someone stood on it, that would likely cause injury. If we instead placed a 5 lb textbook on the key it probably would not break the skin, so let’s aim to keep the average force on the keys (and thus our hand) below 5 lbs, or 22 N. However, we know the peak force could be several times bigger than the average force (see the graph in the previous example), so let’s include a safety factor of 10 and keep the force below 2.2 N. Now that we have a force value to work with, we just need a mass for the keys, which would be about 0.050 kg as you can see in this video of someone putting a car key on a scale. Now we can enter these values into our equation, being careful about our choice of directions. Let’s say downward is the negative direction so our initial velocity is -14 m/s and the upward force on the keys from our hand is positive. Of course the final velocity of the key is zero after we catch them.

We need to move our hands along with the keys as we catch them to ensure that our “soft catch” lasts for 0.32 s (about 1/3 of a second).
- Carlson, K. J., & Marchi, D. (2014). Reconstructing Mobility. New York: Springer. doi:10.1007/978-1-4899-7460-0 ↵
the state being in equilibrium (no unbalanced forces or torques) and also having no motion
any interaction that causes objects with mass to change speed and/or direction of motion, except when balanced by other forces. We experience forces as pushes and pulls.
the change in velocity per unit time, the slope of a velocity vs. time graph
movement or the ability to move from one place to another
the maximum stress a material can withstand
a physical quantity that expresses the internal forces that neighboring particles of material exert on each other
The cross-sectional area is the area of a two-dimensional shape that is obtained when a three-dimensional object - such as a cylinder - is sliced perpendicular to some specified axis at a point. For example, the cross-section of a cylinder - when sliced parallel to its base - is a circle
the outward force supplied by an object in response to being compressed from opposite directions, typically in reference to solid objects.
average change in velocity per unit time, calculated as change in velocity during a time interval divided by the time interval
a quantity of speed with a defined direction, the change in speed per unit time, the slope of the position vs. time graph
the total amount of remaining unbalanced force on an object
describing what and how much happens
the acceleration experienced by an object is equal to the net force on the object divided my the object's mass
for every force applied by an object on a second object, a force equal in size, but opposite in direction, will be applied to the first object by the second object
a rough value obtained without making a measurement by using prior knowledge and assumptions.
a measurement of the amount of matter in an object made by determining its resistance to changes in motion (inertial mass) or the force of gravity applied to it by another known mass from a known distance (gravitational mass). The gravitational mass and an inertial mass appear equal.
