
Chapter 13: Multiple Pages: Unity
13.1 Exercise 1: Unity through repetition – master pages
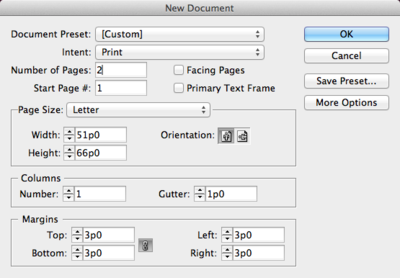
- Create a new document by choosing File > New > Document. Notice that a document can have many pages. We will work on just two pages. For this lesson, specify the letter page size, no facing pages, two pages, one column, and leave the margins at their default settings. A new document may also be created by clicking “New Document” on the welcome screen. Click OK. Save your document as ch13-yourlastname-unity.indd.
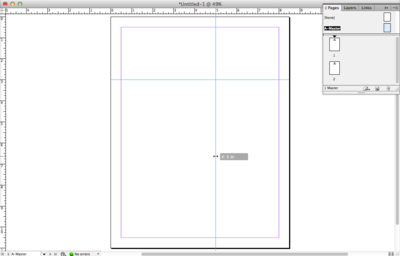
Setting up a new InDesign® document The Welcome screen appears at the launch of most Adobe® applications such as InDesign® and Dreamweaver®, but not all. It can be turned off by checking the box in the lower left corner, “Don’t show again.” - Load the Advanced workspace by choosing Advanced from the Application bar then click on the Pages panel to open it. In this panel, each rectangular icon represents a page in the document. Double-click the page 2 icon to jump to that page and then double-click the page 1 icon to go back. Another way to navigate through the pages in a document is to click the Next Page or Previous Page arrows at the bottom of the document window. You can also use the Hand tool to drag the pages around within the document window.
Tip: A workspace can also be selected from Window > Workspace
Notice that pages 1 and 2 are labeled with the letter “A”. The letter “A” signifies that these pages are based on the master page called “A-Master”. You can create multiple master pages, which can be applied to any page within the document. Master pages commonly contain a grid and any recurring design elements. They allow you to create a consistent layout throughout the pages in a publication and they make it possible to automate layout changes, because any modification you make to a master page is automatically reflected on all the pages to which it is applied. By default, a new document’s pages are all based on A-Master, even though A-Master is empty. We will work on the A-Master page next.
The InDesign® workspace and working with Master pages - Double-click the A-Master page icon in the Pages panel. You are now on the master page. Anything you place on this page will be stored on A-Master and will automatically appear on all the pages based on it. Also notice that A-Master is the page you are currently working on by looking at the page box at the bottom of the document window.
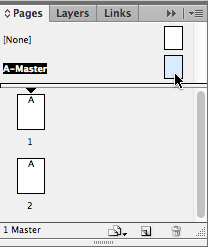
A-Master selected as the current working page in the Pages panel. - We will now set up guides on the master page similar to the Illustrator® exercises in Chapter 4. Guides are created by dragging them from the horizontal and vertical rulers in all Adobe® programs. If your rulers were not displaying in inches, you can Control-click (or right-click) each ruler and selected Inches before adding guides to the page.
Key Command: Show or hide rulers from the View menu in any Adobe® program or press Command+R.
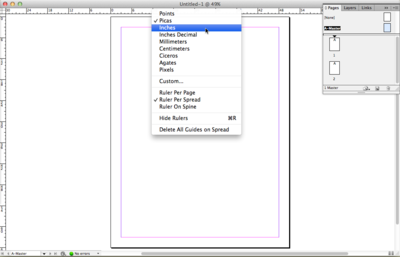
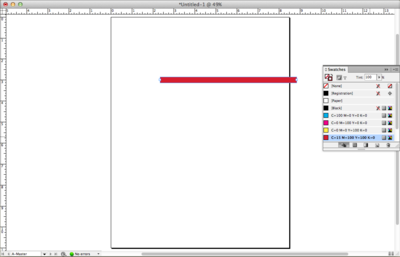
Control-click or right click on the InDesign® rulers to change their unit of measure. - Click and drag to create guides. Starting with the horizontal ruler at the top of the document window, click into the ruler and drag a guide to 3 inches, using the vertical ruler at the left of the document window as a reference. Then drag a guide from the vertical ruler to 5 inches, using the horizontal ruler as a reference.
Your guides should have a similar placement to the ones shown here. - Now we will use the Line tool to draw a heavy line along the horizontal guide. Click on the Line tool in the Toolbox to select it. Starting at the right edge of the page, Shift-click and drag toward the left edge of the page to draw a straight line along the horizontal guide. Notice that we didn’t draw the line all of the way to the left edge, so the negative space remains active as it did in Chapter 4. When you release the mouse button, you’ll notice that the line almost disappears into the guide. We will hide the non-printing guides to make it easier to see the line.

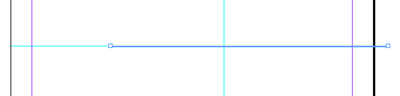
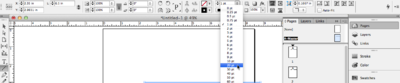
The top image shows the location of the Line Tool on the InDesign® Toolbar. The second image shows where to draw a line along the horizontal guide. To hide the guides, press the keys Command+Semicolon. This will enable you to see the thin line you just made. Next we will make the line thicker.
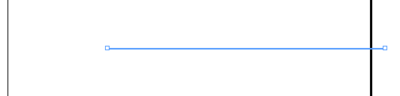
Guides can be hidden by pressing Command+Semicolon on the keyboard. - Use the Selection tool to select the line if it isn’t already selected, and then choose a line weight from the Stroke pull-down menu in the Control panel at the top of the work area (we used a weight of 20 points).
Control-click (or right click) each ruler to change measurement standard to Inches - Open the Swatches panel. Click the Stroke icon to bring it to the front and then click on the red color swatch (C=15, M=100, Y=100, K=0). Notice that all the swatches are defined with CMYK values. Since InDesign® is mainly used for creating documents that are output to a commercial printer, the default colors in the Swatches panel are using the CMYK color space.
Use the swatches panel to choose CMYK color for the line Watch Out: Make sure the Stroke icon is on top of the Fill icon so that the color red is applied to the line - Turn on the guides again with Command+; or View Menu > Guides & Grids > Show Guides.
- Double-click the page 1 icon in the Pages panel to view the first page of the document. Notice that the guides and thick, red line are in place on page
- Double-click the page 2 icon in the Pages panel and notice that the guides and red line are also in place on the second page of the document. Objects on a master page automatically show up on any pages based on that master. It’s important to understand that the items on a master page can only be modified or deleted from the master page they belong to (unless they are overridden first, which we will do in Exercise 2). Try to select the red line or move the guides on pages 1 or 2 and you will see that they are not selectable. Reminder–Save your work often!
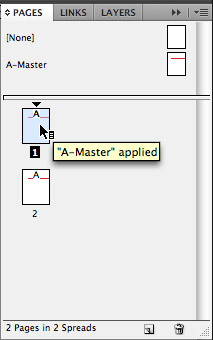
The “A-Master” page has been applied to both pages in the document.
